- Last week I have a blog post on the CQWP Add and configure in SharePoint 2010.
- In this post I will provide you some basic idea about customizing the Item Style templates for the CQWP (Content Query Webpart).
- Microsoft SharePoint Server 2010 includes three Extensible Style Language (XSL) files that you can modify to render fields in styles that the Content By Query Web Part uses to display the content it aggregates.
- This topic identifies the three XSL files the Content By Query Web Part uses and describes how they work; identifies the templates and variables that you can modify; and describes how to modify the files so that the Content By Query Web Part renders data with the look and feel that you specify.
- The following table lists and describes the three XSL files that describe the Content By Query Web Part.
| File | Location | Description |
| ContentQueryMain.xsl | \Style Library\XSL Style Sheets\ContentQueryMain.xsl |
|
| ItemStyle.xsl | \Style Library\XSL Style Sheets\ItemStyle.xsl | Contains templates that define how to display an item. These templates receive and process one row of data at a time, ensuring that the style and data in the item rows is consistent.
You can retrieve data about a row by using the @Property directive. |
| Header.xsl | \Style Library\XSL Style Sheets\Header.xsl | Contains templates that define how to display a header and ensure the consistency of group headers.
Templates specified in Header.xsl receive the next item row to process, usually the first row in a group unless there are multiple columns. If there are multiple columns, the templates receive the first row of the column. You can retrieve data about the next item row by using the @Property directive. You can use the $Groupparameter that contains the groupby column name and the $GroupType that represents the column type of thegroupby column. |
- Open your root site in SharePoint Designer 2010. In the Navigation pane, go to All Files > XSL Style Sheets > ItemStyle.xsl. Right-click on ItemStyle.xsl and choose Edit File in Advanced Mode. Click yes at the prompt.
- Make a backup of ItemStyle.xsl BEFORE you modify.
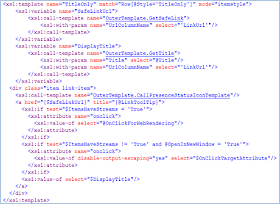
- Since I'll likely want to modify the Calendar date field format, I've added the ddwrt namespace to the top of the stylesheet.
Here is a screen shot:

Now I need to create a template in ItemStyle.xsl which corresponds to the Item Style dropdown in the Web Part editor
1.To do so, copy the template style that most closely matches the style you're looking for e.g. "TitleOnly".

2.Paste this just above the "Hidden Slots" template (You can paste is anywhere in xsl).
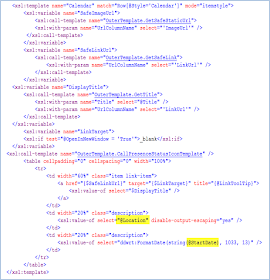
3.Rename "TitleOnly" in both the template name and match="Row…" to a custom template name. In my case, I chose "Calendar".
4.Once again, this template name corresponds to the Item Style dropdown in the Web Part editor.
Here is my custom Calendar template:
 In order for this style to show up in the options available to the CQWP, save and check in the ItemStyle. (I usually check in minor versions until I have completely finished creating the style template).
Apply the custom ItemStyle template
Go back to the page where you added the CQWP and make sure you're in Edit Page mode.
- From the Web part menu, choose Edit Web Part.
- Under Presentation > Styles, click the drop-down and select the new style you have created. Click Apply.
- You should now see empty slots for Location and StartDate.
- In the screen shots below, I verify the columns names: Location and Start Time from View Calendar Item (but you could find these other ways) and then add the SharePoint column names to the CQWP.

| 
|
- Notice how the Title slot needs Title [Custom Columns]; I still haven't quite figured out why that is, but I've run into the same situation with a few other fields so I just let SharePoint be SharePoint and continue on my merry way.
- Once you completed these steps, click Apply and/or OK to save your web part modifications.
- If you get a message "Unable to display this Web Part…." along with Correlation ID when you save the web part, something is wrong with the XSL that you've created. You will need to tweak it or remove it altogether and start over.
Apply the Filters in Content Query Web Part
- By default, Content Query Web part comes with three filters
- Once you've hit that limit – then you almost need to start all over again – using SharePoint Designer
- BUT – there is a way you can include MORE filter criteria – and you don't have to change the other settings within the CQWP you've got in place – often important with regard to style/layout/etc.
1.Edit Page > Export WebPart
2.Save it somewhere you'll remember – eg. SPR1.webpart
3.Open the file in Notepad – or within Visual Studio (easier to see/read)
You'll see the FILTER fields within there:
FilterField1, FilterField2, FilterField3
FilterDisplayValue1, FilterDisplayValue2, FilterDisplayValue3
FilterValue1, FilterValue2, FilterValue3
These will be populated depending on what you've chosen in the CQWP user interface (as above)
- There is another property in there entitled: QueryOverride
- This can be used to add MORE filters (where clause) and will be used instead of the 1,2,3 filters.
- You just need to define the CAML to put inside the property – and then save the WEBPART.
- Here's an example that I pieced together:
-
It looks like a LOT – but it essentially does this:
<property name="QueryOverride" type="string">
<![CDATA[<Where>
<And>
<And>
<And>
<Or Group="true"><Leq>
<FieldRef Name="PublishingStartDate"/><Value Type="DateTime"><Today/>
</Value>
</Leq>
<IsNull>
<FieldRef Name="PublishingStartDate"/></IsNull>
</Or>
<Or Group="true"><Gt>
<FieldRef Name="PublishingExpirationDate"/><Value Type="DateTime"><Today/>
</Value>
</Gt>
<IsNull>
<FieldRef Name="PublishingExpirationDate"/></IsNull>
</Or>
</And>
<Eq>
<FieldRef Name="Document_x0020_Type" /><Value Type="Text">Notice</Value></Eq>
</And>
<Eq>
<FieldRef Name="Meeting_x0020_Category" /><Value Type="Text">Board Meeting</Value></Eq>
</And>
</Where>
<OrderBy>
<FieldRef Name='Created' Ascending='FALSE' />
</OrderBy>
]]>
</property>
WHERE (PublishDate < TODAY or PublishDate = NULL)
AND (ExpiryDate > TODAY or ExpiryDate = NULL)
AND (Document Type = Notice)
AND (Meeting Category = Board Meeting)
ORDER BY Created DESC
- So – we can use that XML (CAML) within the CQWP webpart – by replacing the "QueryOverride" tag.
- Next step is to copy that piece of XML into the .WEBPART file – and save it.
- ** Note: Remember to include the CDATA tags – and also – ditch the original "QueryOverride" tag. Also – remember that the 1,2,3 filter values are now IGNORED – so you'll have to do it ALL in the CAML query.
- 1.Edit Page
2.Add WebPart
3.Import WebPart > Browse
4.Choose the file (.WEBPART)
5.Click Upload - THEN – have to re-click the "Add WebPart" button and then you'll see it listed in the "Imported Web Parts"
 And – that's it – hopefully, it should be working OK.
You can Filter CQWP Using Page Field value, Query String as Shown in Figure below:
The key thing is to understand the token format:
[PageFieldValue:]
PageFieldValue token will filter the items based on a current page's field value. The query above will fetch me all the items whose Staff Department is Photography (in this example) and adding Titlenot equal to current page's Title vale will eliminate the current item appearing in the results.
If you want to use query string to filter the data then just use the PageQueryString instead
Apply the Grouping and Sorting in Content Query Web Part
In the Presentation tab you can Group and Sort items by the column name and also assign the sort order as Ascending or Descending. You can also limit the number of items to display for content query web part.

If you have any questions you can reach out our SharePoint Consulting team here.
No comments:
Post a Comment