July 31, 2024

Migrating Permissions across SharePoint sites using ShareGate

In SharePoint, permissions are crucial for ensuring appropriate access to resources within SharePoint sites. There may be instances where you need to replicate the permissions of one site to another. To achieve this, a method for copying or migrating SharePoint site permissions from one site to another is necessary.


In this article, we will provide a step-by-step guide on how to copy or migrate SharePoint site permissions from one site to another.


For Migrating the Permission we will be using the ShareGate Migration Tool, Its a migration tool that simplifies and accelerates migration processes directly to the latest SharePoint or Microsoft 365.

Prerequisites:

  • ShareGate licence

  • ShareGate Migration Tool Installed

  • The user performing this action must be a Site Collection Administrator

  • PowerShell version 3.0 or higher (Note: This will not work with version 7.0)


Migrating permissions across sites involves not only assigning users to their respective groups but also migrating the Permission Roles, SharePoint Groups, and their associated Users.

We will be migrating the Permissions using two methods.

Method 1 Using ShareGate Migration tool:

The ShareGate migration tool offers user-friendly features that simplify any migration task. When migrating permissions, you can select the source site and destination site, ensure proper mapping, and migrate the permissions with just a click. Follow the steps below to migrate permissions using the migration tool.


Step 1: Open the ShareGate Migration Tool. In the left section, click on "Copy" and then select "Copy Structure and Content."


Step 2: Enter the source site URL, select "Browser for Authentication," and log in with your credentials.


Step 3: Similarly, log in to the destination site by entering the destination URL and selecting "Browser" as the authentication type. Once logged in to both the source and destination sites, you will see the following interface.


Step 4: First, migrate the Permission Levels, and then migrate the SharePoint Groups from the source site to the destination site.


Select the Permission Levels, choose the specific Permission Levels you want to migrate, and then click "Start Copy."


With this, the permission roles will be copied to the destination site. Next, we can proceed to migrate the SharePoint Groups across the sites.


Open the SharePoint Groups from the Site Objects.


Step 5: Now, select all the groups that you want to migrate to the destination site.


Make sure that Mapping is set for the default Groups of SharePoint like Members, Owners and Visitors under mappings as shown below.


ShareGate Mapping provides a way to map the source object with destination and set the content accordingly in the destination as per the mapping.
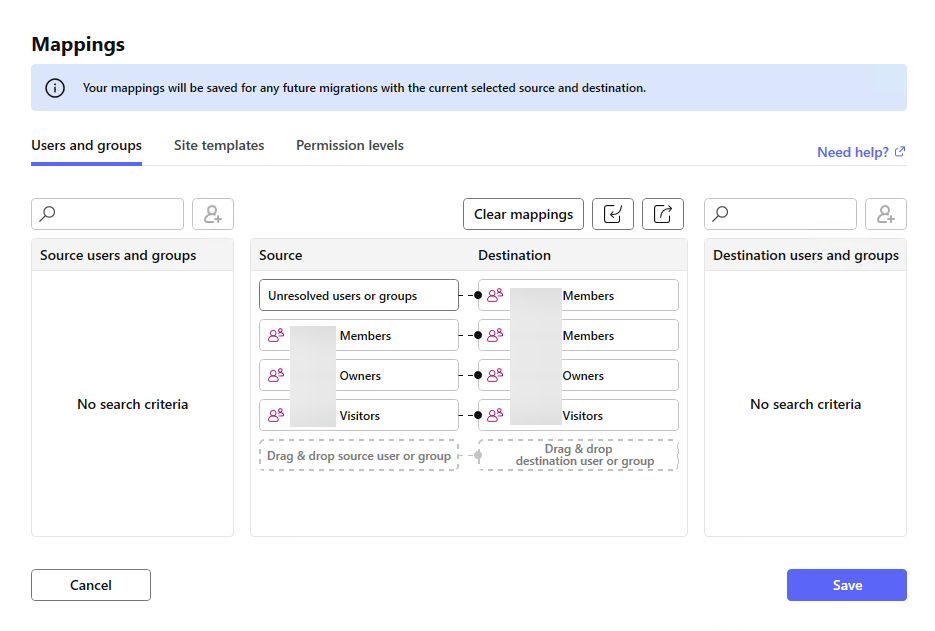


Now, click "Start Copy" to begin copying the SharePoint groups along with their members.


After the copying task is completed, you will see that the groups have been migrated. You can also verify the members of each group by checking the respective site.

Method 2: Using ShareGate & PnP PowerShell

PowerShell is a robust command-line tool that can automate numerous tasks in Microsoft 365. For copying SharePoint site permissions from one site to another, we will use ShareGate PowerShell. Execute the following PowerShell script to copy the SharePoint site permissions.


Note: Please ensure that you have the Sharegate module imported before running this script. Additionally, ensure that PnP.PowerShell version 1.12 is installed (ShareGate Migration tool must be installed on your system).


To import the Sharegate module, use the following command:


Import-Module Sharegate

To install PnP.PowerShell version 1.12, use:

Install-Module PnP.PowerShell -RequiredVersion 1.12 -Force

  • Execute the script provided below.

  • Enter your login credentials when prompted to access the site.

  • The script will then continue its execution.


#Config Parameters
$SourceSite = "<<Source Site>>"
$DestinationSite = "<<Destination Site>>"


#Function to Copy-Migrate the SharePoint Site Level Permission from one site to another
Function Copy-MigrateSiteLevelPermission {
    param (
        $DestinationSite,
        $SourceSite
    )
   
    Write-Host "Establishing the connection between source site and destination site..."
    $Source = Connect-Site -Url $SourceSite -Browser
    $Destination = Connect-Site -Url $DestinationSite -UseCredentialsFrom $Source
   
    Write-Host "Setting up the Mappings for the Default SharePoint Groups..."
    $mappingSettings = New-MappingSettings
    $mappingSettings = Set-UserAndGroupMapping -Source "Destination Site Members" -Destination "Source Members"
    $mappingSettings = Set-UserAndGroupMapping -MappingSettings $mappingSettings -Source "Destination Site  Owners" -Destination "Source Owners"
$mappingSettings = Set-UserAndGroupMapping -MappingSettings $mappingSettings -Source "Destination Site Visitors" -Destination "Source Visitors"
Write-Host "Copying the Permission from one site to another..." Copy-ObjectPermissions -Source $Source -Destination $Destination -MappingSettings $mappingSettings Write-Host "Permission Copied Successfully from one site to another..." -f Green } #Function to Copy the Permission Level from one site to another Function Copy-PermissionLevel { param ( $DestinationSite, $SourceSite ) Write-Host "Connecting with Source and Destination Site..." $SourceSiteConnection = Connect-PnPOnline -Url $SourceSite -UseWebLogin -ReturnConnection $DestinationSiteConnection = Connect-PnPOnline -Url $DestinationSite -UseWebLogin -ReturnConnection Write-Message "Starting the Migration Process for Permission Levels..." Write-Message "Reading all the Permission Level From source site..." $AllPermissionLevel = Get-PnPRoleDefinition -Connection $SourceSiteConnection foreach ($permissionLevel in $AllPermissionLevel) { $permissionLevelName = $permissionLevel.Name Write-Host "Migration: $permissionLevelName" Write-Host "Checking permission level $permissionLevelName..." if (!(Get-PnPRoleDefinition -Identity $permissionLevelName -ErrorAction SilentlyContinue -Connection $DestinationSiteConnection)) { Write-Host "Creating new permission level $permissionLevelName..." if ($permissionLevel.PermissionLevels) { Add-PnPRoleDefinition -RoleName $permissionLevelName -PermissionLevels $permissionLevel.PermissionLevels -Description $permissionLevel.Description -Connection $DestinationSiteConnection } else { Add-PnPRoleDefinition -RoleName $permissionLevelName -Clone $permissionLevel -Description $permissionLevel.Description -Connection $DestinationSiteConnection } } } Write-SuccessMessage "Permission Level Migration Completed successfully..." } #Execute the Function to Copy the Permission Level Copy-PermissionLevel -DestinationSite $DestinationSite -SourceSite $SourceSite #Execute the Function with Parameter to Copy the Groups and other Permissions Copy-MigrateSiteLevelPermission -DestinationSite $DestinationSite -SourceSite $SourceSite

Upon successful execution of the script, you will observe that permission roles within SharePoint Groups have been copied from one site to another. This demonstrates how ShareGate PowerShell and the ShareGate Migration tool facilitate the migration of SharePoint site permissions between sites.

If you have any questions you can reach out our SharePoint Consulting team here.

November 23, 2023

Unlocking the Power of Azure AI Language Service: A Comprehensive Overview and Document Summarization

Introduction:

In the ever-evolving world of artificial intelligence, Azure AI Language Service stands out as a formidable tool that promises to revolutionize the way we interact with and analyze textual content.


This article will dive you into the depths of Azure AI Language Service, offering a comprehensive overview and insight into its capabilities. Also we will witness the magic of document summarization in a small yet powerful React application.


This interactive experience will showcase how seamlessly Azure AI Language Service integrates with modern web technologies, providing a practical demonstration of its capabilities using Natural Language Processing (NLP) features for understanding and analyzing text.

Prerequisites:

  • Azure Subscription - Create free subscription from here.

  • NodeJS Installed on Machine (Tested on Node.js 16.19.0)

Azure AI Language Service: Unleashing Its Power:

Azure AI Language is a cloud-centric solution offering Natural Language Processing (NLP) capabilities for text comprehension and analysis. Using this service we can develop smart applications that manipulate textual content. Here is a complete overview of what the Language service can do with its powerful features:


Named Entity Recognition (NER): It spots entities like names, events, places, and dates from the text with named entity recognition.


Personally identifying (PII) and health (PHI) information detection: Detect and hide sensitive info like phone numbers, email addresses, and IDs in text with PII detection.


Language detection: Figure out the language of a document and get a language code with language detection that works for many languages and variations.


Sentiment Analysis and opinion mining: Learn what people think about our topic with sentiment analysis and opinion mining. These features analyze text to discover positive or negative feelings and link them to specific aspects.


Summarization: Generate document or conversation summaries using summarization, Which extracts key sentences to capture the most crucial information from the original contents


Key phrase extraction: It identifies and lists the main concepts in text with key phrase extraction, a preconfigured feature.


Explore additional features and functionalities within the Language service in this documentation available here. Let’s gain insights into the Summarization feature within the Language Service and integrate it into our compact React application.


Azure AI Language Service: Document Summarization:

In today's fast-paced and information-rich world, the need for efficient content processing has become paramount. Summarization plays a crucial role in addressing this need by distilling lengthy and complex information into concise and digestible forms.

Summarization constitutes one of the capabilities provided by Azure AI Language, a suite of cloud-based machine learning and AI algorithms tailored for crafting intelligent applications centered around written language.

Document summarization employs natural language processing techniques to create a condensed version of a document. The API supports two main approaches to automatic summarization: extractive and abstractive.

Extractive: Selects and extracts sentences directly from the original content that collectively capture the most crucial information.

Abstractive: Creates a summary by generating concise and coherent sentences or words, not limited to extracting sentences from the original document. This approach aims to provide a shortened version of lengthy content.

Let’s create an instance of the Language service to showcase practical summarization and seamlessly integrate it into our React application.

Follow Below Steps to Create an Instance of Language Service:

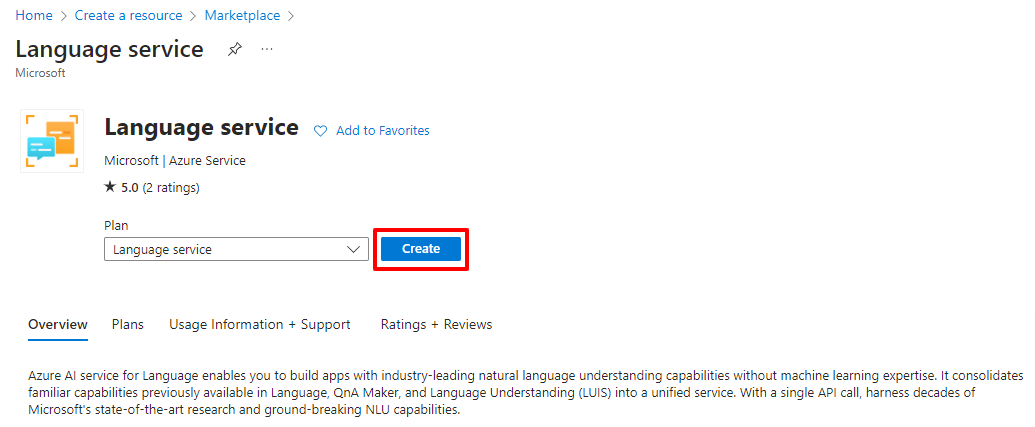
  • To Create Instance, log in to your Azure Subscription, go to “Create a resourceand type for language.


  • Click on Create and then Continue to Create your resource at bottom.

  • Fill all the Details with Name of the Instance and Resource. (You can use the free pricing tier (Free F0) to try the service, and upgrade later to a paid tier for production.)

  • Click on Next Until Review and Create tab.

  • Verify all the Details and then Click on Create.


After creating the service instance, review the details in the resource group. To utilize the Language service,
Now will obtain Endpoints and an API key by accessing the Language Studio through this link. Login using the Azure Subscription in which you created the instance.

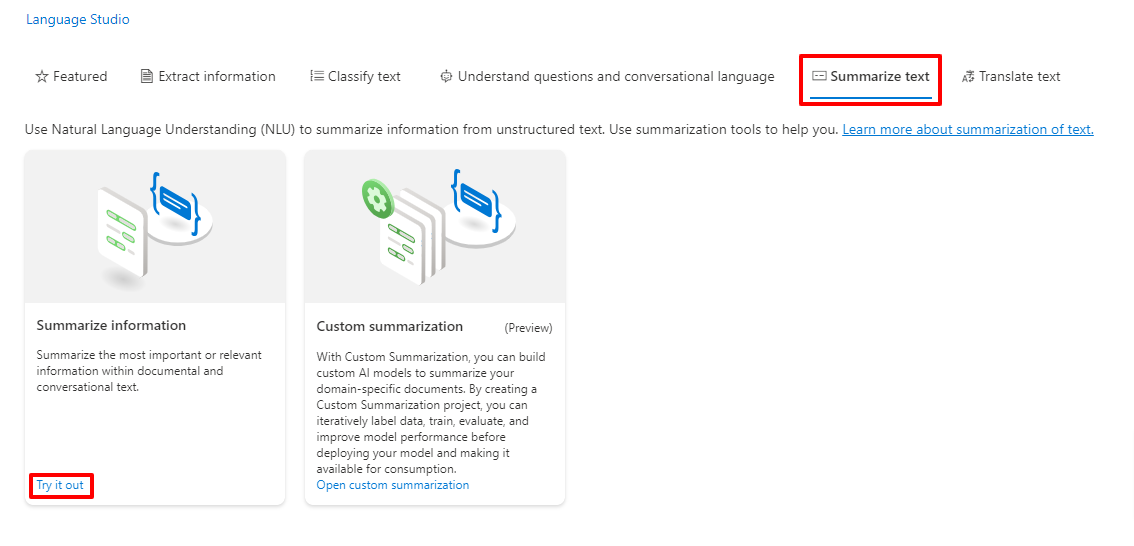
Navigate to the Summarization text tab within Language Studio and choose the "Summarize Information" option.


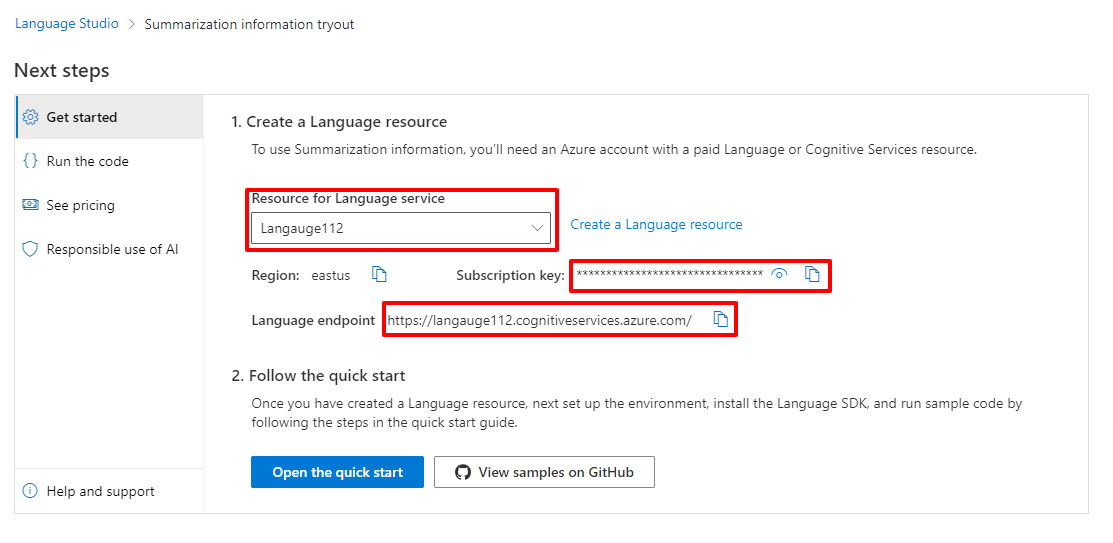
Now you can explore summarization directly in the Playground or seamlessly integrate it into our application using the provided Endpoints and API Key at bottom. Scroll to the bottom to find Language endpoints and Subscription Key. Ensure you have chosen the correct Resource for the Language service.


Copy the Subscription Key and Endpoint URL; we will utilize them in our React project.

Setting Up a React Application for Azure Language Service Integration:

The API, along with the obtained Endpoints from the above step, can be employed in various frontend applications. However, for demonstration purposes, we will utilize them in the React app.

Follow below steps to Create the React app and Install all the Packages needs in order to Integrate this:

Note: Ensure that your local development machine has Node version 14 or higher.


  • Run the "npx create-react-app document-summarize" command to set up the scaffolding for the React app.

  • Then Install the Client Package Library “npm install --save @azure/ai-language-text@1.1.0” in order to work with Azure AI Language.

  • Now open the Project in the VS Code.

  • Create a .env file in the root folder.

  • Store the EndPoint and APIKey in it as shown below.


  • Navigate to App.js file in the Folder.

  • Replace the Code with below code.


import React, { useState } from 'react';
const { AzureKeyCredential, TextAnalysisClient } = require("@azure/ai-language-text");

const endpoint = process.env.REACT_APP_ENDPOINT;
const apiKey = process.env.REACT_APP_APIKEY;

function App() {
  const [loading, setLoading] = useState(false);

  // In Order to Generate the Download Link of the File
  const download = async(filename, text) => {
    var previousElement = document.getElementById('downloadLink')
    if(previousElement){
      document.body.removeChild(previousElement);
    }
    var element = document.createElement('a');
    element.setAttribute('id', "downloadLink");
    element.setAttribute('href', 'data:text/plain;charset=utf-8,' + encodeURIComponent(text));
    element.setAttribute('download', filename);
    var linkText = document.createTextNode("Download the summarized version of the file");
    element.appendChild(linkText);
    document.body.appendChild(element);
  }

  // In Order to Handle the Input element
  const handleFileChange = async (event) => {
    setLoading(true)
    const file = event.target.files[0];
    var input = event.target;
    var reader = new FileReader();
    reader.onload = async function () {
      var text = reader.result;
      await analyzeAndSummarizeText(file.name,text)
      setLoading(false)
    };
    reader.readAsText(input.files[0]);
  };

  // Analyze and Summarize the Text
  const analyzeAndSummarizeText = async (inputFileName, originalText) => {
    const client = new TextAnalysisClient(endpoint, new AzureKeyCredential(apiKey));
    const actions = [
      {
        kind: "ExtractiveSummarization",
        maxSentenceCount: 2,
      },
    ];
    const analyzeBatch = await client.beginAnalyzeBatch(actions, [originalText], "en");
    analyzeBatch.onProgress(() => {
      console.log(
        `Last time the operation was updated was on: ${analyzeBatch.getOperationState().modifiedOn}`
      );
    });
    const results = await analyzeBatch.pollUntilDone();
    for await (const actionResult of results) {
      if (actionResult.kind !== "ExtractiveSummarization") {
        throw new Error(`Expected extractive summarization results but got: ${actionResult.kind}`);
      }
      if (actionResult.error) {
        const { code, message } = actionResult.error;
        throw new Error(`Unexpected error (${code}): ${message}`);
      }
      for (const result of actionResult.results) {
        console.log(`- Document ${result.id}`);
        if (result.error) {
          const { code, message } = result.error;
          throw new Error(`Unexpected error (${code}): ${message}`);
        }
        let summarizedTextContent = result.sentences.map((sentence) => sentence.text).join("\n");
        await download(inputFileName, summarizedTextContent);
      }
    }
  };

  return (
    <div id="inputFile">
      <input type="file" onChange={handleFileChange} />
      {
        loading && <p>Summarizing the document please wait a while...</p>
      }
    </div>
  );
}

export default App;

Save the files, then run "npm start" to initiate the development server on port 3000 and test the solution. Upload the document and wait briefly for the generation of the summarized version. Once ready, click the download link to retrieve the summarized version.

Output:


Conclusion:

Throughout this article, we explored the capabilities of Azure AI Language Service, delving into its features and functionality. Specifically, we seamlessly integrated the Document Summarization feature of the Language service into a React application. By doing so, we harnessed the power of Azure AI Language Service to enhance document processing in a practical and user-friendly manner.

If you have any questions you can reach out our SharePoint Consulting team here.

September 1, 2023

ChatGPT Code Interpreter: Revolutionizing How We Write and Understand Code

In the digital age, the intersection of Artificial Intelligence (AI) and coding has given rise to powerful tools that transform the way we approach programming. Among these, the ChatGPT Code Interpreter stands out as a remarkable innovation. If you've ever wondered, "Is there a way for AI to help me understand or write code?", or "How can I simplify the coding process with the help of AI?", you're in the right place.

Dive into the world of ChatGPT Code Interpreter and discover how it's making waves in the programming landscape.

Discover the power of AI in coding with the ChatGPT Code Interpreter. Whether you're a seasoned developer or just starting, see how AI can revolutionize your coding experience.

What is AI?

Artificial Intelligence, commonly referred to as AI is a branch of computer science that aims to create machines that can perform tasks that typically require human intelligence. These tasks include problem-solving, understanding natural language, recognizing patterns, and making decisions. With advancements in machine learning and neural networks, AI systems like ChatGPT are now capable of mimicking human thought processes to an unprecedented degree.

Why Use the ChatGPT Code Interpreter?

  1. Efficiency: No more endless hours of debugging. The Code Interpreter can assist in identifying and suggesting fixes for your coding challenges.
  2. Learning: Whether you're a beginner trying to understand a complex code snippet or an expert seeking to optimize your code, ChatGPT offers insights and explanations tailored to your needs.
  3. Collaboration: Sharing code with peers? ChatGPT can act as a mediator, interpreting and explaining code segments for better team understanding.
  4. Versatility: From Python to JavaScript, the Code Interpreter is designed to understand and assist with a wide range of programming languages.

The most recent Code Interpreter ChatGPT model has new functionalities that prior AI models lacked. OpenAI has done an excellent job of allowing you to run Python inside of ChatGPT to perform interactive tasks. This blog serves as a reference for Code Interpreters.

According to OpenAI's website, the code interpreter is a new experimental model of ChatGPT as a completely new model. In this blog, I'll describe and demonstrate how it allows you to upload files and run code in a Python Sandbox. People are already utilizing it to create games in minutes, map the population density of the country by ZIP code, and even create pretty good diagrams for statistics and information based on Excel spreadsheets.

It can now do a few more things, such as use Python, upload files, and download files. 

So, how does this new model run code? 

Python exists in a sandbox, allowing it to be firewalled and then executed inside of a temporary region. This means that this version of ChatGPT can do Maths, which was one of the most significant restrictions of prior versions.

How to enable ChatGPT Code Interpreter?

Let's give it a shot. It has been enabled for all Premium Subscribers. Go to Settings, then to Beta features, then tick the code interpreter to make it available under GPT4 from the drop-down list.


Different ways to use Code Interpreter

Create Graphical Representations: 

First, I requested it "generate a graphical depiction of Pi". It doesn't only tell me what pi is; it also tries to run it in a code sandbox. Unfortunately, the initial attempt fails, but because this model is intelligent, it can detect when it fails. 
I told it to utilize Python libraries this time, and it did. The end result is this diagram, which is exactly what I was searching for. I can go back and look at the Python code; it imports a library; the code is clean and well-marked; and I could copy and paste it directly into an application.


Mathematical Calculations: 

You can ask mathematical calculations such as "How long would it take to drive to the nearest city from New Delhi at 100 kilometers per hour?" ChatGPT Code Interpreter identifies each city and its distance then develops a formula to calculate how long it would take vs. the distance. I double-checked this on Google, and it was mostly correct.


Work with files: 

The next amazing feature is the ability to upload files. You can upload nearly anything as long as it is 100 MB or less. In this scenario, I'll attach a PDF invoice for the product as well as a document for the product module. I can then ask queries such as, "What is this PDF about?" or "How much tax I have paid for this product?" or "Explain to me the Purpose of the module."


Analyzing Excel files or CSVs, is one of the nicest things that Code Interpreter can do. I attempted to upload a large CSV file and asked some interesting questions, such as how to create a bar chart. This is the stage where ChatGPT can conduct some pretty fantastic data analysis using spreadsheets like this.


Image Editing: 

Another function of the new ChatGPT Code Interpreter model is the ability to upload, access, and alter photos. I'm going to submit a photo and ask if it can recognize the face and its location in the photo. Python is being used to do this activity. There are Python packages for stuff like face detection that it can utilize to locate the face. It did an excellent job with the red square around the face in the supplied image. Then I asked it to crop around the face so I could make an avatar, and it could do that as well.


The ChatGPT Code Interpreter isn't just another tool; it's a testament to how AI is reshaping our approach to coding. For professionals, hobbyists, and learners alike, this AI-powered assistant offers an unparalleled blend of guidance, interpretation, and optimization. If you're on the fence about integrating AI into your coding journey, remember that in the world of programming, staying ahead means embracing the future. And the future is undeniably intertwined with AI.

There are numerous methods to use the OpenAI Code Interpreter. If I missed any, please feel free to add the same in the comments section.

If you have any questions you can reach out our SharePoint Consulting team here.