Showing posts with label Microsoft Teams. Show all posts

March 6, 2025

Step-by-Step Guide: Building, Integrating, and Deploying a Microsoft Teams Bot Using Visual Studio, OpenAI, and Azure - Part 2


What is a Bot and Its Advantages?
A bot is a software application designed to automate tasks, often simulating human interaction. Bots are widely used in customer support, data retrieval, and task automation, making workflows efficient and reducing manual effort. With advancements in AI, bots can now engage in intelligent conversations and provide personalized assistance.

Advantages of Bots:
  • Efficiency: Automates repetitive tasks, saving time and resources.
  • 24/7 Availability: Provides uninterrupted support to users.
  • Scalability: Handles multiple interactions simultaneously.
  • Cost-Effective: Reduces the need for extensive human resources.

This tutorial is part of a series. To understand it fully, make sure to check out Part 1: Azure Configuration for Your Bot.

  1. Add the Bot Framework v4 SDK Templates to Visual Studio.
  2. Bot Framework SDK(Software Development Kit): This SDK provides essential tools and configurations for building bots. Visual Studio makes it easy to integrate and manage your bot's development.|

    1. Click on the 'Download' link to open the Bot Framework v4 SDK page.
    2. Once the page opens, find the green "Download" button.
    3. Click the green button to download the Bot SDK. 
    4. After the download is complete, install the SDK on your system.


    5. This template includes default bot configurations, making it easier to get started with your bot development.


  3. Create an Echo Bot Solution in Visual Studio.
    1. Open Visual Studio and choose "Create a new project.
    2. Search bar in search ‘bot’. 
    3. Select template  ‘Echo Bot (Bot Framework V4) 


    4. Add a Project name and create a project.


  4. Configure the OpenAI API in the Echo Bot Solution.
    • Add Dependencies: Install the System.Net.Http and Newtonsoft.Json packages via NuGet for handling HTTP requests and JSON.
    • Implement the ChatGPT Service: 
      1. Go to solution explore and Open file EchoBot.cs
      2. Add a new method in the following code to interact with the OpenAI API
        // New method to implement for retrieving OpenAI API responses and  returning them in the
        //proper format

         private async Task<string> GPTResponseAsync(string userQuery)
         {
            // API key for accessing Azure OpenAI service (replace this with your actual key)
            string apiKey = "API_KEY";
         
            // Endpoint URL of the Azure OpenAI deployment with the correct API version
            string endPoint = "AZURE_API";
         
            // Creating an HttpClient to send HTTP requests to the API
            var client = new HttpClient();
         
            // Preparing an HTTP POST request with the specified endpoint
            var request = new HttpRequestMessage(HttpMethod.Post, endPoint);
         
            // Adding the API key to the request header for authentication
            request.Headers.Add("api-key", apiKey);
         
            // Constructing the request body in JSON format
            // - `messages`: Contains the conversation with roles (`system`, `user`, `assistant`)
            // - `max_tokens`: Defines the maximum response length
            // - `temperature`: Controls the randomness of the response (higher values make output
            //    more creative)
            // - `top_p`, `frequency_penalty`, `presence_penalty`: Other parameters to fine-tune
            //    the response generation
             var content = new StringContent($@"{{
             ""messages"": [{{
               ""role"": ""system"",
               ""content"": ""You are an AI assistant designed to help people discover information.""
             }}, {{
               ""role"": ""user"",
               ""content"": ""{userQuery}""
             }}, {{
               ""role"": ""assistant"",
               ""content"": ""Hello! How can I assist you today?""
             }}],
             ""max_tokens"": 800,
             ""temperature"": 0.7,
             ""frequency_penalty"": 0,
             ""presence_penalty"": 0,
             ""top_p"": 0.95,
             ""stop"": null
           }}", null, "application/json");
         
            // Setting the content of the request to the JSON string prepared above
            request.Content = content;
         
            // Sending the request asynchronously and awaiting the response
            var response = await client.SendAsync(request);
         
            // Ensuring the response status code is successful (2xx), throwing an error if not
            response.EnsureSuccessStatusCode();
         
            // Reading the response content as a string
            var result = await response.Content.ReadAsStringAsync();

            // Parsing the result string into a JSON object    
            var resultObject = JObject.Parse(result);      

            // Returning the assistant's response from the JSON object    
             return Convert.ToString(resultObject["choices"][0]["message"]["content"]);
         }
        Note:
         Please double-check your API and API key to ensure they are working. (This code uses the Azure OpenAI API.)

    • Integrate ChatGPT with the Bot: 
      1. In your bot's main dialogue or message handler (e.g., EchoBot.cs), integrate the ChatGPT service: 
      2. Method Purpose: This method is triggered whenever a user sends a message in the conversation (e.g., in Microsoft Teams). It takes the message, forwards it to OpenAI's GPT API, and sends the response back to the user.
      3. TurnContext: This object contains all the relevant details about the conversation, including the message sent by the user. turnContext.Activity.Text gets the message text that the user sent. 
      4. GPTResponseAsync: The method sends the user's message to the GPT model hosted on Azure OpenAI and waits for the AI's response. It returns the response, which will be sent back to the user. 
      5. MessageFactory.Text: This creates a new message to be sent back to the user. The same text is passed twice; the first parameter is what will be displayed, and the second is for any formatting or processing. 
      6. CancellationToken: This parameter is used to manage the cancellation of asynchronous tasks. It ensures that the operation can be cancelled if needed without blocking the application. 
          protected override async Task OnMessageActivityAsync(
            ITurnContext<IMessageActivity> turnContext,
             CancellationToken cancellationToken)
         {
             //var replyText = $"Echo: {turnContext.Activity.Text}";
             var gptResponse = await GPTResponseAsync(turnContext.Activity.Text);
             await turnContext.SendActivityAsync(
                    MessageFactory.Text(gptResponse, gptResponse),
                    cancellationToken);
         }


  5. Test the Bot Locally in BotFramework-Emulator.
    1.  Go to the following link to directly 'download' BotFramework-Emulator exe file.
    2. Once the Bot Framework Emulator is downloaded, install it.
    3. Run your Project When successfully running the solution open the Bot window and copy the URL. 

    4. Open the Emulator > “Open Bot” > set your URL plus “api/messages” > Connect

    5. Test your bot.


  6. Deploy the Bot to Azure App Service.
    • Prerequisite
      • Azure Tenant ID
      • MicrosoftAppId
      • MicrosoftAppPassword

    1. Azure Tenant ID: Azure Portal > Azure Active Directory > Overview > Directory ID (copy this value)
    2. Microsoft App ID: Azure Portal > All services > Bot Services (or Azure Bot) > [Your Bot] > Settings > Microsoft App ID (copy this value)
    3. Microsoft App Password: Azure Portal > All services > Bot Services (or Azure Bot) > [Your Bot] > Settings > Manage > Certificates & secrets > New client secret > Add (copy the value of the newly created client secret)
    4. Open the Visual Studio solution(6) for your Echo Bot and navigate to the appsettings.json file. Add the following configuration (paste the IDs)


    5. Visual Studio > Solution Explorer > Right-click on your project > Publish > Add New Profile > Azure 


    6. Sign in to Azure (if required) and select Created app service for the bot. then Finish

    7. Click on 'Publish' to deploy the app to Azure App Service.

  7. Create a manifest.json for Microsoft Teams.
    1. Create a new file named manifest.json in your project folder.
    2. Add the following basic structure to your manifest.json file: Need more information click manifest.json

          {
              "$schema": "https://developer.microsoft.com/en-us/json-schemas/teams/v1.16/MicrosoftTeams.schema.json",
              "manifestVersion": "1.16",
              "version": "1.0.9",
              "id": "<YOUR_TEAMS_APP_ID>",
              "packageName": "com.microsoft.teams.extension",
              "developer": {
                  "name": "Teams App, Inc.",
                  "websiteUrl": "<YOUR_WEBSITE_URL>",
                  "privacyUrl": "<YOUR_WEBSITE_URL>",
                  "termsOfUseUrl": "<YOUR_WEBSITE_URL>"
              },
              "icons": {
                  "color": "color.png",
                  "outline": "outline.png"
              },
              "name": {
                  "short": "Gangbox ChatBot",
                  "full": "Gangbox ChatBot"
              },
              "description": {
                  "short": "This is AI Chatbot.",
                  "full": "This is AI Chatbot."
              },
              "accentColor": "#FFFFFF",
              "bots": [
                  {
                      "botId": "<YOUR_TEAMS_APP_ID>",
                      "scopes": [
                          "personal",
                          "team",
                          "groupchat"
                      ],
                      "supportsFiles": false,
                      "isNotificationOnly": false,
                      "commandLists": [
                          {
                              "scopes": [
                                  "personal",
                                  "team",
                                  "groupchat"
                              ],
                              "commands": [
                                  {
                                      "title": "welcome",
                                      "description": "Resend welcome card of this Bot"
                                  },
                                  {
                                      "title": "learn",
                                      "description": "Learn about Adaptive Card and Bot Command"
                                  }
                              ]
                          }
                      ]
                  }
              ],
              "composeExtensions": [],
              "configurableTabs": [],
              "staticTabs": [],
              "permissions": [
                  "identity",
                  "messageTeamMembers"
              ],
              "validDomains": []
          }
         

    3. Replace Placeholders
      • id: Your bot's Microsoft App ID.
      • developer: Fill in details about your name/company and URLs for your website, privacy policy, and terms of use.
      • botId: The same as your Microsoft App ID.
      • icons: Add the paths to your bot's icon images (color and outline versions).

        Add two images (icon files) in your folder:
        - color.png (192x192 pixels)
        - outline.png (32x32 pixels)

    4. Compress Files into a Zip
      Include the following files in a zip file:
      - manifest.json
      - color.png
      - outline.png

      The zip file will be your Teams app package.


  8. Add the App to Microsoft Teams.
    1. Go to Microsoft Teams > Apps > Upload a custom app > Upload for me or my teams.


    2. Upload your .zip file, and your bot will be added to Microsoft Teams.

    Thank you for reading! We hope this guide helped you successfully configure your bot. Feel free to share your thoughts or questions in the comments below!

    If you have any questions you can reach out our SharePoint Consulting team here.

    Step-by-Step Guide: Building, Integrating, and Deploying a Microsoft Teams Bot Using Visual Studio, OpenAI, and Azure - Part 1


    In today's fast-paced business environment, effective communication and automation are crucial for productivity. Microsoft Teams bots powered by AI can significantly enhance your team's collaboration and efficiency. By integrating OpenAI with a Microsoft Teams bot, you can automate responses, streamline workflows, and offer instant support. This guide will walk you through the process of setting up and deploying a bot that leverages OpenAI’s capabilities to bring intelligent, natural interactions to your Microsoft Teams environment.

    Why Need a Teams Bot?
    A Microsoft Teams bot integrated with OpenAI enhances team collaboration by automating repetitive tasks, providing instant responses to queries, and streamlining workflows. It improves productivity and ensures round-the-clock support, offering human-like interactions within the team's environment. 

    Key Advantages: 
    • Automated Assistance: Reduces repetitive work and answers common questions instantly.
    • Natural Conversations: Uses AI to understand and respond naturally in multiple languages.
    • Integration and Personalization: Customizable to meet specific business needs and integrate with other tools

    This blog is divided into two parts to help you easily navigate and follow the steps for creating and deploying a bot:

    Part 1: Azure Configuration for Your Bot
    1. Setting up a new resource group for your bot.
    2. Set up the Azure Bot and Key Vault resources.
    3. Setting up the web application along with its service plan.
    4. Configuring the bot credentials and channels 

    Part 2: Bot Configuration and Deployment here
    1. Add the Bot Framework v4 SDK Templates to Visual Studio.
    2. Create an Echo Bot Solution in Visual Studio.
    3. Configure the OpenAI API in the Echo Bot Solution.
    4. Test the Bot Locally in BotFramework-Emulator.
    5. Deploy the Bot to Azure App Service.
    6. Create a manifest.json for Microsoft Teams.
    7. Add the App to Microsoft Teams.

    This blog covers the points of Part 1: Azure Configuration for Your Bot.

    1. Setting up a new resource group for your bot.
    2. We'll begin by setting up a new resource group in our subscription to host the resources needed for our bot deployment. 

      1. Launch the Azure Portal in your browser.
      2. Navigate to Resource Groups from the menu on the left, and click Create. 
      3. Choose the subscription you want to use. 
      4. Enter a name for the resource group, following your organization's naming standards.
      5. Pick a region close to your users (for example, the US if your users are in Europe


    3. Set up the Azure Bot and Key Vault resources.
    4. Once the resource group is set up, go to the resource group and follow these steps to create the Azure Bot and Key Vault resources. The Key Vault is automatically created when setting up the bot resource. The Azure Bot resource is essential for managing communication between the bot code hosted on Azure and the client application (such as Microsoft Teams). The Key Vault stores the client secret necessary for authentication. 

      1. Within the newly created resource group, click the 'Create Resource' button. This will take you to the Marketplace.
      2. In the search bar, type Azure Bot and select it from the results.


      3. Click Create to start setting up your bot.


      4. Enter a unique name for the bot as its identifier (e.g., projectname-bot). This will serve as the bot’s "handle." You can set a separate display name, but the handle is just a unique identifier. 
      5. Verify that the correct subscription and resource group are preselected. 
      6. The default pricing tier is Standard, but you can downgrade it to Free by selecting Change plan if premium channels aren't needed.
      7. Choose 'Multi-Tenant' as the app type. 
      8. Keep the creation type set to its default option, which is 'Create a new Microsoft App ID'.
      9. Finally, navigate to the 'Review + Create' tab and click on 'Create.'
      10. Once the bot resource is created, click on 'Go to the resource.'


    5. Setting up the web application along with its service plan.
    6. The Azure Bot we previously set up manages communication between the bot's logic and the client application (in this case, Microsoft Teams). However, we still need to host the bot’s core code somewhere. To do this, we will create a Web App resource in Azure.Web apps require an App Service Plan, which lets us choose the hardware and computational resources for our bot. The plan you select will directly impact both the bot's performance and the associated running costs.

      1. After the bot resource is created, click on 'Go to the resource.'
      2. In the search bar, type Web App and select it


      3. Click on Create.


      4. Subscription: Select your Azure subscription.
      5. Resource Group: Choose an existing resource group or create a new one.
      6. Name: Enter a unique name for your web app.
      7. Publish: Choose Code if you are deploying code directly, or Docker Container if you are using a container.
      8. Runtime Stack: Select the runtime stack (e.g., .NET, Node.js, Python, etc.).
      9. Region: Choose the region closest to your users.
      10. App Service Plan: Select an existing plan or create a new one.
      11. Review all the configurations and click on Create. Azure will deploy your web app, which might take a few minutes.


    7. Configuring the bot credentials and channels .
    8. With the bot resource created, we can now proceed with the configurations. Start by recording the bot app ID and secret for future reference.

      1. Navigate to the Configuration section in the bot resource settings.
      2. Go to your Azure Bot > Configuration > Messaging endpoint: set to the URL that your App Service gave you + “api/messages”


      3. Copy the Microsoft App ID to a place like Notepad, as you'll need to use it later in your bot code project.


      4. Click on the 'Manage' link just above the field containing the GUID you copied. This will take you to the Azure AD app registration created alongside your bot resource.
      5. You will land on the 'Certificates and Secrets' section. Generate a new client secret (valid for 24 months) and save its value in Notepad for future use.
      6. Now that we have the authentication details, let's enable the bot to communicate with our client application. Although I am setting up a bot for Teams here, you can choose another platform as the bot channel in a similar manner.

        • Return to the bot resource and navigate to the Channels section.
        • Open the Channels section.
        • Select Microsoft Teams (or another platform)

        • Accept the terms of service if required.
        • Use the default settings (Teams Commercial, calling off) or adjust them for your bot’s needs (e.g., GCC environment, calling enabled)
        • Click Apply and Close.


    Thank you for reading! We hope this guide helped with Azure configuration for your bot. Click here to read Part 2 and complete your bot setup!


    If you have any questions you can reach out our SharePoint Consulting team here.

    August 24, 2023

    Integrating Azure OpenAI into Microsoft Teams using Teams Toolkit: A How-To Guide

    Introduction:

    In today's digital landscape, effective communication and collaboration are essential for productive teamwork. Microsoft Teams has emerged as a popular platform that brings people together. Now, imagine taking your Microsoft Teams experience to the next level by integrating it with Azure OpenAI, a powerful language model capable of generating human-like responses.


    This article will walk you through the integration of Azure OpenAI with Microsoft Teams, enabling users to engage in chat-based conversations and receive intelligent responses within the familiar Teams interface.

    Prerequisites:

    • Access to OpenAI Service on Azure (Please be aware that access to Azure OpenAI services is currently limited. If your Azure tenant does not have access, you have the option to apply for access through this link)

    • An M365 account.

    • NodeJS (Tested on Node.js 16.19.0)

    • Latest stable version of Teams Toolkit Visual Studio Code Extension (Tested on version 5.0.1)

    Teams Toolkit:

    Teams Toolkit is a user-friendly development framework by Microsoft, designed for creating apps, bots, and integrations within Microsoft Teams. It streamlines the process, making it easier to build collaborative solutions.


    To install Teams Toolkit Visual Studio Code extensions, follow these steps:

    • Click on the Extensions icon on the left sidebar.

    • Search and install Teams Toolkit.


    To scaffold the project, follow these steps within the Teams Toolkit interface:

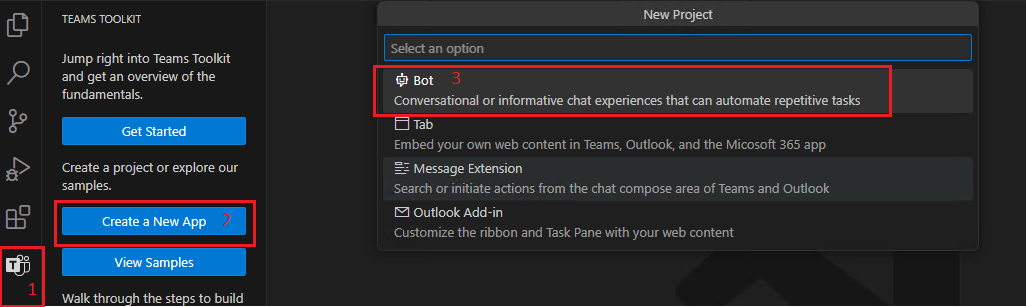
    • Click on the Teams Toolkit icon located in the left sidebar.

    • Select "Create a New App" and then choose the "Bot" option.

     
    • Now in the next step select "Basic Bot".

    • Move ahead with selecting  "TypeScript" as a Programming Language.

    • Specify the Location and Name of the App for our case it’s "TeamsGPT".


    After scaffolding the project, you can test the bot solution by following these steps:

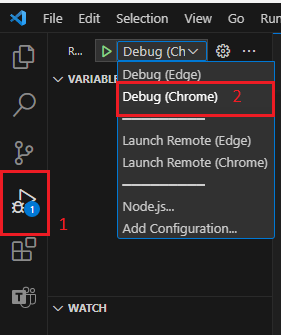
    • From the left menu, select "Run and Debug."

    • Choose the desired run profile.

    • Click on the "Run" button to test the bot solution.

    Azure Open AI Model Deployment:

    Azure OpenAI is a service provided by Microsoft that allows us to access powerful artificial intelligence models. It enables us to integrate AI capabilities into our applications, making them smarter and more intelligent.


    Follow Below Steps to Create an Instance of Azure Open AI:

    • Navigate to Azure Open AI under the Cognitive Service in the Azure Portal.

    • Click on "Create New".

    • Fill all the Details with Name of the Instance and Resource.

    • Click on Next Until Review and Submit tab.

    • Verify all the Details and then Click on Create.


    This will Create a Resource Group which contains Azure Open AI Service Instance now Navigate to the Resource Group and Select this Instance.


    Follow Below steps to deploy the Model using this Instance:

    • Click on  "Model Deployment" on the Left Hand Side.

    • Then Select "Manage Deployment" and it will take us to the Azure Open AI Studio.

    • Now, Click on "Deployments" on the Left Hand Side.

    • Then Click on "Create new deployment" and it will Prompt us to add the Details for our Model.


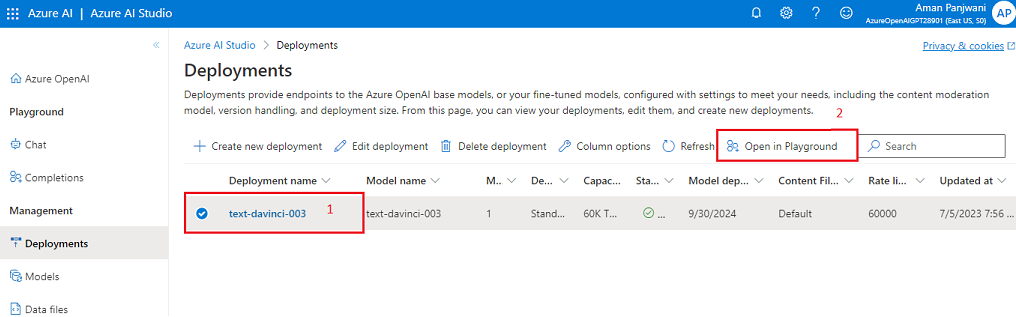
    In Select a Model Field Add "text-davinci-003" and also same in the Deployment Name and the Click on Create.


    Text-davinci-003 model is a language model developed by OpenAI. It is designed to generate human-like text and provide natural language processing capabilities. This model can be used for various tasks such as chatbots, language translation, content generation, and more.


    • Now, Select the Model and Click on Open in Playground.


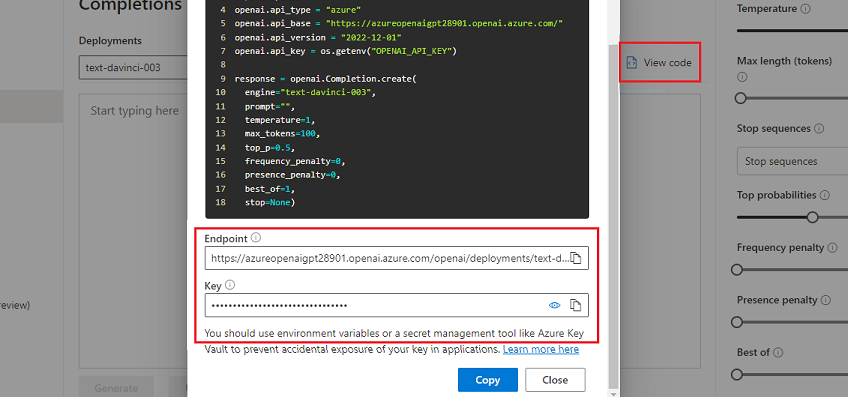
    • Click on View Code and note down the Endpoint and Key.


    Now, coming back to our teams toolkit solution we will store this Endpoint and Key in the Configuration File. Open Config.ts file and Modify the Code as:

    const config = {
      botId: process.env.BOT_ID,
      botPassword: process.env.BOT_PASSWORD,
      Endpoint: 'https://XXXX-openai.openai.azure.com/', //Your EndPoint URL
      APIKey: 'XXXX' //Your API Key
    };
    
    export default config;
    

    To enable receiving the response back in the Teams interface, modify the implementation of the welcome Adaptive Card logic as follows.


    Go to adaptiveCards and then the welcome.json file modify the code as below.

    {
      "type": "AdaptiveCard",
      "body": [
        {
          "type": "TextBlock",
          "size": "Medium",
          "weight": "Bolder",
          "text": "${title}"
        },
        {
          "type": "TextBlock",
          "text": "${body}",
          "wrap": true
        }
      ],
      "$schema": "http://adaptivecards.io/schemas/adaptive-card.json",
      "version": "1.4"
    }
    

    Now, the Final Change - modify the teamsBot.ts file as below in order to get the work done.

    import {
      TeamsActivityHandler,
      CardFactory,
      TurnContext,
    } from "botbuilder";
    import rawWelcomeCard from "./adaptiveCards/welcome.json";
    import { AdaptiveCards } from "@microsoft/adaptivecards-tools";
    import config from "./config";
    
    export class TeamsBot extends TeamsActivityHandler {
    
      constructor() {
        super();
        
        this.onMessage(async (context, next) => {
          console.log("Running with Message Activity.");
          let text = context.activity.text;
          const removeMentionedText = TurnContext.removeRecipientMention(context.activity);
          if (removeMentionedText) {
            text = removeMentionedText.toLowerCase().replace(/\n|\r/g, "").trim();
          }
    
          const fetch = require('node-fetch');
    
          const endpoint = config.Endpoint;
          const apiKey = config.APIKey;
    
          const prompt = text;
          const maxTokens = 100;
          const temperature = 1;
          const frequencyPenalty = 0;
          const presencePenalty = 0;
          const topP = 0.5;
          const bestOf = 1;
          const stop = null;
    
          const requestBody = JSON.stringify({
            prompt,
            max_tokens: maxTokens,
            temperature,
            frequency_penalty: frequencyPenalty,
            presence_penalty: presencePenalty,
            top_p: topP,
            best_of: bestOf,
            stop,
          });
    
          const headers = {
            'Content-Type': 'application/json',
            'api-key': apiKey,
          };
    
          const response = await fetch(endpoint, {
            method: 'POST',
            headers,
            body: requestBody,
          });
    
          const data = await response.json();
          if (response.ok) {
            const generatedtext = data.choices[0].text;
            const cardData = {
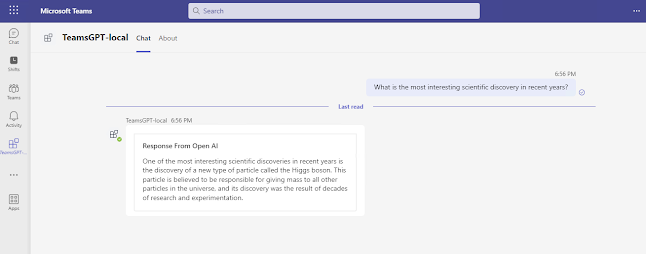
              title: "Response From Open AI",
              body: generatedtext,
          };
            const card = AdaptiveCards.declare(rawWelcomeCard).render(cardData);
            await context.sendActivity({ attachments: [CardFactory.adaptiveCard(card)] });
          } else {
            throw new Error('Failed to generate Response');
          }
    
        })
      }
    }
    

    Now, Follow Below Steps to Run and Debug the Bot.

    • From the left menu, select "Run and Debug."

    • Choose the desired run profile.

    • Click on the "Run" button to test the bot solution.


    Now, Imagine having the ability to effortlessly generate responses and engage in intelligent conversations within the familiar interface of Microsoft Teams.

    Conclusion:

    With the integration of Azure OpenAI, this becomes a reality. Now, you can ask whatever comes to mind and receive seamless, insightful replies, unlocking a whole new level of communication and collaboration within Teams. Say goodbye to limitations and welcome a world where your thoughts and queries are met with intelligent conversations at your fingertips.


    If you have any questions you can reach out our SharePoint Consulting team here.