Showing posts with label Power Apps. Show all posts

April 27, 2026

How to Fix "App Unresponsive" in Power Apps Using Chunked Processing

Introduction

You've built a Power App that works perfectly on small datasets. Then a colleague opens it with 400 real product records - and the dreaded "App Unresponsive" warning appears. The app isn't broken. It's doing exactly what you asked - processing everything simultaneously, on a single thread, with no capacity left for anything else.

Power Apps applications frequently handle large datasets with complex, record-level business logic such as pricing rules, tax computation, and discounts. When this logic runs entirely on the client side in a single operation, performance problems like freezing and "App Unresponsive" warnings become inevitable.

In this post, we walk through exactly why this happens and demonstrate how chunking - processing records in smaller sequential batches - resolves the problem without changing your underlying business logic.

Technical Challenge

Consider a typical Power Apps scenario where each record may contain nested or related data, complex per-record calculations such as pricing rules, tax computation, or discounts, and where all processing is performed using client-side Power Fx formulas.

When a large dataset is processed in a single operation, the application may freeze and users may receive "Unresponsive" warnings - even though the app is still executing logic in the background.

Important: Performance degradation depends not only on the number of records, but also on the complexity of calculations per record and the user's system configuration - CPU, memory, browser, and device performance.

Why Power Apps Become Unresponsive

1. All Records Are Processed at Once

A single ForAll() loop executes calculations for every record simultaneously. This becomes especially impactful when working with large collections that contain heavy logic per record. For light calculations, even 1,000+ records may process without issue. For heavy nested formulas, as few as 200–300 records can trigger an unresponsive state.

2. High Memory and CPU Consumption

Each record evaluation produces intermediate calculation results. When hundreds of records are processed simultaneously, memory and CPU usage spike - overwhelming the client device. Three compounding failures occur at once:

  • Memory Spike - All intermediate results are held in memory simultaneously, causing excessive consumption that overwhelms the client device.
  • CPU Overload - Parallel processing of hundreds of complex calculations saturates the processor, leaving no capacity for UI rendering or user interaction.
  • UI Freeze - The render thread is blocked entirely, preventing any screen updates until all processing completes.

3. UI Thread Blocking

Power Apps evaluates formulas on the same thread that renders the UI. While large calculations run, the UI cannot refresh - making the app appear frozen even if execution is still ongoing in the background.

Before Chunking: Processing All Records at Once

The following example processes all records in a single pass. While straightforward to write, this pattern blocks the UI thread for the entire duration and is the primary cause of "App Unresponsive" warnings in production.

Power Apps processing all records at once
ForAll(
    colProducts,
    Patch(
        colProducts,
        ThisRecord,
        {
            BaseRevenue: BasePrice * QuantitySold,
            DiscountAmount: BasePrice * QuantitySold * DiscountRate,
            TaxAmount: ((BasePrice * QuantitySold) -
                (BasePrice * QuantitySold * DiscountRate)) * TaxRate,
            FinalRevenue:
                (BasePrice * QuantitySold)
                - (BasePrice * QuantitySold * DiscountRate)
                - (((BasePrice * QuantitySold) -
                   (BasePrice * QuantitySold * DiscountRate)) * TaxRate)
        }
    )
);

Why this causes problems: The threshold at which this fails is not fixed. For light calculations, even 1,000+ records may process without issue. For heavy calculations - like the nested formula above - as few as 200–300 records can trigger an unresponsive state. The risk scales directly with per-record logic complexity.

After Chunking: Processing Records in Batches

The chunked implementation below processes records incrementally. The business logic is identical - only the delivery mechanism changes. Start with a batch size of 100 and adjust based on the complexity of your formulas and the capabilities of your target devices.

// Adjust _chunkSize based on formula complexity and device capability
Set(_chunkSize, 100);
Set(_totalRecords, CountRows(colProducts));

ForAll(
    Sequence(RoundUp(_totalRecords / _chunkSize, 0)) As _batch,
    With(
        {
            _start: (_batch.Value - 1) * _chunkSize + 1,
            _end:   Min(_batch.Value * _chunkSize, _totalRecords)
        },
        ForAll(
            Sequence(_end - _start + 1, _start, 1) As _row,
            With(
                { _p: Last(FirstN(colProducts, _row.Value)) },
                Patch(
                    colProducts,
                    _p,
                    {
                        BaseRevenue:    _p.BasePrice * _p.QuantitySold,
                        DiscountAmount: _p.BasePrice * _p.QuantitySold * _p.DiscountRate,
                        TaxAmount:      ((_p.BasePrice * _p.QuantitySold) -
                                         (_p.BasePrice * _p.QuantitySold * _p.DiscountRate)) * _p.TaxRate,
                        FinalRevenue:   (_p.BasePrice * _p.QuantitySold)
                                        - (_p.BasePrice * _p.QuantitySold * _p.DiscountRate)
                                        - (((_p.BasePrice * _p.QuantitySold) -
                                            (_p.BasePrice * _p.QuantitySold * _p.DiscountRate)) * _p.TaxRate)
                    }
                )
            )
        )
    )
);

How it works: The outer ForAll(Sequence(...)) iterates over batch numbers. For each batch, a With() scope calculates the start and end record indices. The inner loop retrieves and processes each record individually using Last(FirstN()) - a standard Power Fx idiom for positional record access. The UI thread is free to refresh between batches, keeping the experience smooth throughout.

Frequently asked questions

Does chunking change the final output or results?

No. Chunking only changes the order in which records are processed, not the calculations applied to each one. The final state of your collection will be identical to what a single ForAll() would produce - it simply gets there without freezing the app.

When should I not use chunking?

For small collections - typically fewer than 100 records with simple arithmetic - a standard ForAll() loop remains perfectly appropriate and easier to maintain. Chunking adds structural complexity, so apply it where the performance benefit is real.

How do I know if my batch size is too large?

If users still report freezes or unresponsive warnings after applying chunking, reduce the batch size. Start at 100, test on your lowest-spec target device, and decrease by 25–50 until the experience is consistently smooth.

Can this pattern be used with SharePoint lists instead of local collections?

Yes, with some adaptation. When working directly against a SharePoint data source, the same batching logic applies - however, each Patch() call will be a network request, so consider the additional latency and delegate where possible to reduce client-side load.

Conclusion

A single ForAll() loop across a large collection blocks the UI thread entirely until every record is processed - causing the freezes and "App Unresponsive" errors that users experience as crashes. The underlying logic isn't wrong; the delivery mechanism is.

Chunking resolves this by processing records in sequential batches. Memory stays bounded, the UI thread has room to breathe, and the app remains interactive throughout the operation - regardless of how complex your per-record formulas are.


May 22, 2025

Step-by-Step Guide: Create a PCF Control to Record Video in Power Apps

Introduction

In Power Apps, the default controls are often enough for typical business needs, but what if you need a more customized user interface or logic that goes beyond the built-in features? That’s where the PowerApps Component Framework (PCF) comes into play.

PCF enables developers to create custom components using modern web technologies like HTML, CSS, and TypeScript. These components can be reused just like standard Power Apps controls but offer much greater flexibility and power.
 
With PCF, you can build: 

  • Rich visual components like sliders, charts, or custom input fields
  • Controls that connect to external data sources
  • Reusable UI elements across different apps and environments

Whether you're enhancing user experience or integrating third-party libraries, PCF gives you the tools to take your apps beyond low-code.

In this blog, we’ll walk you through creating a custom PCF control that records video directly within a Power Apps, perfect for scenarios like field service reporting.
 
Prerequisites
Before you begin, ensure you have the following tools and knowledge:
  • Node.js (LTS version)
  • Power Platform CLI (pac)
  • Visual Studio Code
  • A Microsoft Power Apps Developer Environment

Use Case: Record Video in Power Apps
Imagine a field engineer needing to quickly document a machine fault. Instead of recording a video externally and uploading it later, a custom PCF control enables the engineer to record and save the video directly within the mobile app, streamlining the entire submission process.


Step-by-Step Guide to Creating the PCF Control

1. Create the PCF Control

  • Open Visual Studio Code and run:

pac pcf init --namespace VideoRecoder --name VideoRecoder --template field 

  • Then install the dependencies:

 npm install

 2.  Add Video Recording Logic (in index.ts)

  • Use the MediaRecorder API to access the camera and record video.

private async startRecording(): Promise<void> {
        this._errorElement.innerText = "";
        try {
            // Request back camera with facingMode: "environment"
            const stream = await navigator.mediaDevices.getUserMedia({
                video: { facingMode: "environment" },
                audio: true
            });
            this._videoElement.srcObject = stream;
            this._videoElement.play();

            this._mediaRecorder = new MediaRecorder(stream);
            this._recordedChunks = [];

            this._mediaRecorder.ondataavailable = (event) => {
                if (event.data.size > 0) {
                    this._recordedChunks.push(event.data);
                }
            };

            this._mediaRecorder.start();
            this._startButton.disabled = true;
            this._stopButton.disabled = false;
            this._uploadButton.disabled = true;
        } catch (error) {
            this._errorElement.innerText = "Failed to access camera/microphone. Please
ensure permissions are granted.";
            console.error("Recording error:", error);
        }
    }

    private stopRecording(): void {
        if (this._mediaRecorder && this._mediaRecorder.state !== "inactive") {
            this._mediaRecorder.stop();
            this._videoElement.srcObject = null;
            this._startButton.disabled = false;
            this._stopButton.disabled = true;
            this._uploadButton.disabled = false; // Enable upload button after stopping
        }
        console.log("from stopRecording() test");
    }


You can view the complete source code here.
  • Run the development server to test locally:
npm start

3. Build the PCF Control into a Solution
  • Create a new solution folder and initialize it:
mkdir VideoRecoderSolution
cd VideoRecoderSolution
pac solution init --publisher-name YourPublisher --publisher-prefix yourprefix
Then add the reference and build:
pac solution add-reference --path ..\..\
dotnet build
  • A .zip file will be created inside VideoRecoderSolution > bin > Debug

4. Import the Solution into Power Apps

  • Open your Power Apps portal
  • Navigate to Solutions

  • Click Import Solution and select the generated .zip file


  • Click Next > Import
Once imported
  • Go to your app
  • Click Insert > Get More Components

  • Click on code and select your custom component
  • Click Import, and it will be available under Code Components


Conclusion

With PCF, you unlock a whole new level of customization in Power Apps. In this tutorial, we created a practical video recording control - ideal for industries like field services, insurance, or any scenario where direct media input is valuable.


If you have any questions you can reach out our SharePoint Consulting team here.

May 1, 2025

How to Add a Custom Command Bar Button to Create a New Row in a Model-Driven App

How to Add a Custom Command bar Button to Create a New Row in a Model-Driven App

Introduction

Model-driven apps in Power Platform offer a powerful way to create data-centric business apps with minimal code. In this post, we’ll walk through the steps to create a custom command bar button on the Main Grid view that allows users to add a new row to a table (entity).

This guide assumes you have some basic familiarity with the Power Apps Maker Portal and Dataverse.


Step 1: Create Your Model-Driven App

  1. Go to Power Apps.
  2. Click Apps from the left navigation pane.
  3. Click + New app > Model-driven app.
  4. Give your app a name (e.g., Data Form) and click Create.
  5. Use the app designer to add a table (e.g., Data) to your app.
  6. Save and publish the app.

Step 2: Add a Custom Command bar Button

We will now add a custom button to the command bar of the Main Grid for the table.

2.1 Navigate to the App

  1. In the Maker Portal, go to View.
  2. Select your view (e.g., DataForms view).
  3. Click the three dots (⋮) beside the view.
  4. Click Edit under the Edit command bar options.


2.2 Edit the Main Grid Command Bar

  1. In the command designer, choose Main grid.


  2. Click +New and select Command.


2.3 Configure the Custom Button

  1. Label: Add New Row
  2. Icon: Choose an appropriate icon or upload a custom one.
  3. Action: Choose JavaScript or Modern Action (recommended).


Step 3: Add the Button Logic (Use JavaScript)

  1. Create a JavaScript web resource.
  2. Add the following function:
  3. Click Add Library button to open new side panel
  4. Click New web resource


Below is the JavaScript Code.

    
function AddNewRowToMainGrid(primaryControl) {
	try {
		// Check if primaryControl is defined (for main grid button)
        if (!primaryControl || !primaryControl.data || !primaryControl.data.entity) {
            console.log("No record selected. This is a new record creation.");
        }

        // Define the table name (logical name of your table)
        var tableName = "new_dataform"; // Make sure this is correct!

        // Prepare default values for the new row
        var defaultData = {
        "new_dateoftillcheck": null,
        "new_tillid": null,
		"new_nameofcurrenttillholder": "",
        "new_discrepancydeficiency": "",
        "new_discrepancysurplus": "",
        "new_actiontakeen": "",
        "new_postplusadjustmentdate": null,
        "new_signatureoftillholdercheckingofficer": "",
        };

        //console.log("Creating record in table: " + tableName);
        //console.log("Data: ", JSON.stringify(defaultData));

        // Create a new record in Dataverse
        Xrm.WebApi.createRecord(tableName, defaultData).then(
		function success(result) {
		  //console.log("Record created successfully with ID: " + result.id);

		  // Refresh the main grid after adding the record
		  if (primaryControl && primaryControl.refresh) {
			primaryControl.refresh();
		  } 
		  else {
		console.warn("primaryControl not available. Trying page refresh.");
		Xrm.Page.ui.refresh(); // Fallback
		}
		  },
		  function(error) {
		  	console.error("Error creating record: ", error.message);
			Xrm.Navigation.openErrorDialog({
			message: "Error adding new record: " + error.message
		  });
		}
	);
} 
catch (e) {
	console.error("Unexpected error:", e);
	Xrm.Navigation.openErrorDialog({
	message: "Unexpected error occurred: " + e.message
	});
  }
}

Step 4: Test the Custom Button

  1. Open your model-driven app.
  2. Navigate to the DataForm Main Grid.
  3. Click on your custom Add New Row button.
  4. A new row added, allowing the user to add a new record.


Conclusion

Customizing command bars in model-driven apps can significantly enhance user experience and streamline operations. Whether using Power Fx for low-code scenarios or JavaScript for more complex logic, adding a "New Row" button makes it easier for your users to create data on the fly.

March 23, 2023

How to Use Multiple Attachments Controls in Power App List Form

Introduction:

In this blog we will learn how to use multiple attachment controls and how to manage attached files with multiple attachment controls in Power Apps custom list form.

Technical Approach:

We will store files of all attachment controls in collection and then we will store files available in collection in document library using Power Automate.

Pre-requisites:

  1. List should be ready for which you want to create Power Apps form.
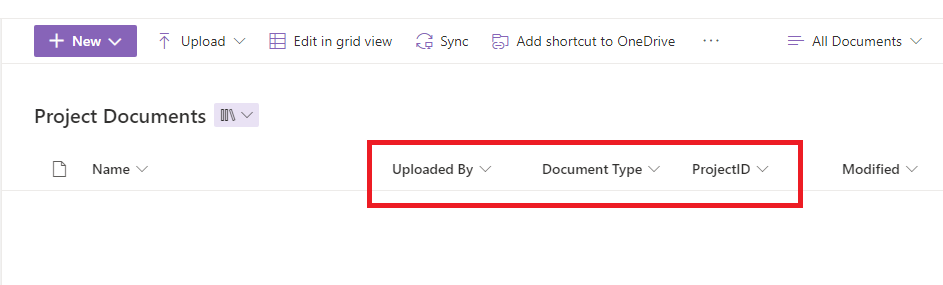
  2. Create Document Library with fields shown in below screenshot. Here in this example, Document Library name is Project Documents.

Create Power Automate

Step 1: Go to the https://make.powerautomate.com/ and select Instant cloud flow from Create menu of left navigation.


Step 2: Now, type the flow name and select the PowerApps (V2) trigger and click on Create button.

Step 3: Now, expand the Power Apps (V2) trigger and add below input fields:
In above inputs "ItemID", "UploadedByName" and "DocumentType" will be text type field and "File Content" will be file type field.

Step 4: Now, click on New step and new action for Create file in SharePoint as shown in below screenshot:


Step 5: Now, select the Site Address and your document library in Folder Path fields. In the File Name, copy-paste the below expression:
 @{triggerBody()['file']['name']}
And, in File Content field, select File Content which we defined in Power App input as shown in below screenshot:

Step 6: Now, add new step for Update File Properties as shown in below screenshot:


Step 7: Now select the Site Address and Library Name. In Id field, select the ItemId from Create file action as shown in below screenshot:

Step 8: For the Document Type, Uploaded By and Project ID columns, select the Power App inputs as shown in below screenshot:

Step 9: Now, all attachments are uploaded to document library, so we can delete documents form list item attachment. So to delete attachment, add a new step for Get Attachments.

Step 10: Select the Site Address and List name and in Id fields, select the ItemId from Power App input.

Step 11: Now, add a new step for Apply to each.

Step 12: Now in Select an output from previous steps field select the body of Get Attachments action as shown in below screenshot:

Step 13: Now, click on Add an action in Apply to each and select the Delete Attachments action.

Step 14: Now, in Delete Attachments action select the Site Address and List Name. In Id field, select the ItemId from Power App inputs and in File Identifier add the expression as shown in below screenshot:


Step 15: Now our flow is ready, so save the flow.

Use multiple attachment controls:

Follow below steps to use multiple attachment controls in Power App list form:

Step 1: Open your SharePoint list and select Customize form option from integrate menu.

Step 2: Once your Power App form open, one attachment field will already available. Now select attachment data card value and copy it.


Step 3: Now, paste it on the same data card, so Attachments data card will now show 2 file upload controls. You can add label above both of the file upload controls as shown below:


Step 4: Now we will need to add the document library in data source.


Step 5: Now select the first attachment control and add below code in its OnAddFile action.
 ClearCollect(SOWDocs,Self.Attachments);  
Above code will add all current selected files in SOWDocs collection.

Step 6: Now, we will use the same code for second attachment control. But with different collection name.

Step 7: Now, in both attachment controls, write the same code for OnRemoveFile action. So when user add or remove any file in attachment controls, we will have all currently selected files in collection.


Step 8: Now, click on Power Automate from left menu and click on Add flow.

Step 9: Now search for your flow name and click on the flow to add in the Power Apps form.

Step 10: Now, go back to the tree view of form and click on sharepointform1. And in OnSuccess method replace the below code.
 ForAll(  
   SOWDocs As Document,  
   UploadProjectManagementDocuments.Run(  
     SharePointForm1.LastSubmit.ID,  
     User().FullName,  
     "File to Upload",  
     {  
       file: {  
         contentBytes: Document.Value,  
         name: Document.Name  
       }  
     }  
   )  
 );  
 ForAll(  
   ProjectPlanDocs As Document,    
   UploadProjectManagementDocuments.Run(  
     SharePointForm1.LastSubmit.ID,  
     User().FullName,  
     "Additional Attachment",  
     {  
       file: {  
         contentBytes: Document.Value,  
         name: Document.Name  
       }  
     }  
   )  
 );  
 ResetForm(Self); RequestHide();  


Step 11: Now save and publish the power app form and selected document of both attachment controls will be stored in document library when we save the list item from Power App form.


Step 12: To show documents which are already uploaded in document library, you can use gallery control and show documents by filtering using Project ID and Document Type.

Conclusion:

This is how we can use multiple attachment controls in Power App list form. Hope this blog will be helpful for you!

If you have any questions you can reach out our SharePoint Consulting team here.

October 6, 2022

Convert Power Apps Controls to PDF without HTML (Using PDF Function)

Introduction:

We have often come across requirements to convert a control or a screen from Power Apps to PDF. Earlier, we used to generate an HTML and populate the data from Power Apps which goes to Power Automate and create a PDF file.

With this new feature of PDF Function in Power Apps, this has become much simpler.

Please follow the below steps for getting the PDF function in PowerApps:


Step 1: Go to File -> Settings

Step 2: Go to Upcoming Feature and search for PDF and enable the PDF Function toggle.


Once we have enabled the function, you will be able to use this function in your App.

Please see the below example for generating PDF from Power Apps:

Step 1: Create a Power Automate Flow with trigger Power Apps (V2) and Add an input as File.

Step 2: Add action to Create file in OneDrive for Business and add the output of the trigger to File Content

Hence, the overall flow will look like this:


Step 3: Go to Power Apps and add this flow on an Action Button.

Step 4: Write the below code on “OnSelect” property of the button.

GeneratePDF.Run(
    {
        file: {
            name: "test.pdf",
            contentBytes: PDF(Screen1)
        }
    }
)

Step 5: Click on the button and it should trigger the Flow.

We should have PDF File generated in the OneDrive when Flow is executed successfully.

NOTE: If you are targeting to convert a gallery control to PDF, then the time it takes to convert varies upon the number of rows in the gallery.


Conclusion:

We can now generate PDF for a specific control as well as for the whole screen without generating any HTML code and CSS issues. Hope this helps!

If you have any questions you can reach out our SharePoint Consulting team here.

September 29, 2022

Get Members from the Security Group in Power Apps

We often come across a requirement wherein we need to fetch the information from the Security Group and need to display within Power Apps for Business Logic implementation.

Example:
Below is one of the Security Group created in Microsoft 365. Here, there are two members added to that Security Group.

In Power Apps, we need information about those two users.

Step 1: Open Power Apps Canvas App. First, we need to add Office 365 Groups Connector. For that, 
  1. Go to View Menu, and select Data sources.

  2. Search for “Office 365 Groups”. Select the highlighted one and add a connector to the App.

  3. Once the Connector is added, this will look like this.

Step 2:
  1. Open Power Apps screen and add a button.
  2. Write the following line of code for “On Select” event of the button.
     ClearCollect(MembersfromSG,Office365Groups.ListGroupMembers("GroupID").value)  
  3. Here, MembersfromSG is the Name of the collection. Office365Groups.ListGroupMembers(“Group ID”) returns the information about all the members of that security group.

How can we find that Group ID for the Security Group?
  1. Open Azure Portal and search for Groups. This will open the following screen.
  2. Select your security group for more information.
  3. Copy Object Id. This is the Group ID. We can use this Group ID in the below formula. The formula will look like this.
 ClearCollect(MembersfromSG,Office365Groups.ListGroupMembers("xxxxxxxx-1xxb-4x4b-xxxxxx").value)  

Step 3: Now, add Gallery Control and add Collection as a data source. This will show users in the Gallery.

Step 4: Now, let’s run the solution. This will show, User’s Display Name and User Principal Name.
You can check more properties of members returned by this collection from the executed collection.

Conclusion:
This is how we can get the Member Information using Office 365 Groups Connector in Power Apps.

If you have any questions you can reach out our SharePoint Consulting team here.