Introduction
Recently we implemented an SPFx web part solution for a Postal and Parcel company based out of Melbourne, Victoria, Australia. We came across a requirement to provide a taxonomy picker control to select the terms for the term set and to store it in the SharePoint list/library.
There are two ways to store the taxonomy picker's selected value in the SharePoint List/Library based on whether it is a single value or multi-value taxonomy picker.
In this blog, we will learn about single-value taxonomy picker control and how to use it in the SPFx web part and store its selected term value with other properties/fields in the SharePoint list/library.
Pre-Requisites
- We need to have a single value selectable managed metadata column associated with a term set in the SharePoint List.
- We need to have the @pnp/spfx-controls-react package installed in our SPFx web part. We can use the command below to install the package.
npm install @pnp/spfx-controls-react --save --save-exact
- Create the context and siteUrl props in the SPFx solution.
- Create a state of Array type to store the selected taxonomy picker’s value.
Implementation
Below are the steps to implement the taxonomy picker control for the single value managed metadata column.
Step 1:
Import the taxonomy picker and IPickerTerms in the .tsx(file that contains the render method) file of the SPFx web part as shown below.
import { TaxonomyPicker, IPickerTerms } from "@pnp/spfx-controls-react/lib/TaxonomyPicker";
Step 2:
  <TaxonomyPicker
          termsetNameOrID="Job Title"
          panelTitle="Select Job Title"
          label=""
          context={this.props.context}
          onChange={this.onJobtitleTaxPickerChange.bind(this)}
          initialValues={this.state.setJobTitletaxonomy}
         />
The Taxonomy Picker required attributes are below.
- panelTitle: We need to provide the Term Set Picker Panel title.
- Label: We need to provide the text displayed above the Taxonomy Picker.
- Context: we need to provide the content of the current web part. For example, this.props.context.
- TermsetNameOrID: we need to provide the term set's name or its GUID.
- OnChange: this attribute is used to store the selected term in a state so we can use that state's value while submitting the item to the SharePoint list/library. It's an optional attribute.
- InitialValues: this attribute is used to set the taxonomy picker's selected values. It's an optional attribute.
Step 3:
After creating taxonomy control, we need to define a method to handle its on-change event and store the selected term in a state as shown below.
 private onJobtitleTaxPickerChange(terms: IPickerTerms) {
   this.setState({
    setJobTitletaxonomy: terms
   });
  }
Step 4:
When we use the rest API to store values to the SharePoint List/Library we need to pass the details in the body of the rest API and to provide the details for managed metadata column we need to use the below format.
  bodyArray['JobTitle'] = {
    __metadata: { type: "SP.Taxonomy.TaxonomyFieldValue" },
    Label: this.state.setJobTitletaxonomy[0].name,
    TermGuid: this.state.setJobTitletaxonomy[0].key,
    WssId: -1
   };
Here, we have used the setJobTitletaxonomy state for the managed metadata column. Now we can use the above body array to the body of the SharePoint rest API call.
Step 5:
Below is the detailed code for retrieving the values and submitting them to create a new item to the SharePoint List/Library. Submit method of the SPFx form:
//getValues() is used to retrieve the request digest value for creating items using the rest API call.
public getValues(site): any {
try {
var url = site + '/_api/contextinfo';
return fetch(url, {
method: "POST",
headers: { Accept: "application/json;odata=verbose", "Content-Type": 'application/json;odata=verbose', 'Access-Control-Allow-Origin': '*' },
credentials: "same-origin"
}).then((response) => {
return response.json();
});
} catch (error) {
console.log("getValues: " + error);
}
}
//CreteItem() is used to create an item in the SharePoint list.
public createItem() {
let bodyArray = {};
bodyArray['__metadata'] = {
"type": "SP.Data.BlogListItem"
},
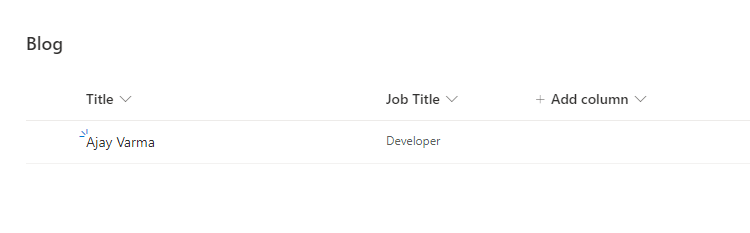
bodyArray['Title'] = "Ajay Varma";
bodyArray['JobTitle'] = {
__metadata: { type: "SP.Taxonomy.TaxonomyFieldValue" },
Label: this.state.setJobTitletaxonomy[0].name,
TermGuid: this.state.setJobTitletaxonomy[0].key,
WssId: -1
};
let jsonBodyArray = JSON.stringify(bodyArray);
var url = this.props.siteUrl + `/_api/web/lists/getbytitle('Blog')/items()`;
return new Promise<any>((resolve, reject) => {
try {
this.getValues(this.props.siteUrl).then((token) => {
fetch(url,
{
method: "POST",
credentials: 'same-origin',
headers: {
Accept: 'application/json',
"Content-Type": "application/json;odata=verbose",
"X-RequestDigest": token.d.GetContextWebInformation.FormDigestValue,
},
body: jsonBodyArray,
}).then((r) => {
return r.status != 204 ?
r.json() : r.status;
})
.then((response) => {
resolve(response);
return response;
})
.catch((error) => {
reject(error);
});
}, (error) => {
console.log(error);
reject(error);
});
}
catch (e) {
console.log(e);
reject(e);
}
});
}
Results
Side Panel for Taxonomy Picker:

SPFx web part:

SharePoint List:


No comments:
Post a Comment