Introduction:
In today's digital landscape, effective communication and collaboration are essential for productive teamwork. Microsoft Teams has emerged as a popular platform that brings people together. Now, imagine taking your Microsoft Teams experience to the next level by integrating it with Azure OpenAI, a powerful language model capable of generating human-like responses.
This article will walk you through the integration of Azure OpenAI with Microsoft Teams, enabling users to engage in chat-based conversations and receive intelligent responses within the familiar Teams interface.
Prerequisites:
Access to OpenAI Service on Azure (Please be aware that access to Azure OpenAI services is currently limited. If your Azure tenant does not have access, you have the option to apply for access through this link)
An M365 account.
NodeJS (Tested on Node.js 16.19.0)
Latest stable version of Teams Toolkit Visual Studio Code Extension (Tested on version 5.0.1)
Teams Toolkit:
Teams Toolkit is a user-friendly development framework by Microsoft, designed for creating apps, bots, and integrations within Microsoft Teams. It streamlines the process, making it easier to build collaborative solutions.
To install Teams Toolkit Visual Studio Code extensions, follow these steps:
Click on the Extensions icon on the left sidebar.
Search and install Teams Toolkit.

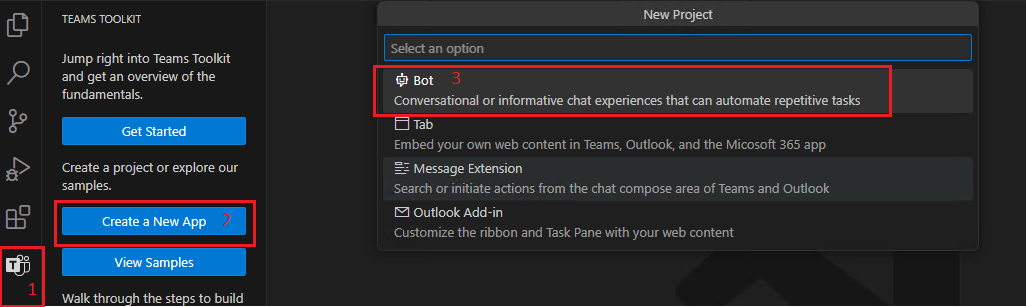
To scaffold the project, follow these steps within the Teams Toolkit interface:
Click on the Teams Toolkit icon located in the left sidebar.
Select "Create a New App" and then choose the "Bot" option.
Now in the next step select "Basic Bot".
Move ahead with selecting "TypeScript" as a Programming Language.
Specify the Location and Name of the App for our case it’s "TeamsGPT".
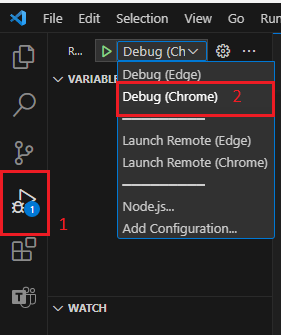
After scaffolding the project, you can test the bot solution by following these steps:
From the left menu, select "Run and Debug."
Choose the desired run profile.
Click on the "Run" button to test the bot solution.
Azure Open AI Model Deployment:
Azure OpenAI is a service provided by Microsoft that allows us to access powerful artificial intelligence models. It enables us to integrate AI capabilities into our applications, making them smarter and more intelligent.
Follow Below Steps to Create an Instance of Azure Open AI:
Navigate to Azure Open AI under the Cognitive Service in the Azure Portal.
Click on "Create New".
Fill all the Details with Name of the Instance and Resource.
Click on Next Until Review and Submit tab.
Verify all the Details and then Click on Create.
This will Create a Resource Group which contains Azure Open AI Service Instance now Navigate to the Resource Group and Select this Instance.
Follow Below steps to deploy the Model using this Instance:
Click on "Model Deployment" on the Left Hand Side.
Then Select "Manage Deployment" and it will take us to the Azure Open AI Studio.

Now, Click on "Deployments" on the Left Hand Side.
Then Click on "Create new deployment" and it will Prompt us to add the Details for our Model.

In Select a Model Field Add "text-davinci-003" and also same in the Deployment Name and the Click on Create.
Text-davinci-003 model is a language model developed by OpenAI. It is designed to generate human-like text and provide natural language processing capabilities. This model can be used for various tasks such as chatbots, language translation, content generation, and more.
Now, Select the Model and Click on Open in Playground.
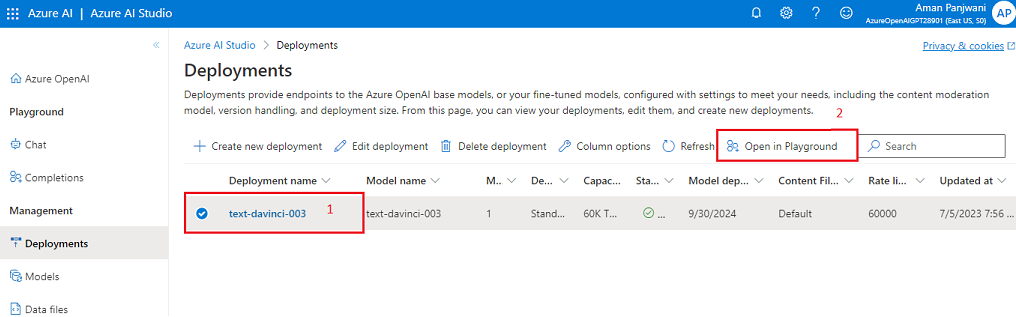
Click on View Code and note down the Endpoint and Key.
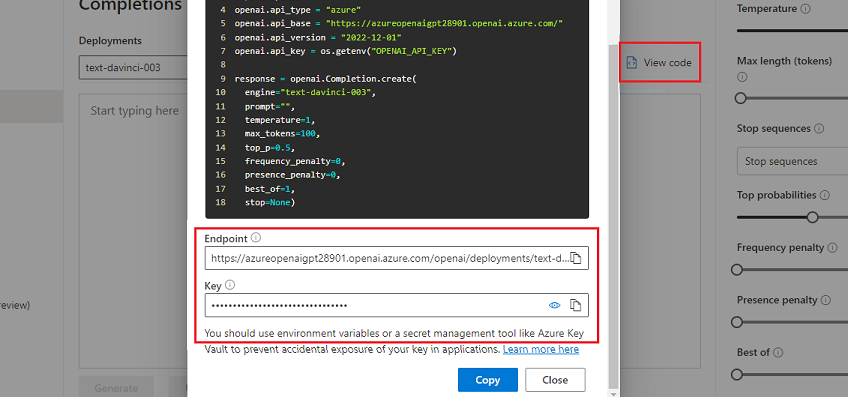
Now, coming back to our teams toolkit solution we will store this Endpoint and Key in the Configuration File. Open Config.ts file and Modify the Code as:
const config = {
  botId: process.env.BOT_ID,
  botPassword: process.env.BOT_PASSWORD,
  Endpoint: 'https://XXXX-openai.openai.azure.com/', //Your EndPoint URL
  APIKey: 'XXXX' //Your API Key
};

export default config;
To enable receiving the response back in the Teams interface, modify the implementation of the welcome Adaptive Card logic as follows.
Go to adaptiveCards and then the welcome.json file modify the code as below.
{
  "type": "AdaptiveCard",
  "body": [
    {
      "type": "TextBlock",
      "size": "Medium",
      "weight": "Bolder",
      "text": "${title}"
    },
    {
      "type": "TextBlock",
      "text": "${body}",
      "wrap": true
    }
  ],
  "$schema": "http://adaptivecards.io/schemas/adaptive-card.json",
  "version": "1.4"
}
Now, the Final Change - modify the teamsBot.ts file as below in order to get the work done.
import {
  TeamsActivityHandler,
  CardFactory,
  TurnContext,
} from "botbuilder";
import rawWelcomeCard from "./adaptiveCards/welcome.json";
import { AdaptiveCards } from "@microsoft/adaptivecards-tools";
import config from "./config";

export class TeamsBot extends TeamsActivityHandler {

  constructor() {
    super();

    this.onMessage(async (context, next) => {
      console.log("Running with Message Activity.");
      let text = context.activity.text;
      const removeMentionedText = TurnContext.removeRecipientMention(context.activity);
      if (removeMentionedText) {
        text = removeMentionedText.toLowerCase().replace(/\n|\r/g, "").trim();
      }

      const fetch = require('node-fetch');

      const endpoint = config.Endpoint;
      const apiKey = config.APIKey;

      const prompt = text;
      const maxTokens = 100;
      const temperature = 1;
      const frequencyPenalty = 0;
      const presencePenalty = 0;
      const topP = 0.5;
      const bestOf = 1;
      const stop = null;

      const requestBody = JSON.stringify({
        prompt,
        max_tokens: maxTokens,
        temperature,
        frequency_penalty: frequencyPenalty,
        presence_penalty: presencePenalty,
        top_p: topP,
        best_of: bestOf,
        stop,
      });

      const headers = {
        'Content-Type': 'application/json',
        'api-key': apiKey,
      };

      const response = await fetch(endpoint, {
        method: 'POST',
        headers,
        body: requestBody,
      });

      const data = await response.json();
      if (response.ok) {
        const generatedtext = data.choices[0].text;
        const cardData = {
          title: "Response From Open AI",
          body: generatedtext,
      };
        const card = AdaptiveCards.declare(rawWelcomeCard).render(cardData);
        await context.sendActivity({ attachments: [CardFactory.adaptiveCard(card)] });
      } else {
        throw new Error('Failed to generate Response');
      }

    })
  }
}
Now, Follow Below Steps to Run and Debug the Bot.
From the left menu, select "Run and Debug."
Choose the desired run profile.
Click on the "Run" button to test the bot solution.
Now, Imagine having the ability to effortlessly generate responses and engage in intelligent conversations within the familiar interface of Microsoft Teams.
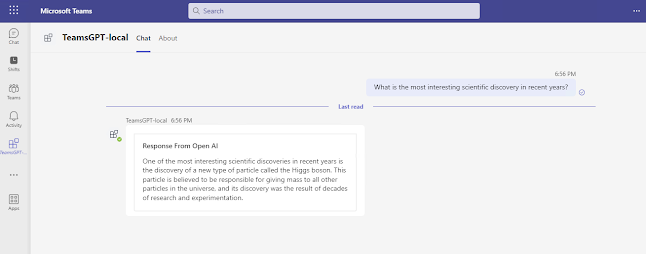
Conclusion:
With the integration of Azure OpenAI, this becomes a reality. Now, you can ask whatever comes to mind and receive seamless, insightful replies, unlocking a whole new level of communication and collaboration within Teams. Say goodbye to limitations and welcome a world where your thoughts and queries are met with intelligent conversations at your fingertips.


