April 16, 2013

How to programmatically order web parts in a publishing page

If web parts are already deployed on the site collection web part gallery and if want to add web part on the web part page programmatically, following is the code. If want to add the Web Part to a Web Part , from Web Part manager in which zone to add the web part and in which order we have to Addwebpart property of webpart taking index of webpart in which order we have to place our webpart.
Suppose in a zone there are two webparts indexing 1 and 2 and now we have to add a new webpart programmatically in between these two webparts then we have to give index value 2 to new value and previous 2 will automatically become 3.
CODE:
   1:  foreach (PublishingPage pubpge in publishingPages)
   2:   
   3:                  {
   4:   
   5:                      SPFile pageCategory = pubpge.ListItem.File;
   6:   
   7:  SPLimitedWebPartManager spmgr = sourceProductsWeb.GetLimitedWebPartManager(pageCategory.Url.ToString(), PersonalizationScope.Shared);
   8:   
   9:                              string exportedWebPartXml = string.Empty;
  10:   
  11:  exportedWebPartXml = new StringReader(sourceSite.RootWeb.GetFileAsString(sourceSite.RootWeb.Url + "/_catalogs/wp/EngagementProductLinks.webpart")).ReadToEnd();
  12:   
  13:  XmlTextReader reader = new XmlTextReader(new StringReader(exportedWebPartXml));
  14:   
  15:                              System.Web.UI.WebControls.WebParts.WebPart importedWp = spmgr.ImportWebPart(reader, out outmessage);
  16:   
  17:  sourceProductsWeb.AllowUnsafeUpdates = true;
  18:   
  19:  if (pageCategory.CheckOutType == SPFile.SPCheckOutType.None)
  20:   
  21:                  {
  22:   
  23:                      pageCategory.CheckOut();
  24:   
  25:                  }
  26:   
  27:                  importedWp.ChromeType = PartChromeType.None;
  28:   
  29:                  spmgr.AddWebPart(importedWp, "ContactsZone", 1);
  30:   
  31:                  spmgr.SaveChanges(importedWp);
  32:   
  33:                  pageCategory.CheckIn(" Added Web Part " + importedWp.Title);
  34:   
  35:                  pageCategory.Publish(" Added Web Part " + importedWp.Title);
  36:   
  37:  if (pubpge.ListItem.ModerationInformation != null &&  (pubpge.ListItem.ModerationInformation.Status == SPModerationStatusType.Draft || pubpge.ListItem.ModerationInformation.Status == SPModerationStatusType.Pending))
  38:   
  39:                              {
  40:   
  41:                                  pageCategory.Approve("Programmatically Approve");
  42:   
  43:                              }
  44:   
  45:                              sourceProductsWeb.AllowUnsafeUpdates = false;
Note: Sharepoint has a limitation of ordering webparts in a single zone.
If there are already three webparts and we have to fourth webpart then increment of webpart index will be 1. Now zone has four webpart and want to add fifth webpart it will be added at correct place but index of webpart will not be increased by one. They will increase by multiple of index like if 2 then it will increase by 4.
Reference for Limitation : http://blogs.msdn.com/b/jjameson/archive/2009/06/05/splimitedwebpartmanager-addwebpart-mysteriously-increments-zoneindex.aspx
http://www.technologytoolbox.com/blog/jjameson/archive/2009/06/05/splimitedwebpartmanager-addwebpart-mysteriously-increments-zoneindex.aspx
Reference for ordering webpart: http://nikspatel.wordpress.com/2010/11/09/programmatically-add-the-web-part-on-the-sharepoint-web-part-page/
Also we can add property value programmatically.
Like i have added custom property(Taxonomy field) value while adding webparts on page.
By using "SetValue" property. CODE:

   1:  foreach (PropertyInfo sitesection in SiteSecitonProperty)
   2:   
   3:                  {
   4:   
   5:                      if (sitesection.Name == "SiteSectionTaxonomy")
   6:   
   7:                      {
   8:   
   9:                          sitesection.SetValue(importedWp, GUID, null);
  10:   
  11:                          spmgr.SaveChanges(importedWp);
  12:   
  13:                      }
  14:   
  15:                      else if (sitesection.Name == "TermStoreID")
  16:   
  17:                      {
  18:   
  19:                          string TermStoreguid = ContentDeploymentConfigObj.TaxonomyStoreID;
  20:   
  21:                          System.Guid guid = new Guid(TermStoreguid);
  22:   
  23:                          sitesection.SetValue(importedWp, guid, null);
  24:   
  25:                          spmgr.SaveChanges(importedWp);
  26:   
  27:                      }
  28:   
  29:                      else if (sitesection.Name == "TermSetID")
  30:   
  31:                      {
  32:   
  33:                          string TermSetguid = ContentDeploymentConfigObj.TaxonomySetID;
  34:   
  35:                          System.Guid guid = new Guid(TermSetguid);
  36:   
  37:                          sitesection.SetValue(importedWp, guid, null);
  38:   
  39:                          spmgr.SaveChanges(importedWp);
  40:   
  41:                      }
  42:   
  43:                      else if (sitesection.Name == "Text")
  44:   
  45:                      {
  46:   
  47:                          sitesection.SetValue(importedWp, GUID, null);
  48:   
  49:                          spmgr.SaveChanges(importedWp);
  50:   
  51:                      }
  52:   
  53:                  }
(SiteSectionTaxonomy GUID,TermStoreguid,TermSetguid ) I have added these properties.
If you have any questions you can reach out our SharePoint Consulting team here.

Database maintenance for SharePoint 2010 Products

Microsoft SharePoint 2010 databases are very large in size and it's essential to maintain it for smooth and faster database operations. SharePoint recommends following task to perform for SharePoint Database.
  • Check database integrity.
  • Defragment indexes by reorganizing them or rebuilding them.
  • Set the fill factor for a server.
Database maintenance task covers all required process to maintain SharePoint database. Database maintenance task can be performed by running database maintenance wizard or by running Transact-SQL commands. Transact-SQL commands are very complex and need deep knowledge of SQL commands and configuration. But SQL server management studio 2008 and 2005 covers database management wizard with very user friendly user interface. Here we will cover SharePoint database maintenance with maintenance plan wizard.
Do following process to run maintenance plan wizard with SQL Server Management studio 2008.
  • Open SQL Server management studio and do login.
  • Select Management and right click maintenance plans and Choose Maintenance Plan wizard.
  • Click next until select plan property page.

  • Give name and description as desired.
  • Select weather configures one or more maintenance plans.
    • To configure a single maintenance plan, select Single schedule for the entire plan or no schedule.
    • To configure multiple maintenance plans with specific tasks, select Separate schedules for each task.
  • For the database more than 10 content databases or having larger size of database, it is recommended to go for separate maintenance plans.
  • Click on change button to create a schedule or timer job to run maintenance plan.
  • It will open Job Schedule Properties dialog box.

    • Set schedule as per requirement.
    • After scheduling click OK and Next.
  • Next page is to select maintenance tasks page. This page will show the list of all maintenance tasks required for SharePoint Maintenance.

    Note:
    • Need to take care in selecting index reorganization or index rebuilding. A maintenance plan should include any one from index reorganization and index rebuilding, Not Both.
    • A maintenance plan should never include shrinking a database.
    • Maintenance cleanup task will remove files left after scheduled Maintenance.
    Select the tasks for the plan and click next.
  • Next page will be Select Maintenance Task Order Page.
    • You can change the order of the tasks in the plan on this page. Then click next.
  • Next page will be Database Check Integrity Task Page.

    • Select databases to reorganizing index and check compact large object check box. Then click ok.
  • Define Rebuild Index Task page
    • Select databases and configure as below. And click next.
  • Define Maintenance Cleanup Task page
    • Select options as required and click next.
  • Select Report Options
    • Give path to save log file.
  • Then click finish to start the maintenance plan process.
  • To shrink database do following process.
    • Start SQL server management studio 2008.
    • In Databases, select the database you want to shrink.
    • Right click the database, select tasks, Shrink, files.
    • Select the file type and file name.
    • Select reorganize files before releasing unused space.
    • Then click OK

If you have any questions you can reach out our SharePoint Consulting team here.

April 2, 2013

All about Explorer View

  • The Explorer View is an excellent feature that is integrated with SharePoint that allows a user to access a document library as if you were accessing a file system through a Windows Explorer window.
  • Being end users, everyone might feel that this is very easy to use. But there are multiple complex interactions happening with different technologies to make documents which are not present in file systems to viewable using explorer.
Note: In earlier version of windows webclient service could be installed by enabling WebDAV and FPRPC component in IIS.
  • The main protocols that are capable of directly manipulating file data stored in SharePoint 2007 are
    • - WebDAV (Web Distributed Authoring and Versioning)
      • WebDAV is a simple extension to the HTTP protocol based on a public specification. It provides an extended vocabulary that defines how basic file functions, such as copy, move, delete, and create folder, are performed across HTTP.
    • - FPRPC (FrontPage Server Extensions Remote Procedure Call)
      • FPRPC provides WebDAV capabilities using extensions to the HTTP vocabulary, but it also has the ability to embed more complex Remote Procedure Call (RPC) communications in the data portion of the packet.
  • WebDAV FPRPC
    Microsoft WebDAV implementation is based on a public standard for authoring and versioning via HTTP FPRCP is a Microsoft technology that is primarily used for its value-added FrontPage capabilities
    Cannot work with SSL sites Can work with SSL sites
    Can map the site as a drive (mapped drive) Cannot map the site as a drive (mapped drive)
    Works only with site which are running under port 80 Works with any sites
  • In addition, please double check whether you meet the following conditions:
    • Make sure all computers accessing the Explorer View have the Web Client Service enabled and running. This is the default behavior for Windows XP, but not for Windows Server 2003.
    • Only host content on the default Web port of 80. If you need to host multiple Web sites on a single server, use host headers or multiple IPs to make those Web sites unique.
    • Do not encrypt Explorer View traffic using SSL. SSL uses port 443, and the Microsoft WebDAV implementation does not work on ports other than 80.
HOWTO: Enable Web Client Service for Windows explorer view:
Prerequisite:

Check For If Web Client Service is enabled and running on the computer where you are trying to open Windows Explorer view.
If No, Follow below given steps to make it available.
Note : In earlier version of windows webclient service could be installed by enabling WebDAV component in IIS
  • To enable webclient service, we need to install desktop experience feature.
  • Start the Windows Server Manager.
  • In the tree view, highlight the Features node.
  • In the details pane, click Add Features.
  • In the Add Features Wizard, check the Desktop Experience box
  • Click Next.
  • Click Install.
  • When the Add Features Wizard has finished, click Close.
  • Click Yes when promoted to restart the computer.
If Yes, Follow below given steps to make it Running.
  • First, right click "My Computer" and select "Manage". You may get a pop up that asks you if you are sure you want to make changes here, so click yes.
  • You will get the Windows Management console now, and it should look something like this:
  • Expand the "Services and Applications" at the bottom. Select "Services" from here:
  • The middle window pane will expand to list all the services installed and whether or not they are running. Scroll down to find the "WebClient" service. Double click it:
  • Finally, you should see this property sheet:
  • Change the Startup type here to Automatic. Go ahead and Start it too (click the Start button) if that does not automatically happen. Then save all your changes.
  • Now when you start Windows this will start this process as well.
How to View a SharePoint 2010 document library in Windows Explorer:
If you're in SharePoint 2010 (either Server or Foundation) and found it difficult to get the "Explorer View"… that's because it doesn't exist any more. The product group took it out between 2007 and 2010.
Having some sort of Explorer view s important for obvious reasons:
  • Multi-select documents using rubber banding
  • Drag & drop files to-and-from from your desktop (again, ca
  • Right mouse click a file for "Properties"
  • Preview documents in Explorer pane
In order to get a similar "Explorer View" to access the files in the SharePoint document repositories in your sites, you need to:
  • Go to the site's document repository (See below)
  • Click on 'Library'
  • Click "Open in Explorer" to the far right.
  • It may be hidden so expand the browser window to reveal it

OR

If you have any questions you can reach out our SharePoint Consulting team here.

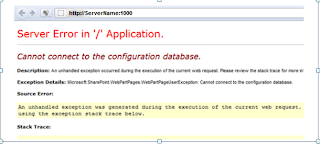
Steps to resolve “Can't connect the configuration database" Error in SharePoint

Steps to resolve “Can not connect to the configuration database Error in SharePoint

When we try to browse a SharePoint site, if it shows the following Error “Cannot connect to the configuration database”.

The reason you get the above message is that the SharePoint cannot connect to the SQL database. You need to check whether SQL Server Service is started or not. To check:-
Go to Start -- > Administrative Tools à Services
The following screen will be displayed showing all services. Now check “SQL Server (MSSQLSERVER) service”.

Need to start this Service as it is not started. Right Click on service and click on “Start”.

After starting the service you can see the status of the service is “Started” as shown in below screenshot.

Now, SharePoint site is opened Successfully.

If you have any questions you can reach out our SharePoint Consulting team here.