Showing posts with label Office 365. Show all posts

June 19, 2025

Introduction to Microsoft Sway: A Guide to Creating Engaging Digital Content

Overview

Nowadays in digital-first world, how we present information matters just as much as the message itself. Whether you are a student, educator, professional, or content creator, Microsoft offers a simple yet powerful tool to help you build interactive, visually-rich presentations without the need for complex design tools—Microsoft Sway. 

In this blog, we will explore what Sway is, why it is useful, when to use it, and tips for users to make the most out of it. 

Introduction to Microsoft Sway: A Guide to Creating Engaging Digital Content

What is Microsoft Sway? 

  • Microsoft Sway is a cloud-based digital storytelling app that allows users to easily create interactive presentations, reports, newsletters, and stories. It focuses on narrative and visual storytelling, making it perfect for creating content that looks professional across all devices—with no advanced design skills needed. 
  • Sway enables users to combine text, images, videos, charts, and external media into a responsive, scrollable webpage or presentation, perfect for online viewing and mobile-first audiences. 

Why Use Sway? 

Sway is designed for simplicity, speed, and impact. Here's why people love using it: 

  1. User-Friendly InterfaceYou do not need to be a designer. The intuitive drag-and-drop layout and built-in themes help anyone create attractive content in minutes. 
  2. Mobile Optimization: Sway presentations are automatically responsive, meaning they adjust perfectly to any screen size—whether viewed on a desktop, tablet, or smartphone. 
  3. Multimedia Integration: You can easily embed images, videos, charts, and even social media posts directly from your device or from online platforms like YouTube, OneDrive, or social media. 
  4. Real-Time Collaboration: Teams can co-create Sways together in real time, just like with other Office 365 tools. 
  5. Auto-Responsive Design: Sway automatically adjusts format, dividing, and designing, sparing you time on manual plan work. 

When Should You Use Sway? 

Sway is perfect in a variety of situations, such as: 

  • Business Reports: Create engaging project updates, performance summaries, or sales reports. 
  • Educational Presentations: Ideal for teachers and students to focus on content and storytelling without worrying about formatting. 
  • Digital Storytelling: Share narratives, case studies, or personal stories in a modern format. 
  • Quick Content Creation: When you need to produce something polished fast—without using tools like PowerPoint or Canva. 
  • Mobile-First Content Delivery: Great for audiences who view content on mobile devices. 

Main Purpose of Sway 

The primary goal of Sway is to simplify content creation for digital platforms. It removes the need for complex layout tools and lets you focus on what matters most—your message. Whether you are sharing an update with your team or presenting to clients, Sway helps make that content more engaging and easier to consume. 

Pros and Cons of Sway 

Pros 

  • Beginner-Friendly: No design experience required. 
  • Automated Design Features: Saves time and effort. 
  • Supports All Media Types: Easily embed video, audio, images, and links. 
  • Cloud-Based Collaboration: Share and edit from anywhere. 
  • Education Ready: Excellent for teaching, training, and online learning. 

Cons 

  • Microsoft Account Required: A Microsoft 365 or individual Microsoft account is required. 
  • Limited Export Options: No direct option to download as a video. 
  • Less Control Over Layout: Custom design is limited to what Sway allows. 

Tips for Users 

To help you get started with Sway, here are some user-friendly tips: 

  1. Explore Templates: Start with pre-designed Sway templates to understand layout possibilities and structure. 
  2. Use the Remix Button: Let Sway automatically redesign your content with different visual styles. A great way to explore layout variations. 
  3. Leverage Multimedia: Include videos, charts, audio, and high-quality images to make your presentation more engaging. 
  4. Tell a Story: To help your viewers navigate your content, use a logical flow or structure. Sway is built for storytelling. 
  5. Collaborate with Others: Utilize real-time editing to co-create substances together with your group or classmates. 
  6. Preview on Mobile: Always preview your Sway on a phone or tablet to ensure it looks perfect across all platforms. 
  7. Reuse Your Layout: Save Sway presentations you like as templates for future content to maintain consistency. 
  8. Use Accessibility Tools: Enable Accessibility View and use the Accessibility Checker to make your content inclusive and user-friendly. 

Final Thoughts 

Microsoft Sway may be effective tool for those looking to communicate thoughts visually and effectively. Whether you’re creating a project update, a classroom presentation, or an interactive newsletter, Sway helps you build beautiful content without the design headache. 

With its user-friendly interface, rich media support, and mobile responsiveness, Sway is an excellent choice for anyone looking to share content that looks great and tells a story. 

Ready to get started? 

Next Step: Learn how to use Sway in depth with Step-by-Step Guide to Microsoft Sway

How to Use Microsoft Sway: Complete Step-by-Step Tutorial

With the help of Microsoft Sway, a robust and intuitive digital storytelling tool, you can produce eye-catching reports, newsletters, presentations, and more. In contrast to conventional slide-based programs such as PowerPoint, Sway provides a more dynamic and fluid layout that is ideal for contemporary digital experiences.
How to use Microsoft Sway: complete step-by-step tutorial
 Note: If you are new to Microsoft Sway, I recommend checking out my Overview of Microsoft Sway first to understand its core purpose and benefits. This blog dives deeper into how to use its features step-by-step.
 
Main Interface Overview 
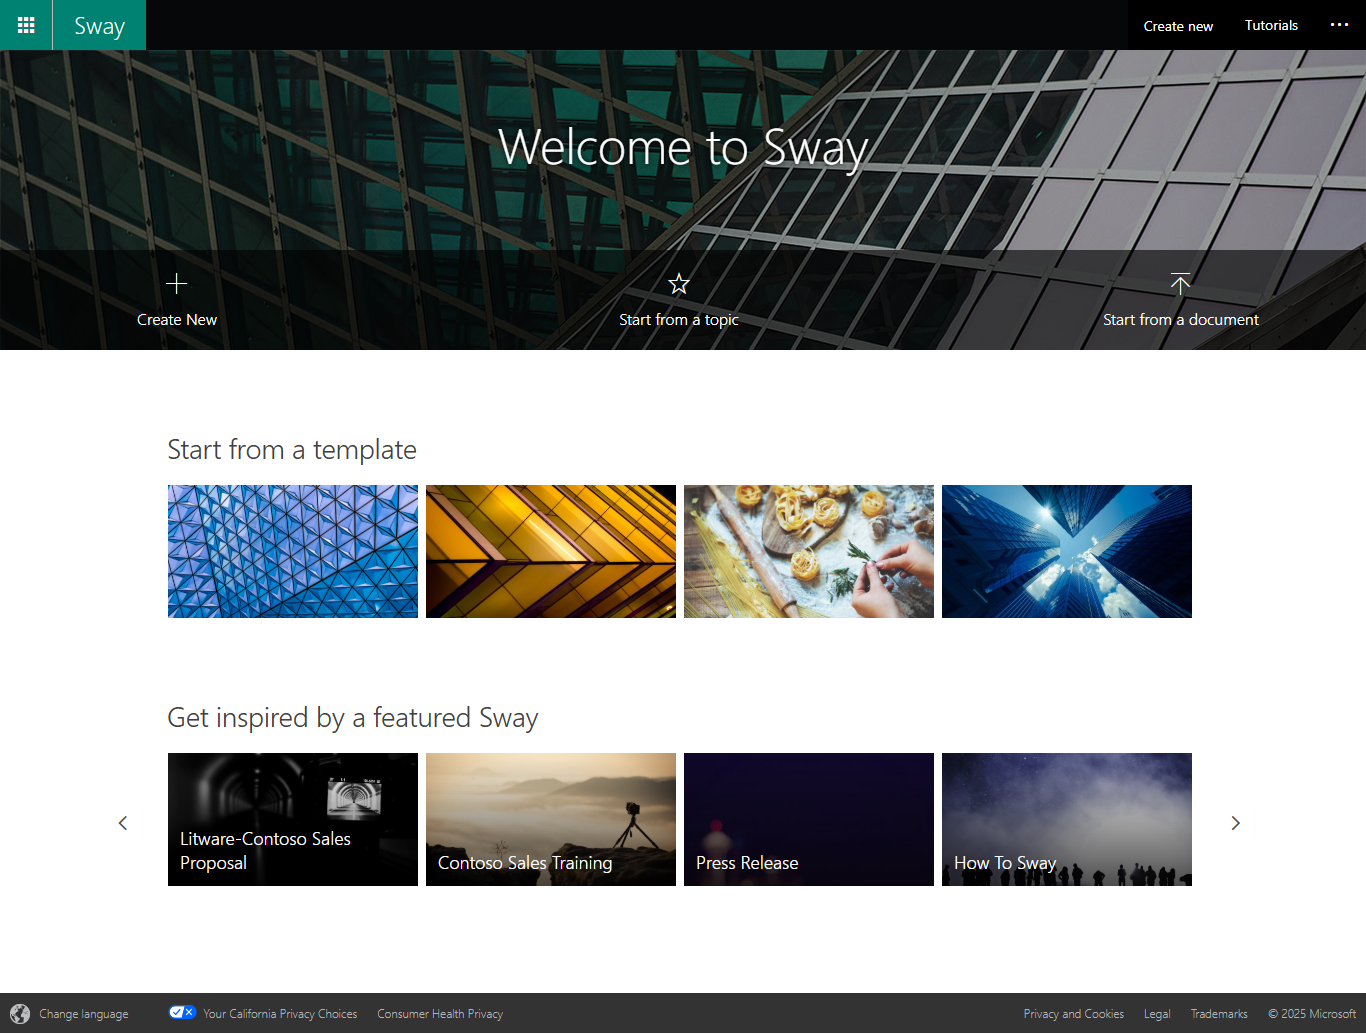
Once you open Sway, you will be welcomed by the Main Screen.  
Home screen of Sway
To start, you can select one of the options below.
➤ Create New 
Start from scratch and build your Sway step-by-step. 

➤ Tutorials 
By clicking this, you will be taken to Microsoft's official Sway learning tutorials.

➤ Start from a Topic
 
Enter any topic, and Sway will generate a layout based on information from Wikipedia, offering a head start with structure and content. 

➤ Start from a Document
 
Upload a file (e.g., a PDF), and Sway will automatically convert it into a visually appealing presentation. 

Additional Options on the Home Page 
➤ My Sways 
Displays a list of all Sways you’ve created. 
  • Edited – Shows your recently edited Sways. 
  • Viewed – Displays the most viewed presentations. 
  • Analytics – Gives basic insights into views and engagement. 
  • Deleted – Recover recently deleted Sways. 

➤ Start from a Template 
Choose from a variety of pre-defined templates to quickly build your Sway. 

➤ Get Inspired by a Featured Sway
 
Browse sample Sways created by others. Click on one, preview it, and if it fits your needs, select “Start Editing This Sway” to customize it. 

There were primarily two tabs on this screen:
  1. Storyline 
  2. Design 
Let’s break these down one by one. 

Storyline Tab

In the Storyline, you construct and arrange your Sway. Think of it as the canvas for your content. 
Storyline, When edit Template

Understanding the Storyline Layout 
The Storyline is a linear, scrollable workspace where you add "cards" — blocks of content like text, images, videos, or embedded links. 

Click the Plus (+) Button to Add Content:
 
 
Suggested 
Provides quick content suggestions based on your current section. 
Text Options: 
Text – Add content with formatting options like: 
  • Heading 1 – Create large headings for new sections.
  • Bold (Emphasize) 
  • Italic (Accent) 
  • Bullet or Numbered Lists 
  • Link 
Add text - text properties

Font Styling Tips: 
  • Gray Icon – Subtle emphasis (original font). 
  • White Icon – Moderate emphasis. 
  • Trash Icon – Deletes the card without confirmation.

Media Options: 
➤ Image 
 
Image properties- upload, search functionality

Add images from: 
  • Suggested 
  • OneDrive 
  • Bing Images 
  • Flickr 
  • Pickit 
  • YouTube 
  • Your device 
You can also: 
  • Emphasize or accent the image. 
  • Add a hyperlink to the image. 

➤ Embed 
Embedded content like videos or custom HTML. 
Add SharePoint File using Embed functionality
Example: Upload an HTML file to SharePoint, copy the embed code, and paste it into the Embed card in Sway. 

➤ Upload
 
Upload a document directly into Sway. It may take time based on the file size. 

Group Layout Options 
You can group content in various layouts: 

Automatic
 
Automatically arranges selected items (images/videos) for optimal display. 
 
Grid 
Displays content in a neat grid layout. 
Grid functionality, work on Image and text both

Comparison 
Enables you to use a slider to compare two images (PDFs are not compatible.).
Image Comparison using Sway

Stack 
The Stack option in Microsoft Sway allows you to add multiple images or text cards layered on top of each other, similar to a deck of cards. This feature is perfect for showcasing content that users can flip through one at a time, such as step-by-step instructions, comparison slides, or sequential visuals. 
Once you add content utilizing the Stack option:
  • Users can click or tap on the highlighted corner of the stack to flip through each card.
  • Each click reveals the next image or text in sequence, offering an interactive experience.
  • This format is especially useful for storytelling, tutorials, or product showcases where you want the user focus on one item at a time.
Stack for image and text both
Slideshow 
In the context of visual communication, it showcases a collection of pictures systematically arranged, resembling a traditional slideshow.
Slide show functionality

Design Tab

Customize the visual style of your Sway here. 

Useful Tools
 
Undo/Redo 
Located at the top corner. These help you revert changes instantly. 
Undo, redo, styles for presentation

Navigation Panel 
Click the small icon on the bottom-right to see an overview of your headings and navigate between sections easily. 

Click “Styles” at the Top-Right Corner 
You can choose: 
  • Vertical scrolling layout 
  • Horizontal scrolling layout 
  • Slides style (like PowerPoint) 
Slides horizontal, vertical, slides as ppt
You can also: 
  • Change background and theme colors. 
  • Click Remix! to let Sway randomly pick a style for you. 
remix to automatically update the styles

Preview Before and After Styles: 
Toggle through styles to see how they transform your presentation.
Here's how the presentation looked before applying a new theme: 
previous without applying style presentation

This is how it appears after changing the theme using the Styles panel:
 
Presentation: After applying style
Export and Share:
Once your design and content are ready, it's time to share it or export it for other uses. Click the Play button to preview your final creation as it will appear to viewers.

When you were ready to share or export your work:
  • Duplicate this Sway: Make a copy of your existing Sway.
  • Save as Template: Turn your current Sway into a reusable template.
  • Print: Choose Print to get a printable version of your Sway in a clean, reader-friendly format.
  • Export as PDF: A static, shareable version for distribution to get better idea.
  • Export as Word Document: Great for additional editing or documentation needs.

Conclusion 
  • Microsoft Sway is an intuitive tool for building dynamic, web-based presentations without needing advanced design skills. With features like automated layouts, embedded support, templates, and easy customization, it's perfect for both professionals and beginners. 
  • Whether you're creating a company newsletter, project report, or classroom presentation, Sway makes storytelling simple and beautiful. 
 
Need a quick recap or want to share Sway with someone new? Read this introductory post: Microsoft Sway – An Overview 

October 15, 2024

How to Set Up SharePoint Brand Center: A Step-by-Step Guide

The SharePoint Brand Center is a centralized application designed for managing branding elements such as logos, colors, and fonts, making it easier for organizations to maintain consistent branding. It utilizes the SharePoint Organization Asset Library (OAL) for backend storage and management of these assets. The Brand Center app can be found on a specific site within your tenant.

Important Considerations Before Activating the Brand Center:
  • One Brand Center per Organization: SharePoint currently allows only one Brand Center for each tenant. All branding assets and font management will be centralized in one location. 
  • Global Administrator Setup: Global Administrator privileges are necessary to activate the Brand Center, ensuring appropriate configuration and management of the organization's brand identity.

How to Set Up a SharePoint Brand Center 

Global admins can activate the SharePoint brand center app from the Microsoft 365 admin center by following these steps:

1. Go to the Microsoft 365 Admin Center: Sign in to your admin account and navigate to the admin center.

2. Navigate to Settings: From the left-hand navigation, go to Settings → Org settings.

3. Select Brand Center (Preview): In the "Services" section, choose Brand Center (preview).

4. Create a Site: Enter the desired site name and address. Alternatively, use the suggested name "Brand Guide" and activate the public CDN by providing your consent. This creates your centralized Brand Center.

5. Finalize Setup: Click Create site. Once complete, links to the Brand Center site and app will be generated. Copy the necessary link and sign in to access the app.

On the next page, you will find links generated for the brand center site and app. Simply copy the link you need and sign in with your credentials to access it.

Access your Brand Center via the following URL format:


Adding Custom Fonts to the SharePoint Brand Center

Now that your Brand Center is set up, follow these steps to add custom fonts:

1. Go to the Brand Center Site: Navigate to the site associated with your Brand Center in SharePoint Online. You will find it listed under your SharePoint Online sites.

2. Open the Brand Center App: Click on Settings and select Brand Center (preview). Once inside the app, click Add Fonts.

3. Upload Custom Fonts: Click the Upload button to upload your custom fonts. Ensure your font files are in one of the supported formats:
  • True Type fonts (.ttf)
  • Open Type fonts (.otf)
  • Web Open Format Font (.woff)
  • Web Open Format Font (.woff2)

4. To apply your chosen brand assets to SharePoint, click on SharePoint: Navigate to the Brand Center (preview), then click on SharePoint to apply the selected branding assets across your sites.

5. Choose your font in the Display font and Content font sections: Select the appropriate fonts for your site's display and content areas to ensure a consistent look across your SharePoint site.

6. Assign Fonts for Site Elements: Specify the fonts for titles, headings, body text, and interactive elements (e.g., buttons).

7. Name and Save the Font Package: Give your font package a unique name, save the configuration, and switch the Visible toggle to "Yes" to make it available on the Change the look page.


User Experience

Now that we have discussed how admins can add new fonts to the Brand Center app, let's look at how users can maximize the use of these new fonts. To do this, navigate to a SharePoint site →  click on the gear icon →  select Change the look.

Select the name of the font package you just uploaded from the list, then click Save.

Old SharePoint View:

New SharePoint View:

Fonts are now distributed across the site. Similarly, you can personalize your site's appearance by selecting the newly added fonts via the brand center.

The SharePoint Brand Center not only centralizes branding management but also introduces the long-awaited support for custom fonts, ensuring a consistent and unique look across all your SharePoint sites. By utilizing the Brand Center, you can enhance your brand identity, improve recognition, and provide a cohesive user experience throughout your digital workspace.

If you have any questions you can reach out our SharePoint Consulting team here.