Showing posts with label Microsoft SharePoint. Show all posts

March 21, 2025

SharePoint Site Provisioning: A Guide to Site Scripts & Site Designs with PowerShell

Introduction: Site Scripts and Site Designs

Automating site provisioning in contemporary SharePoint Online environments is essential for ensuring consistency, upholding governance, and enhancing collaboration within an organization. Site Scripts and Site Designs are key tools that facilitate this process, helping to standardize site creation and maintain organizational standards.


What is Site Design?

Site Design is a predefined set of actions that allows users to create new sites with a Modern UI in SharePoint Online (Office 365). It helps SharePoint consultants enhance consistency across multiple site collections within the same tenant. For example, with SharePoint Site Design, users can create new lists and libraries, define the site and list columns, establish content types, set themes, and choose a site logo, among other features.

Site Design is often associated with templates, but it is important to understand that it is not the same as a traditional template tied to a specific site. Many users mistakenly believe that changes made in Site Design will automatically apply to their existing sites. However, this is not how SharePoint Site Design functions. To implement the modifications from Site Design on existing sites, you must actively apply the Site Design to those sites.

SharePoint consultants have the option to choose Site Design when creating a new site through the user interface. Additionally, Site Designs can be applied to existing sites using various methods such as REST, CSOM, or PowerShell scripts. Essentially, Site Designs consist of a collection of scripts that operate in the background during the selection of a design for the creation of a new site. This functionality streamlines the process of site setup and ensures consistency across different SharePoint sites.

What are Site Scripts?

Site Scripts are JSON files that outline a specific sequence of actions to be executed when a Site Design is applied to an existing site or when a new site is created. These scripts can be run multiple times on the same site. They have a non-destructive nature, meaning they will only add missing elements to SharePoint sites.

As of now, you can add the below actions to your Site Script:
  1. Create a new list or library (or alter the default one created with the site).
  2. Create the site columns, and content types, and configure other list settings.
  3. Set site branding properties such as navigation layout, header layout, and header background.
  4. Apply a theme and also Set a site logo.
  5. Triggering a Microsoft Flow.
  6. Include principals (users and groups) in SharePoint roles.

NOTE: For constructing a JSON schema and its valid verbs, you can check the following resources.

Why Use Site Scripts and Site Designs?

  1. Standardization & Consistency
    • Ensures all sites follow the same structure, branding, and compliance requirements.
    • Reduces manual errors by applying predefined settings.
  2. Automation & Efficiency
    • Eliminates repetitive tasks such as manually creating lists, libraries, columns, or permissions.
    • Reduces setup time for new SharePoint sites.
  3. Customization without Custom Code
    • Site Scripts enable customization using JSON, eliminating the need for complex development efforts.
    • It can be enhanced using PnP PowerShellPower Automate, and various other SharePoint automation tools.
  4. Easy Updates & Scalability
    • Site Designs can be updated centrally and re-applied to existing sites.
    • Ideal for large organizations managing multiple SharePoint sites.

Creating a New Site Design and Site Script

Let us develop a new site script and design to enhance our understanding and generate additional ideas regarding the site script and design.

Create a JSON file named "Site-Script.json" and include the following code within it. The code defines five actions: 
  1. The first two actions create site columns.
  2. The third action creates a new content type in the site, named "User," and adds the two previously created site columns to this content type.
  3. The fourth action creates a new list in the SharePoint site, named "User Information," utilizing the newly created content type.
  4. The fifth action creates a new document library in the SharePoint site, named "User Documents", utilizing the created content type.

{
  "$schema": "https://developer.microsoft.com/json-schemas/sp/site-design.json#",
  "actions": [
    {
      "verb": "createSiteColumn", //verb to create SiteColumn
      "fieldType": "Text", //column type you want to create
      "displayName": "First Name", //Column Display Name
      "internalName": "FirstName",//Column Internal Name
      "isRequired": false, 
      "id": "2d738560-6a73-4d1b-854e-8b195f9021eb", //Unique gui-id for your site column you can genrate it manuualy.
      "group": "Test Site Columns" //give group name to identify
    },
    {
      "verb": "createSiteColumn",
      "fieldType": "DateTime",
      "displayName": "Date of Birthday",
      "internalName": "DateOfBirthday",
      "isRequired": false,
      "id": "da840479-d27e-490d-8624-cd1144ee07cc",
      "group": "Test Site Columns"
    },
    {
      "verb": "createContentType", //verb to create content type in site
      "name": "User", //ContentType Name
      "id": "0x0101009D1CB255DA76424F860D91F20E6C411800B609FEFDEFAA484299C6DE254182E666", //Unique content typeID
      "description": "User content type containing personal information",
      "parentId": "0x0101009D1CB255DA76424F860D91F20E6C4118", //Parent content type id
      "hidden": false,
      "subactions": [
        // you can add your site columns as many as you can..
        {
          "verb": "addSiteColumn",
          "internalName": "FirstName"
        },
        {
          "verb": "addSiteColumn",
          "internalName": "DateOfBirthday"
        }
      ]
    },
    {
      "verb": "createList", //Verb for Create a List
      "listType": "GenericList", //List type you want to create Ex:GenericList(CustomList),Document Library,Task List etc...
      "title": "User Information", //Title of your list
      "description": "List to store user personal information.", //Desciption of your list
      "templateType": 100, //Gave templtype for custom list it's 100, for document library it's 101
      "contentTypesEnabled": true, 
      "subactions": [
        {
          "verb": "addContentType",
          "name": "User"
        }
      ]
    },
    {
      //Creates a new Document Library
      "verb": "createList",
      "listType": "DocumentLibrary", //List type Document Library 
      "title": "User Documents", 
      "description": "Library for storing user-related documents.",
      "templateType": 101,
      "contentTypesEnabled": true,
      "subactions": [
        {
          "verb": "addContentType",
          "name": "User"
        }
      ]
    }
  ],
  "version": 1
}
If you want to create a list directly with its columns, you need to add the below JSON schema structure in the site script to accomplish this.

{
  "verb": "createList",
  "listType": "GenericList",
  "title": "User Information",
  "description": "List to store user personal information.",
  "templateType": 100,
  "subactions": [
    {
      "verb": "addField",
      "fieldType": "Text",
      "displayName": "First Name",
      "internalName": "FirstName",
      "isRequired": false
    },
    {
      "verb": "addField",
      "fieldType": "DateTime",
      "displayName": "Date of Birthday",
      "internalName": "DateOfBirthday",
      "isRequired": false
    }
  ]
}

How we can add Taxonomy Fields (Managed Metadata Fields) as Site Columns in Site-Script

In SharePoint, taxonomy fields, also known as managed metadata fields, are used to connect content types and lists with the Term Store. When creating site scripts, you can incorporate taxonomy fields as site columns and attach them to content types. Below is an example of how to construct the JSON schema to create a taxonomy field as a site column and add it to a content type using SharePoint site scripts.

First, you need to create a hidden site column associated with your actual taxonomy field. This column is already created with your managed property when you registered your managed property in the term store. Enter the below JSON schema to add the site column and change the value as per your managed property.

These fields are essential for backend processing, calculations, or metadata purposes but should remain hidden from end-users, especially when utilized for taxonomy management.

{
  "verb": "createSiteColumnXml",
  "schemaXml": "<Field ID=\"{"Unique Field GUID of your Managed Property"}\" Type=\"Note\" Name=\"DegreeTaxnomyField\" StaticName=\"DegreeTaxnomyField\" Group=\"Test Site Columns\" DisplayName=\"DegreeTaxnomyField\" ShowInViewForms=\"FALSE\" Required=\"FALSE\" Hidden=\"TRUE\" CanToggleHidden=\"TRUE\" />"
}
NOTE: Ensure that the Hidden attribute is set to true, and the Field ID matches exactly as it was created in the term store.

As mentioned before, these fields are hidden from the end-user and cannot be seen in the term store anywhere. To find the term's unique field ID, you can acquire it using the below PnP commands.

$adminSite = "https://<<Your-TenantName>>-admin.sharepoint.com"

Connect-PnPOnline -Url $adminSite -UseWebLogin

$TermField = Get-PnPField -Identity "<<Your Term-Name>>"
$fieldID = $TermField.TextField

write-Host "Field Id: $fieldID"
These commands return the Term's Field ID like: "Field Id: 6b9b1fd5-474c-4f08-820c-f1fc4352c1ba"

Now we create the Taxonomy Field Site Column, which we can add as site columns in our content type or anywhere else we choose to use it.
  • To create a taxonomy field as a site column in a site script, you need to define the field’s properties such as the Term Store, Term Set, and whether the field allows multiple selections.
  • Below is an example of creating a TaxonomyFieldType (managed metadata field) as a site column:
{
    "$schema": "https://developer.microsoft.com/json-schemas/sp/site-design.json#",
    "actions": [
        {
            "verb": "createSiteColumnXml",
            "schemaXml": "<Field ID=\"{Random unique Field-ID}\" Type=\"TaxonomyFieldType\" Name=\"Degree\" SourceID=\"http://schemas.microsoft.com/sharepoint/v3\" StaticName=\"Degree\" DisplayName=\"Degree\" Group=\"Test Site Columns\" ShowField=\"Term1033\" Required=\"FALSE\" EnforceUniqueValues=\"FALSE\" Mult=\"TRUE\"> \
      <Default></Default> \
      <Customization> \
          <ArrayOfProperty> \
              <Property> \
                  <Name>SspId</Name> \
                  <Value><<Your TaxonomyStoreSSPID>></Value> \
              </Property> \
              <Property> \
                  <Name>GroupId</Name> \
                  <Value><<Your TermStoreGroupID>></Value> \
              </Property> \
              <Property> \
                  <Name>TermSetId</Name> \
                  <Value><<DegreeTermSetID>></Value> \
              </Property> \
              <Property> \
                  <Name>TextField</Name> \
                  <Value>{<<Your Taxonomy Field ID>>  // same as per the Your Hidden column's FieldID
            }</Value>      
              </Property> \
              <Property> \
                  <Name>AnchorId</Name> \
                  <Value>00000000-0000-0000-0000-000000000000</Value> \
              </Property> \
              <Property> \
                  <Name>IsPathRendered</Name> \
                  <Value>false</Value> \
              </Property> \
              <Property> \
                  <Name>IsKeyword</Name> \
                  <Value>false</Value> \
              </Property> \
              <Property> \
                  <Name>Open</Name> \
                  <Value>false</Value> \
              </Property> \
          </ArrayOfProperty> \
      </Customization> \
  </Field>"
        }
    ]
}
Explanation of the JSON Schema:
  • Type: TaxonomyFieldType – Defines that this field will be used as a managed metadata field.
  • SourceID: Points to the SharePoint schema.
  • ShowField: Defines the language to be used to show the term (e.g., Term1033 for English).
  • Required: If the field is mandatory (FALSE means optional).
  • Mult: Allows multiple terms to be selected from the Term Set (TRUE).
  • Customization: Contains additional configuration for the taxonomy field, such as:
  • SspId: The ID for the taxonomy store.
  • GroupId: The ID of the Term Set group.
  • TermSetId: The ID of the Term Set from the Term Store.
  • TextField: The GUID of the field that will render the term text.
  • IsPathRendered: Whether to show the term path (hierarchy).
  • AnchorId: A default value (usually 00000000-0000-0000-0000-000000000000 for root terms).
  • IsKeyword: Defines whether the term is a keyword.
  • Open: Specifies whether the term set is open.
This is how we can create our site script with desired Content Types, Ste Columns, Predefined List Configurations, Document Libraries, and much more.

Now, we'll deploy our JSON Schema as a site script for our SharePoint tenant. Please refer to the PnP commands below for more information.

$adminSite = "https://<<Your-TenantName>>-admin.sharepoint.com" #Your Sharepoint admin site URL
$siteScriptFile ="c:\scripts\site-script.json" #File path of JSON file.

Connect-PnPOnline -Url $adminSite -UseWebLogin

$content = [IO.File]::ReadAllText($siteScriptFile)

$SPSiteScript = Add-PnPSiteScript -Content $content -Title "Test Site-Script"

$SiteScriptId = $SPSiteScript.Id

Write-Host "Site-Script ID: $SiteScriptId"
NOTE: Please save the Script ID that we used to create the Site Design.

Now, We create a new site design from the newly created site script. Please refer to the PnP commands below to create the site design.

$adminSite = "https://<<Your-TenantName>>-admin.sharepoint.com" #Your Sharepoint admin site URL

Connect-PnPOnline -Url $adminSite -UseWebLogin

$SiteDesignDetails = Add-PnPSiteDesign -Title $SiteDesignTitle -SiteScriptIds $SPSiteScript.Id -Description $SiteDesignTitle -WebTemplate TeamSite

Write-Host "Site Design is deployed successfully the GUID is:$($SiteDesignDetails.Id)"
NOTE: Please save the Site Design ID that we can use anywhere else.

After creating the site design, we can apply it to any site within our tenant. To do this, we need to run the following command.

$adminSite = "https://<<Your-TenantName>>-admin.sharepoint.com" #Your Sharepoint admin site URL

Connect-PnPOnline -Url $adminSite -UseWebLogin

# Run this Command If Your Site-Script has 30 Or less than 30 Actions
Invoke-PnPSiteDesign -Identity "<<Site-DesigneeID>>" -WebUrl "<<Site url>>"

# Run this Command If Your Site-Script has More than 30 actions
Add-PnPSiteDesignTask -SiteDesignId "<<Site-DesigneeID>>" -WebUrl "<<Site url>>"
NOTE: Execute the command based on the number of actions defined in your site script.

Summary 

This blog post discusses how Site Scripts and Site Designs in SharePoint Online simplify the site provisioning process by automating the creation of lists, libraries, content types, and branding. These tools help maintain consistency and governance across sites. 


Site Designs specify the configurations for a site, while Site Scripts—created using JSON—execute specific actions. These actions can include adding site columns, applying themes, and integrating Power Automate. By using these tools, organizations can reduce manual effort, enforce standardization, and achieve customization without the need for complex coding.


If you have any questions you can reach out our SharePoint Consulting team here.

July 31, 2024

Migrating Permissions across SharePoint sites using ShareGate

In SharePoint, permissions are crucial for ensuring appropriate access to resources within SharePoint sites. There may be instances where you need to replicate the permissions of one site to another. To achieve this, a method for copying or migrating SharePoint site permissions from one site to another is necessary.


In this article, we will provide a step-by-step guide on how to copy or migrate SharePoint site permissions from one site to another.


For Migrating the Permission we will be using the ShareGate Migration Tool, Its a migration tool that simplifies and accelerates migration processes directly to the latest SharePoint or Microsoft 365.

Prerequisites:

  • ShareGate licence

  • ShareGate Migration Tool Installed

  • The user performing this action must be a Site Collection Administrator

  • PowerShell version 3.0 or higher (Note: This will not work with version 7.0)


Migrating permissions across sites involves not only assigning users to their respective groups but also migrating the Permission Roles, SharePoint Groups, and their associated Users.

We will be migrating the Permissions using two methods.

Method 1 Using ShareGate Migration tool:

The ShareGate migration tool offers user-friendly features that simplify any migration task. When migrating permissions, you can select the source site and destination site, ensure proper mapping, and migrate the permissions with just a click. Follow the steps below to migrate permissions using the migration tool.


Step 1: Open the ShareGate Migration Tool. In the left section, click on "Copy" and then select "Copy Structure and Content."


Step 2: Enter the source site URL, select "Browser for Authentication," and log in with your credentials.


Step 3: Similarly, log in to the destination site by entering the destination URL and selecting "Browser" as the authentication type. Once logged in to both the source and destination sites, you will see the following interface.


Step 4: First, migrate the Permission Levels, and then migrate the SharePoint Groups from the source site to the destination site.


Select the Permission Levels, choose the specific Permission Levels you want to migrate, and then click "Start Copy."


With this, the permission roles will be copied to the destination site. Next, we can proceed to migrate the SharePoint Groups across the sites.


Open the SharePoint Groups from the Site Objects.


Step 5: Now, select all the groups that you want to migrate to the destination site.


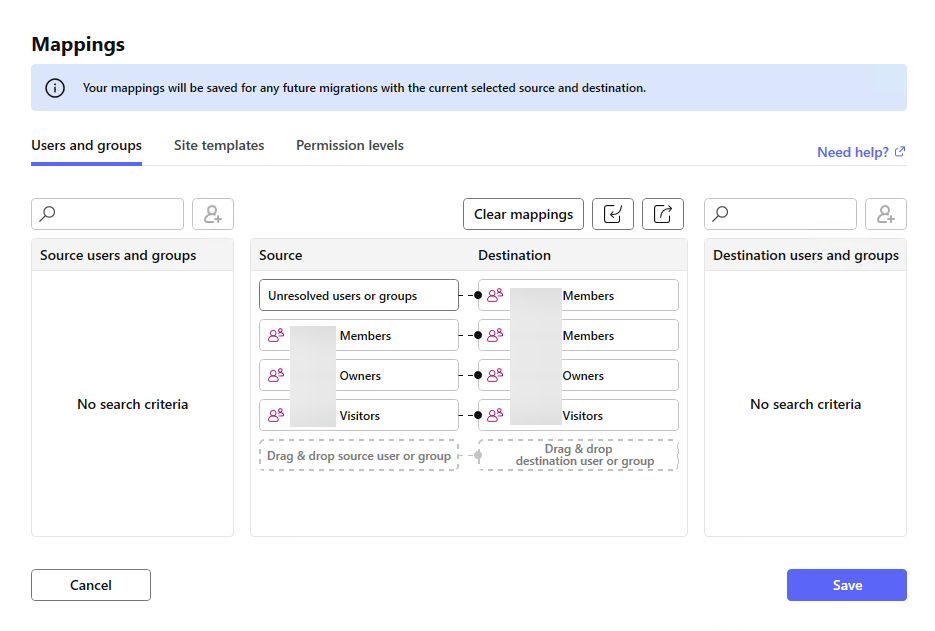
Make sure that Mapping is set for the default Groups of SharePoint like Members, Owners and Visitors under mappings as shown below.


ShareGate Mapping provides a way to map the source object with destination and set the content accordingly in the destination as per the mapping.


Now, click "Start Copy" to begin copying the SharePoint groups along with their members.


After the copying task is completed, you will see that the groups have been migrated. You can also verify the members of each group by checking the respective site.

Method 2: Using ShareGate & PnP PowerShell

PowerShell is a robust command-line tool that can automate numerous tasks in Microsoft 365. For copying SharePoint site permissions from one site to another, we will use ShareGate PowerShell. Execute the following PowerShell script to copy the SharePoint site permissions.


Note: Please ensure that you have the Sharegate module imported before running this script. Additionally, ensure that PnP.PowerShell version 1.12 is installed (ShareGate Migration tool must be installed on your system).


To import the Sharegate module, use the following command:


Import-Module Sharegate

To install PnP.PowerShell version 1.12, use:

Install-Module PnP.PowerShell -RequiredVersion 1.12 -Force

  • Execute the script provided below.

  • Enter your login credentials when prompted to access the site.

  • The script will then continue its execution.


#Config Parameters
$SourceSite = "<<Source Site>>"
$DestinationSite = "<<Destination Site>>"


#Function to Copy-Migrate the SharePoint Site Level Permission from one site to another
Function Copy-MigrateSiteLevelPermission {
    param (
        $DestinationSite,
        $SourceSite
    )
   
    Write-Host "Establishing the connection between source site and destination site..."
    $Source = Connect-Site -Url $SourceSite -Browser
    $Destination = Connect-Site -Url $DestinationSite -UseCredentialsFrom $Source
   
    Write-Host "Setting up the Mappings for the Default SharePoint Groups..."
    $mappingSettings = New-MappingSettings
    $mappingSettings = Set-UserAndGroupMapping -Source "Destination Site Members" -Destination "Source Members"
    $mappingSettings = Set-UserAndGroupMapping -MappingSettings $mappingSettings -Source "Destination Site  Owners" -Destination "Source Owners"
$mappingSettings = Set-UserAndGroupMapping -MappingSettings $mappingSettings -Source "Destination Site Visitors" -Destination "Source Visitors"
Write-Host "Copying the Permission from one site to another..." Copy-ObjectPermissions -Source $Source -Destination $Destination -MappingSettings $mappingSettings Write-Host "Permission Copied Successfully from one site to another..." -f Green } #Function to Copy the Permission Level from one site to another Function Copy-PermissionLevel { param ( $DestinationSite, $SourceSite ) Write-Host "Connecting with Source and Destination Site..." $SourceSiteConnection = Connect-PnPOnline -Url $SourceSite -UseWebLogin -ReturnConnection $DestinationSiteConnection = Connect-PnPOnline -Url $DestinationSite -UseWebLogin -ReturnConnection Write-Message "Starting the Migration Process for Permission Levels..." Write-Message "Reading all the Permission Level From source site..." $AllPermissionLevel = Get-PnPRoleDefinition -Connection $SourceSiteConnection foreach ($permissionLevel in $AllPermissionLevel) { $permissionLevelName = $permissionLevel.Name Write-Host "Migration: $permissionLevelName" Write-Host "Checking permission level $permissionLevelName..." if (!(Get-PnPRoleDefinition -Identity $permissionLevelName -ErrorAction SilentlyContinue -Connection $DestinationSiteConnection)) { Write-Host "Creating new permission level $permissionLevelName..." if ($permissionLevel.PermissionLevels) { Add-PnPRoleDefinition -RoleName $permissionLevelName -PermissionLevels $permissionLevel.PermissionLevels -Description $permissionLevel.Description -Connection $DestinationSiteConnection } else { Add-PnPRoleDefinition -RoleName $permissionLevelName -Clone $permissionLevel -Description $permissionLevel.Description -Connection $DestinationSiteConnection } } } Write-SuccessMessage "Permission Level Migration Completed successfully..." } #Execute the Function to Copy the Permission Level Copy-PermissionLevel -DestinationSite $DestinationSite -SourceSite $SourceSite #Execute the Function with Parameter to Copy the Groups and other Permissions Copy-MigrateSiteLevelPermission -DestinationSite $DestinationSite -SourceSite $SourceSite

Upon successful execution of the script, you will observe that permission roles within SharePoint Groups have been copied from one site to another. This demonstrates how ShareGate PowerShell and the ShareGate Migration tool facilitate the migration of SharePoint site permissions between sites.

If you have any questions you can reach out our SharePoint Consulting team here.

August 3, 2023

To create terms dynamically in a TermSet and set them in a Managed Metadata column using Power Automate

Introduction: 

In this blog post, we will learn how to dynamically create Terms in a TermSet of a Termstore and set them in a managed metadata column using Microsoft Power Automate.

Requirement:

To obtain information about Skills and Past Projects from the Office 365 user profile and add it to a SharePoint list, we will enable Out-of-the-Box (OOTB) filtering and sorting operations on these fields.
We can use Single line of text OR Multiline of text site column and store information with delimiters, but limitation was, can’t perform OOTB filtering and sorting operation.

To overcome this issue, we are going to use a Managed Metadata site column to store the terms values dynamically. This approach will allow us to perform Out-of-the-Box (OOTB) filtering and sorting operations on the information, providing a more effective solution compared to using Single line of text or Multiline of text site columns with delimiters.

Approach:

Create “Managed Metadata field” with “Allow multiple values” checkbox enabled and “Customize your term set” option selected as shown in below screenshot.


Below are the steps in Power Automate to dynamically create Terms in a TermSet of a Termstore and then create an item in a SharePoint list with those terms in a Managed Metadata field.

Step 1: Add an action “Initialize Variable”, Name it as “Initialize variable Skills” as shown in below screenshot. This will be used to store JSON for use in SharePoint list Item creation.


Step 2: Add “Get user profile (V2)” action with user principal name or Email ID in “User (UPN)” as shown below.


Step 3: Append value to “Skills” variable as shown in below screenshot.


 Step 4: Add below set of actions to process each element in “Skills” array (which we retrieved in Step-2).


Step 5: Then we need to add an action called “Send an HTTP request to SharePoint” to retrieve terms from TermSet.

Uri - _api/v2.1/termStore/groups/97ac8ae5-1608-4047-8951-585b3a2640c5/sets/e0af947c-6cef-4766-8c79-9c454cc5a323/children.

In Uri, “97ac8ae5-1608-4047-8951-585b3a2640c5” is Termstore ID and “e0af947c-6cef-4766-8c79-9c454cc5a323” is TermSet ID in which we need to store or create terms.


Step 6: To compare the current item in the loop with the term name, we need to filter the values retrieved in Step-5 to check if they are "equal to" the term name.

string (item ()? ['labels'][0] ['name']) expression is used in comparison as shown in below screenshot.


Step 7: Add the following set of actions to form JSON or create JSON data for the "Skills" variable. The condition, as shown in the below screenshot, checks whether the term is present in the "Skills" TermSet or not, using the expression length(body('Filter_skills_array')). If the term is not present, we are adding a POST call to create a new term and then appending the values to the "Skills" variable. On the other hand, if the term is already present, we simply append the values to the "Skills" variable.


Step 8: If the condition is "Yes," indicating that the term is present in the "Skills" TermSet of the Termstore, then we simply append the values to the "Skills" variable.

Note: Value will be appended in JSON format as - 
{
“value”: “Sharepoint|3198df72-311b-4757-9246-052296af2”
}

Where, the expression in below screenshot consists of “{current term name in loop}|body('Filter_skills_array')[0]['id']”


Step 9: If the condition is "No," meaning that the term is not present in the "Skills" TermSet of the Termstore, in such a case, we need to create the term using a POST call with the action called "Send an HTTP request to SharePoint," as shown in the below screenshot.

Uri - _api/v2.1/termStore/groups/97ac8ae5-1608-4047-8951-585b3a2640c5/sets/e0af947c-6cef-4766-8c79-9c454cc5a323/children.

In Uri, “97ac8ae5-1608-4047-8951-585b3a2640c5” is Termstore ID and “e0af947c-6cef-4766-8c79-9c454cc5a323” is TermSet ID in which we need to store or create terms.


Step 10: Add “Compose” action to fetch and store term ID from Step-9, as shown below.


Step 11: After that, append the JSON value, as shown in the below screenshot, with the term name and ID from the "Step-10" compose action.


Step 12: Add the below action after completing the Condition and loop actions to append the closing of JSON in the "Skills" variable.


Step 13: Add the below action to parse the JSON, enabling us to create and store the data in a SharePoint list item.

Schema: {
    "type": "array",
    "items": {
        "type": "object",
        "properties": {
            "Value": {
                "type": "string"
            }
        },
        "required": [
            "Value"
        ]
    }
}


Step 14: Use Step-13 parsed JSON in “Create Item” action as shown in below screenshot.


Finally, we can see that terms have been added to the "Skills" TermSet using Power Automate flow.


Also, terms have been added to the "Skills" Managed Metadata field in the SharePoint list as well.


Additionally, we can view the "Skills" managed metadata field from the list settings, where we have dynamically appended terms using Power Automate


If you have any questions you can reach out our SharePoint Consulting team here.

December 16, 2021

[Issue Resolved]: "You must specify a value for this required field" error while updating a Multi Valued Managed Metadata column value in Power Automate


Introduction

Recently, we implemented an OOTB Document Approval process using Power Automate for a Postal and Parcel company based out of Melbourne, Victoria, Australia. The approval process was built using the "Start and wait for an Approval" action of Power Automate and based on the approver's response the Power Automate was updating the status and other metadata fields of the Document in the SharePoint Library.  So, here we encountered an issue while updating a multi-valued managed metadata column to the SharePoint Library and we resolved it by providing a valid expression value which we will explain in further process.


In this blog, we will learn about the "You must specify a value for a required field" issue and its solution that will help us to store its value in the document library.  

Issue

      • In Power Automate, we used an update item SharePoint action for a multi-valued managed metadata column. 
      • When we use the value of the trigger field it was not binding the value accordingly and the Update item action returns the error You must specify a value for this required field” message with 400 status code as shown below. 

      • We tried with the trigger values of the Category managed property but it was giving as invalid as shown below. 


      • We tried with other metadata properties also like the Category value but it was creating an Apply to each loop because it is a multi-value field and this loop updates the item multiple times with different category field values which was not the correct behavior. 

      Solution

        • When we use update item action, we have to provide all the required field values. 
        • If we do not provide a proper value, then update item action would return this type of error. 
        • As this column was a multi-valued managed metadata column, we have to create an array variable and store all the values in the array with a specific format for storing the value in a correct format to the library. 
        • First, we will create an array variable as shown below. 

        • Now we will store all the managed metadata values in the array inside the Append to array variable action. For that we will pass the expression value in format {item('Apply_to_each_3')?['Value']} as shown below. 


        • We will use the array in the Update item action as shown below.


        Hence, a multi-valued managed metadata column Category values will be stored in the library with the proper format.

        Conclusion

        This is how we can resolve the error with managed metadata multi-valued field in Power Automate. Hope this helps, good day! 

        If you have any questions you can reach out our SharePoint Consulting team here.