Showing posts with label ChatGPT. Show all posts

August 28, 2025

The Developer Toolkit: Essential Custom GPTs for Productivity

Custom GPTs Every Developer Should Try

With so many GPTs available, finding the ones that actually make a difference in your workflow can be a game-changer. Whether you're into architecture planning, coding, SQL optimization, or UI design, there’s something out there to make your life easier.

Header image for: My Favorite Custom GPTs Every Developer Should Try

Here are a few of my personal favorites that I keep going back to. They’ve genuinely saved my time and boosted productivity.

1. Software Architecture GPT

This is like having a senior architect in your pocket. It guides you through creating a complete software architecture document by asking the right questions and following industry best practices.

Screenshot of the Software Architecture GPT card

The best part? It uses the MoSCoW prioritization technique (Must Have, Should Have, Could Have, Won’t Have), which helps you focus on what's essential and avoid feature overload.

Try Software Architect GPT →

2. Code Copilot

Think of this GPT as your coding buddy who never sleeps. Whether you're stuck, looking to optimize a block of code, or want auto-complete magic, this tool’s got your back. It’s fast, smart, and feels like working alongside a 10x developer.

Screenshot of the Code Copilot GPT card

Try Code Copilot →

3. SQL Expert

SQL queries getting messy? Performance taking a hit? This GPT helps you write and optimize SQL queries effortlessly. From query structure to index suggestions, it makes database work a whole lot smoother.

Screenshot of the SQL Expert GPT card

Try SQL Expert →

4. Screenshot to Code GPT

UI/UX folks, you’ll love this. You can upload a screenshot of a website, or even a rough UI sketch from your notebook, and this GPT turns it into clean HTML, Tailwind CSS, and JavaScript. Great for prototyping or getting started quickly with frontend development.

Screenshot of the Screenshot to Code GPT interface

Try Screenshot to Code GPT →

Final Thoughts

These custom GPTs aren’t just cool—they’re genuinely helpful. Whether you’re planning architecture, writing code, or designing interfaces, these tools can seriously level up your workflow.

If you’ve got other cool GPTs that you’ve used, feel free to drop them in the comments. Always happy to explore more!

September 1, 2023

ChatGPT Code Interpreter: Revolutionizing How We Write and Understand Code

In the digital age, the intersection of Artificial Intelligence (AI) and coding has given rise to powerful tools that transform the way we approach programming. Among these, the ChatGPT Code Interpreter stands out as a remarkable innovation. If you've ever wondered, "Is there a way for AI to help me understand or write code?", or "How can I simplify the coding process with the help of AI?", you're in the right place.

Dive into the world of ChatGPT Code Interpreter and discover how it's making waves in the programming landscape.

Discover the power of AI in coding with the ChatGPT Code Interpreter. Whether you're a seasoned developer or just starting, see how AI can revolutionize your coding experience.

What is AI?

Artificial Intelligence, commonly referred to as AI is a branch of computer science that aims to create machines that can perform tasks that typically require human intelligence. These tasks include problem-solving, understanding natural language, recognizing patterns, and making decisions. With advancements in machine learning and neural networks, AI systems like ChatGPT are now capable of mimicking human thought processes to an unprecedented degree.

Why Use the ChatGPT Code Interpreter?

  1. Efficiency: No more endless hours of debugging. The Code Interpreter can assist in identifying and suggesting fixes for your coding challenges.
  2. Learning: Whether you're a beginner trying to understand a complex code snippet or an expert seeking to optimize your code, ChatGPT offers insights and explanations tailored to your needs.
  3. Collaboration: Sharing code with peers? ChatGPT can act as a mediator, interpreting and explaining code segments for better team understanding.
  4. Versatility: From Python to JavaScript, the Code Interpreter is designed to understand and assist with a wide range of programming languages.

The most recent Code Interpreter ChatGPT model has new functionalities that prior AI models lacked. OpenAI has done an excellent job of allowing you to run Python inside of ChatGPT to perform interactive tasks. This blog serves as a reference for Code Interpreters.

According to OpenAI's website, the code interpreter is a new experimental model of ChatGPT as a completely new model. In this blog, I'll describe and demonstrate how it allows you to upload files and run code in a Python Sandbox. People are already utilizing it to create games in minutes, map the population density of the country by ZIP code, and even create pretty good diagrams for statistics and information based on Excel spreadsheets.

It can now do a few more things, such as use Python, upload files, and download files. 

So, how does this new model run code? 

Python exists in a sandbox, allowing it to be firewalled and then executed inside of a temporary region. This means that this version of ChatGPT can do Maths, which was one of the most significant restrictions of prior versions.

How to enable ChatGPT Code Interpreter?

Let's give it a shot. It has been enabled for all Premium Subscribers. Go to Settings, then to Beta features, then tick the code interpreter to make it available under GPT4 from the drop-down list.


Different ways to use Code Interpreter

Create Graphical Representations: 

First, I requested it "generate a graphical depiction of Pi". It doesn't only tell me what pi is; it also tries to run it in a code sandbox. Unfortunately, the initial attempt fails, but because this model is intelligent, it can detect when it fails. 
I told it to utilize Python libraries this time, and it did. The end result is this diagram, which is exactly what I was searching for. I can go back and look at the Python code; it imports a library; the code is clean and well-marked; and I could copy and paste it directly into an application.


Mathematical Calculations: 

You can ask mathematical calculations such as "How long would it take to drive to the nearest city from New Delhi at 100 kilometers per hour?" ChatGPT Code Interpreter identifies each city and its distance then develops a formula to calculate how long it would take vs. the distance. I double-checked this on Google, and it was mostly correct.


Work with files: 

The next amazing feature is the ability to upload files. You can upload nearly anything as long as it is 100 MB or less. In this scenario, I'll attach a PDF invoice for the product as well as a document for the product module. I can then ask queries such as, "What is this PDF about?" or "How much tax I have paid for this product?" or "Explain to me the Purpose of the module."


Analyzing Excel files or CSVs, is one of the nicest things that Code Interpreter can do. I attempted to upload a large CSV file and asked some interesting questions, such as how to create a bar chart. This is the stage where ChatGPT can conduct some pretty fantastic data analysis using spreadsheets like this.


Image Editing: 

Another function of the new ChatGPT Code Interpreter model is the ability to upload, access, and alter photos. I'm going to submit a photo and ask if it can recognize the face and its location in the photo. Python is being used to do this activity. There are Python packages for stuff like face detection that it can utilize to locate the face. It did an excellent job with the red square around the face in the supplied image. Then I asked it to crop around the face so I could make an avatar, and it could do that as well.


The ChatGPT Code Interpreter isn't just another tool; it's a testament to how AI is reshaping our approach to coding. For professionals, hobbyists, and learners alike, this AI-powered assistant offers an unparalleled blend of guidance, interpretation, and optimization. If you're on the fence about integrating AI into your coding journey, remember that in the world of programming, staying ahead means embracing the future. And the future is undeniably intertwined with AI.

There are numerous methods to use the OpenAI Code Interpreter. If I missed any, please feel free to add the same in the comments section.

If you have any questions you can reach out our SharePoint Consulting team here.

August 24, 2023

Integrating Azure OpenAI into Microsoft Teams using Teams Toolkit: A How-To Guide

Introduction:

In today's digital landscape, effective communication and collaboration are essential for productive teamwork. Microsoft Teams has emerged as a popular platform that brings people together. Now, imagine taking your Microsoft Teams experience to the next level by integrating it with Azure OpenAI, a powerful language model capable of generating human-like responses.


This article will walk you through the integration of Azure OpenAI with Microsoft Teams, enabling users to engage in chat-based conversations and receive intelligent responses within the familiar Teams interface.

Prerequisites:

  • Access to OpenAI Service on Azure (Please be aware that access to Azure OpenAI services is currently limited. If your Azure tenant does not have access, you have the option to apply for access through this link)

  • An M365 account.

  • NodeJS (Tested on Node.js 16.19.0)

  • Latest stable version of Teams Toolkit Visual Studio Code Extension (Tested on version 5.0.1)

Teams Toolkit:

Teams Toolkit is a user-friendly development framework by Microsoft, designed for creating apps, bots, and integrations within Microsoft Teams. It streamlines the process, making it easier to build collaborative solutions.


To install Teams Toolkit Visual Studio Code extensions, follow these steps:

  • Click on the Extensions icon on the left sidebar.

  • Search and install Teams Toolkit.


To scaffold the project, follow these steps within the Teams Toolkit interface:

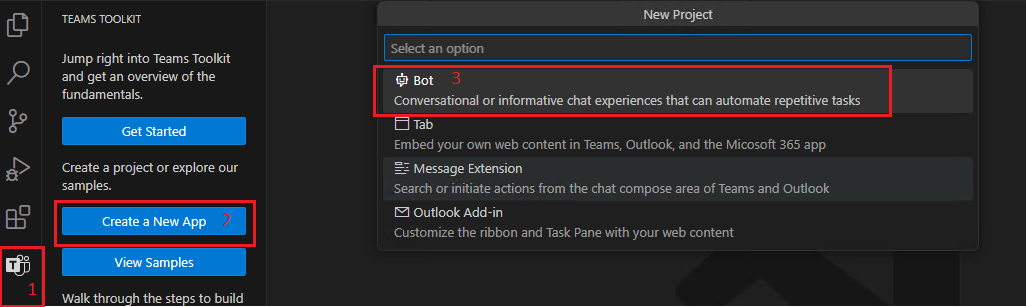
  • Click on the Teams Toolkit icon located in the left sidebar.

  • Select "Create a New App" and then choose the "Bot" option.

 
  • Now in the next step select "Basic Bot".

  • Move ahead with selecting  "TypeScript" as a Programming Language.

  • Specify the Location and Name of the App for our case it’s "TeamsGPT".


After scaffolding the project, you can test the bot solution by following these steps:

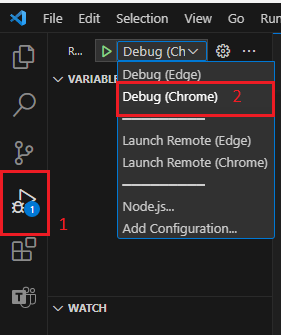
  • From the left menu, select "Run and Debug."

  • Choose the desired run profile.

  • Click on the "Run" button to test the bot solution.

Azure Open AI Model Deployment:

Azure OpenAI is a service provided by Microsoft that allows us to access powerful artificial intelligence models. It enables us to integrate AI capabilities into our applications, making them smarter and more intelligent.


Follow Below Steps to Create an Instance of Azure Open AI:

  • Navigate to Azure Open AI under the Cognitive Service in the Azure Portal.

  • Click on "Create New".

  • Fill all the Details with Name of the Instance and Resource.

  • Click on Next Until Review and Submit tab.

  • Verify all the Details and then Click on Create.


This will Create a Resource Group which contains Azure Open AI Service Instance now Navigate to the Resource Group and Select this Instance.


Follow Below steps to deploy the Model using this Instance:

  • Click on  "Model Deployment" on the Left Hand Side.

  • Then Select "Manage Deployment" and it will take us to the Azure Open AI Studio.

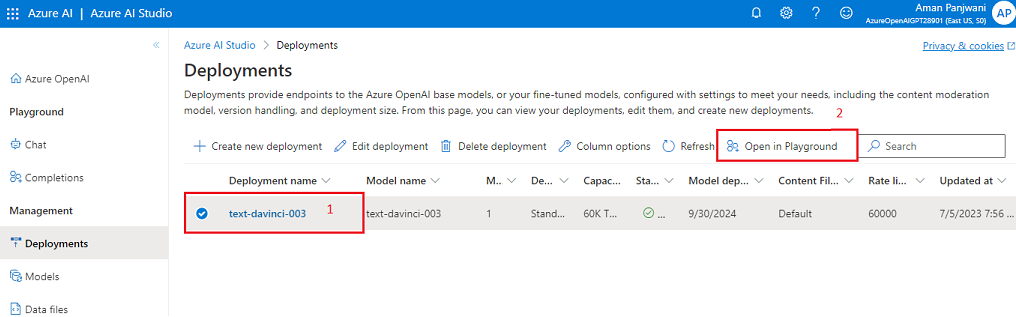
  • Now, Click on "Deployments" on the Left Hand Side.

  • Then Click on "Create new deployment" and it will Prompt us to add the Details for our Model.


In Select a Model Field Add "text-davinci-003" and also same in the Deployment Name and the Click on Create.


Text-davinci-003 model is a language model developed by OpenAI. It is designed to generate human-like text and provide natural language processing capabilities. This model can be used for various tasks such as chatbots, language translation, content generation, and more.


  • Now, Select the Model and Click on Open in Playground.


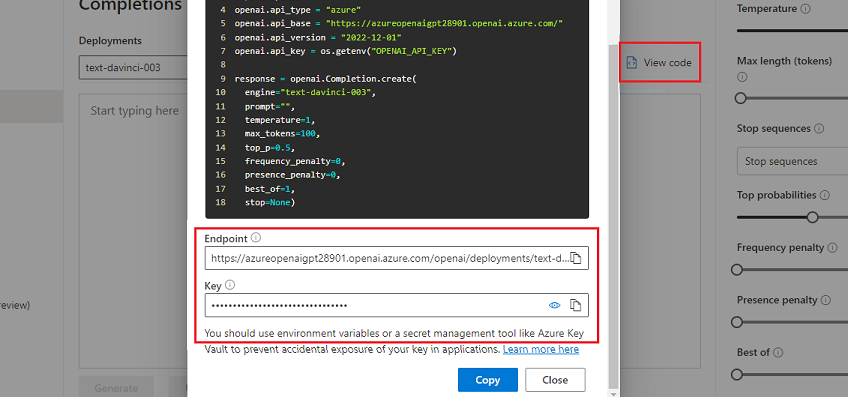
  • Click on View Code and note down the Endpoint and Key.


Now, coming back to our teams toolkit solution we will store this Endpoint and Key in the Configuration File. Open Config.ts file and Modify the Code as:

const config = {
  botId: process.env.BOT_ID,
  botPassword: process.env.BOT_PASSWORD,
  Endpoint: 'https://XXXX-openai.openai.azure.com/', //Your EndPoint URL
  APIKey: 'XXXX' //Your API Key
};

export default config;

To enable receiving the response back in the Teams interface, modify the implementation of the welcome Adaptive Card logic as follows.


Go to adaptiveCards and then the welcome.json file modify the code as below.

{
  "type": "AdaptiveCard",
  "body": [
    {
      "type": "TextBlock",
      "size": "Medium",
      "weight": "Bolder",
      "text": "${title}"
    },
    {
      "type": "TextBlock",
      "text": "${body}",
      "wrap": true
    }
  ],
  "$schema": "http://adaptivecards.io/schemas/adaptive-card.json",
  "version": "1.4"
}

Now, the Final Change - modify the teamsBot.ts file as below in order to get the work done.

import {
  TeamsActivityHandler,
  CardFactory,
  TurnContext,
} from "botbuilder";
import rawWelcomeCard from "./adaptiveCards/welcome.json";
import { AdaptiveCards } from "@microsoft/adaptivecards-tools";
import config from "./config";

export class TeamsBot extends TeamsActivityHandler {

  constructor() {
    super();
    
    this.onMessage(async (context, next) => {
      console.log("Running with Message Activity.");
      let text = context.activity.text;
      const removeMentionedText = TurnContext.removeRecipientMention(context.activity);
      if (removeMentionedText) {
        text = removeMentionedText.toLowerCase().replace(/\n|\r/g, "").trim();
      }

      const fetch = require('node-fetch');

      const endpoint = config.Endpoint;
      const apiKey = config.APIKey;

      const prompt = text;
      const maxTokens = 100;
      const temperature = 1;
      const frequencyPenalty = 0;
      const presencePenalty = 0;
      const topP = 0.5;
      const bestOf = 1;
      const stop = null;

      const requestBody = JSON.stringify({
        prompt,
        max_tokens: maxTokens,
        temperature,
        frequency_penalty: frequencyPenalty,
        presence_penalty: presencePenalty,
        top_p: topP,
        best_of: bestOf,
        stop,
      });

      const headers = {
        'Content-Type': 'application/json',
        'api-key': apiKey,
      };

      const response = await fetch(endpoint, {
        method: 'POST',
        headers,
        body: requestBody,
      });

      const data = await response.json();
      if (response.ok) {
        const generatedtext = data.choices[0].text;
        const cardData = {
          title: "Response From Open AI",
          body: generatedtext,
      };
        const card = AdaptiveCards.declare(rawWelcomeCard).render(cardData);
        await context.sendActivity({ attachments: [CardFactory.adaptiveCard(card)] });
      } else {
        throw new Error('Failed to generate Response');
      }

    })
  }
}

Now, Follow Below Steps to Run and Debug the Bot.

  • From the left menu, select "Run and Debug."

  • Choose the desired run profile.

  • Click on the "Run" button to test the bot solution.


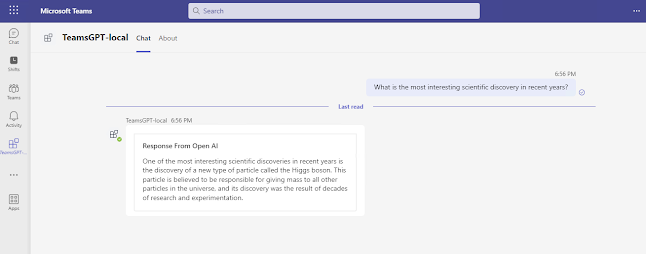
Now, Imagine having the ability to effortlessly generate responses and engage in intelligent conversations within the familiar interface of Microsoft Teams.

Conclusion:

With the integration of Azure OpenAI, this becomes a reality. Now, you can ask whatever comes to mind and receive seamless, insightful replies, unlocking a whole new level of communication and collaboration within Teams. Say goodbye to limitations and welcome a world where your thoughts and queries are met with intelligent conversations at your fingertips.


If you have any questions you can reach out our SharePoint Consulting team here.

June 22, 2023

Step-by-Step Guide: Unlocking the Power of AI with Azure OpenAI for Custom Data Models

Introduction:

OpenAI has revolutionized the world, prompting many individuals to seek its integration into their own data models. However, concerns regarding data privacy, security, and governance have arisen when utilizing OpenAI models. These considerations hold paramount importance in ensuring the responsible use of AI technologies.

Thankfully, there is a solution: Azure OpenAI Cognitive Services. Microsoft has introduced Azure OpenAI, which enables the deployment of OpenAI models for customized applications while benefiting from the robust security and governance measures provided by Microsoft.

In this article, we will explore the utilization of Azure OpenAI Services to access the ChatGPT model (gpt-3.5-turbo) and leverage Azure Cognitive Search for efficient data indexing and retrieval. Through these technologies, we will demonstrate how to create ChatGPT-like experiences using custom data, all while upholding the necessary privacy, security, and governance protocols.


Prerequisites:

  1. Access to OpenAI Service on Azure
     - Please note that access to Azure OpenAI is currently limited. If your tenant doesn't have access, you can apply for it here.
  2. Your Azure Account must have the necessary permissions, such as Microsoft.Authorization/roleAssignments/write operation permissions (E.g., User Access Administrator or Owner). 
  3. Azure Developer CLI
  4. Python 3+
     - Make sure you can run python --version from the console.

  5. Node.js
  6. Git
  7. PowerShell 7+ (pwsh)
     - Verify that you can run "pwsh.exe" from a PowerShell command. If this fails, it's likely that you need to upgrade your PowerShell version.

Installation:

To install and set up the necessary components, follow these steps:
  1. Create a new folder and open it in the Command Prompt.
  2. Run the command "azd auth login". This will open a browser window for authentication. Enter your Azure credentials in the browser window.
     - 
    Note: Once the authentication is complete, you can close the browser window.
  3. You should see a message like "Logged in to Azure" in the terminal window, indicating a successful authentication:

  4. Run the command "azd init -t azure-search-openai-demo". This command will initialize a git repository.
  5. When prompted for a new environment name, you can either keep the default name or change it as needed. Press Enter to keep the default name.
  6. After this step, you will see a message like "SUCCESS: New project initialized!":


You have now completed the installation and initialization process.

Custom Data Files:

To incorporate your own custom data files (such as PDFs, Word Documents, etc.) into your data models, follow these steps:
  1. Navigate to the folder where the project is initialized. Inside this folder, you will find a directory called "data".

  2. Access the "data" folder and you will find sample data files already present. You can replace or copy your own files into this folder.

Ensure that your custom files are placed within this "data" folder for the project to access and utilize them effectively.

Azure Deployment:

Now that everything is set up locally, we can proceed with deploying the project on Azure. Follow the steps below:

  1. Open the terminal.
  2. Run the command "azd up".
  3. Select the appropriate subscription and press Enter:

  4. Choose the desired region for deployment. Note that the regions currently supporting the models used in this sample are East US or South Central US. For an up-to-date list of regions and models, you can refer to the documentation here.

  5. The deployment process will begin, which includes packaging up the services and deploying them to Azure. Please be patient as this process may take some time.
  6. Once the deployment is complete, you will see a message in the terminal similar to:

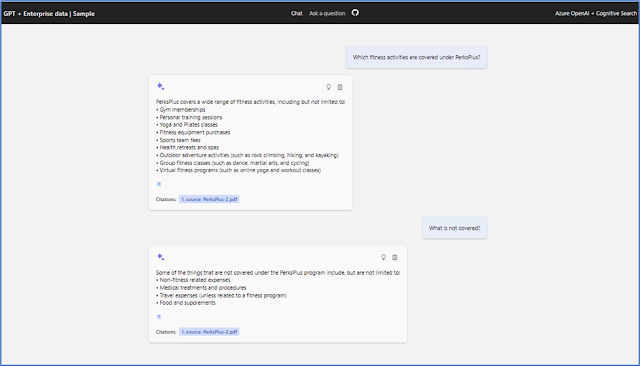
Additionally, you will be provided with an endpoint. Opening this endpoint in a browser will take you to the ChatGPT experience, where you can ask questions to the AI, and it will respond using the custom data files as the source of information and models.

Congratulations! Your application is now deployed on Azure and ready to be accessed via the provided endpoint.

Reference:

Conclusion:

Azure OpenAI Cognitive Services provides a secure and efficient solution for integrating OpenAI models into custom data models. With the power of Azure Cognitive Search and Microsoft's robust security measures, organizations can deploy ChatGPT-like experiences over custom data while ensuring data privacy and governance. By leveraging Azure OpenAI, businesses can unlock the potential of AI technologies and create innovative applications with confidence.

If you have any questions you can reach out our SharePoint Consulting team here.