Showing posts with label AI. Show all posts

January 30, 2026

Generative AI in Quality Assurance: Automating Modern QA Workflows

Introduction

Quality Assurance has traditionally relied on manual testing, predefined scripts, and lengthy regression cycles. With growing software complexity and faster release timelines, these methods struggle to scale.

Generative Artificial Intelligence (GenAI) is transforming QA by automating test creation, improving defect detection, and optimizing test execution. Real-world AI-powered tools are already driving faster, smarter, and more reliable testing workflows.

What is Generative AI in Quality Assurance and How Does It Work?

Generative AI in QA uses advanced machine learning (AI/ML) models to generate content such as test cases, automation scripts, test data, and even defect analysis insights.

In QA workflows, GenAI enables:

  • Automatic test case generation
  • AI-driven automation creation
  • Intelligent defect prediction
  • Self-healing test scripts
  • Smart regression optimization

How Generative AI is Automating and Transforming Modern QA Workflows?

  1. AI-Driven Test Case Generation Based on Requirements: GenAI analyzes user stories, acceptance criteria, and business flows to automatically generate comprehensive test cases. Tools like ACCELQ, Functionize, and Tricentis Tosca allow teams to convert requirements directly into executable tests, reducing manual effort and improving coverage.
  2. Intelligent Test Script Creation (Low-Code/No-Code): GenAI helps create automation scripts without heavy coding by understanding application behavior. GenAI-powered platforms such as Testim, Mabl and Functionize create low-code and self-healing automation scripts. These tools adapt automatically to UI changes, reducing maintenance while increasing automation stability.
  3. AI-Powered Defect Detection and Root Cause Analysis: AI analyzes logs, failures, and historical defects to predict high-risk areas and find root causes faster. Tools like Functionize and Mabl use AI analytics to detect anomalies, predict failures, and identify root causes. This enables faster issue resolution and proactive quality improvements.
  4. AI-Driven Self-Healing Test Automation: AI updates test scripts automatically when UI elements change, eliminating broken tests. Tools such as Testim automatically adapt to UI changes, Mabl provides self-healing locators with smart waits, and Tricentis Tosca leverages AI-based test object recognition to ensure stable and resilient test automation.
  5. AI-Based Risk-Driven Test Prioritization: GenAI predicts which test cases are most likely to fail based on recent changes and past trends. Platforms like Mabl enable risk-based test execution, Tricentis Tosca applies AI-driven regression optimization, and ACCELQ provides smart execution planning to accelerate and prioritize critical test scenarios.
  6. AI-Powered Test Data Generation: AI creates realistic and compliant synthetic test data. Tools such as Tricentis Data Integrity leverage AI-driven data generation and masking, while GenRocket uses AI-assisted synthetic data creation to produce realistic, compliant test datasets for comprehensive testing.
  7. Conversational AI Assistants: AI chat interfaces assist testers in debugging, reporting, and test analysis. AI-powered assistants help QA engineers understand failures, generate reports, and receive insights through natural language. Solutions like Functionize AI Chat explain test failures and recommend fixes, while AI-powered DevOps bots integrated with Slack and Jira provide real-time insights and automation support across QA workflows.

Business Impact of Generative AI in Quality Assurance

AI-driven QA workflows reduce manual testing effort, stabilize automation, accelerate releases, lower costs, and significantly improve product quality and customer satisfaction.

Challenges and Considerations

Successfully adopting Generative AI in QA requires reliable training data, strong security controls, and human oversight to validate AI outputs. Organizations must also ensure regulatory compliance and carefully integrate AI solutions into their existing testing processes.

Conclusion

Generative AI is revolutionizing QA through real-world platforms like Testim, Mabl, Functionize, Tricentis Tosca, and ACCELQ. By automating testing and introducing intelligence into workflows, organizations can achieve faster delivery and higher quality software.

Frequently Asked Questions

FAQ 1: What is Generative AI in Quality Assurance?

Generative AI in Quality Assurance refers to AI models that automatically create test cases, automation scripts, test data, and defect insights by analyzing requirements, application behavior, and historical testing data.

FAQ 2: How does Generative AI improve software testing?

Generative AI improves software testing by automating test design, enabling self-healing automation, predicting defects, optimizing regression testing, and reducing manual effort across QA workflows.

FAQ 3: Which tools use Generative AI for QA testing?

Popular AI-driven QA tools include Testim, Mabl, Functionize, Tricentis Tosca, ACCELQ, Tricentis Data Integrity, and GenRocket, all of which leverage AI for automation, analytics, and test optimization.

FAQ 4: Can Generative AI replace manual testers?

No, Generative AI enhances QA workflows but does not replace testers. Human expertise is essential for test strategy, validation, business logic understanding, and governance.

FAQ 5: Is AI-driven testing suitable for enterprise applications?

Yes, AI-driven testing is widely adopted in enterprise environments to handle complex systems, large regression suites, and continuous delivery pipelines.

FAQ 6: Is AI-driven testing suitable for enterprise applications?

The future of QA includes autonomous testing pipelines, predictive quality analytics, self-healing automation, and AI-powered continuous testing integrated into DevOps processes.


If you have questions about implementing Generative AI in your QA workflows, connect with our AI Consulting team here.

November 23, 2023

Unlocking the Power of Azure AI Language Service: A Comprehensive Overview and Document Summarization

Introduction:

In the ever-evolving world of artificial intelligence, Azure AI Language Service stands out as a formidable tool that promises to revolutionize the way we interact with and analyze textual content.


This article will dive you into the depths of Azure AI Language Service, offering a comprehensive overview and insight into its capabilities. Also we will witness the magic of document summarization in a small yet powerful React application.


This interactive experience will showcase how seamlessly Azure AI Language Service integrates with modern web technologies, providing a practical demonstration of its capabilities using Natural Language Processing (NLP) features for understanding and analyzing text.

Prerequisites:

  • Azure Subscription - Create free subscription from here.

  • NodeJS Installed on Machine (Tested on Node.js 16.19.0)

Azure AI Language Service: Unleashing Its Power:

Azure AI Language is a cloud-centric solution offering Natural Language Processing (NLP) capabilities for text comprehension and analysis. Using this service we can develop smart applications that manipulate textual content. Here is a complete overview of what the Language service can do with its powerful features:


Named Entity Recognition (NER): It spots entities like names, events, places, and dates from the text with named entity recognition.


Personally identifying (PII) and health (PHI) information detection: Detect and hide sensitive info like phone numbers, email addresses, and IDs in text with PII detection.


Language detection: Figure out the language of a document and get a language code with language detection that works for many languages and variations.


Sentiment Analysis and opinion mining: Learn what people think about our topic with sentiment analysis and opinion mining. These features analyze text to discover positive or negative feelings and link them to specific aspects.


Summarization: Generate document or conversation summaries using summarization, Which extracts key sentences to capture the most crucial information from the original contents


Key phrase extraction: It identifies and lists the main concepts in text with key phrase extraction, a preconfigured feature.


Explore additional features and functionalities within the Language service in this documentation available here. Let’s gain insights into the Summarization feature within the Language Service and integrate it into our compact React application.


Azure AI Language Service: Document Summarization:

In today's fast-paced and information-rich world, the need for efficient content processing has become paramount. Summarization plays a crucial role in addressing this need by distilling lengthy and complex information into concise and digestible forms.

Summarization constitutes one of the capabilities provided by Azure AI Language, a suite of cloud-based machine learning and AI algorithms tailored for crafting intelligent applications centered around written language.

Document summarization employs natural language processing techniques to create a condensed version of a document. The API supports two main approaches to automatic summarization: extractive and abstractive.

Extractive: Selects and extracts sentences directly from the original content that collectively capture the most crucial information.

Abstractive: Creates a summary by generating concise and coherent sentences or words, not limited to extracting sentences from the original document. This approach aims to provide a shortened version of lengthy content.

Let’s create an instance of the Language service to showcase practical summarization and seamlessly integrate it into our React application.

Follow Below Steps to Create an Instance of Language Service:

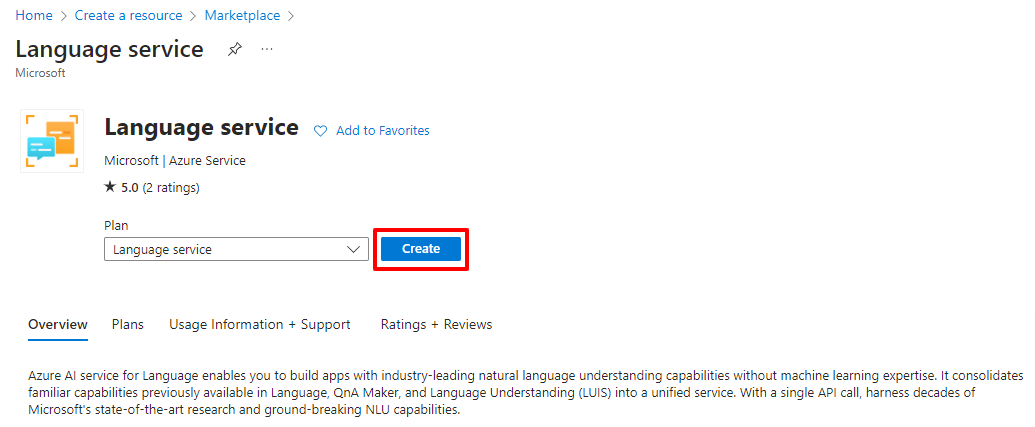
  • To Create Instance, log in to your Azure Subscription, go to “Create a resourceand type for language.


  • Click on Create and then Continue to Create your resource at bottom.

  • Fill all the Details with Name of the Instance and Resource. (You can use the free pricing tier (Free F0) to try the service, and upgrade later to a paid tier for production.)

  • Click on Next Until Review and Create tab.

  • Verify all the Details and then Click on Create.


After creating the service instance, review the details in the resource group. To utilize the Language service,
Now will obtain Endpoints and an API key by accessing the Language Studio through this link. Login using the Azure Subscription in which you created the instance.

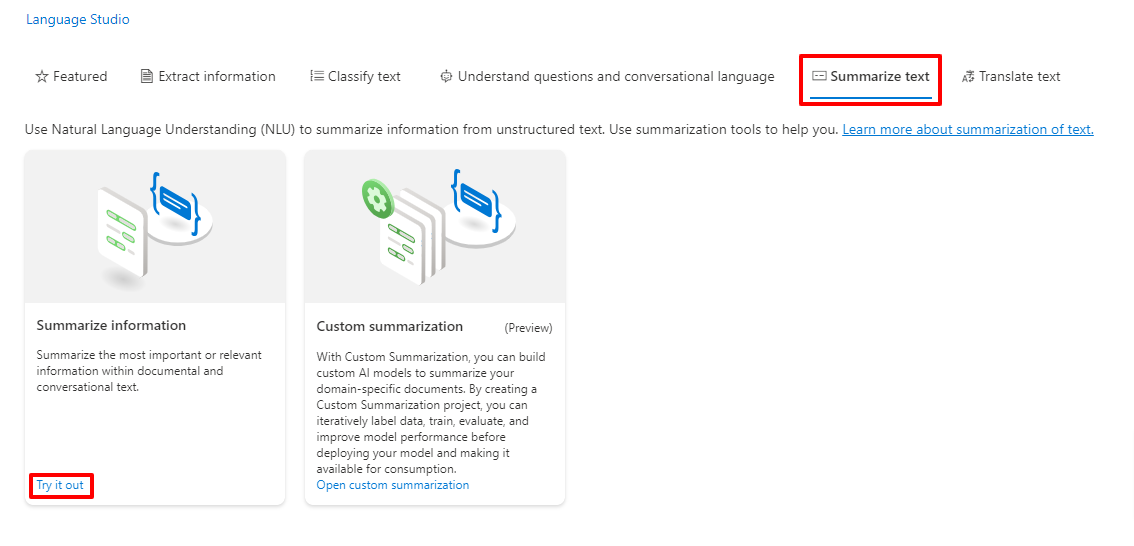
Navigate to the Summarization text tab within Language Studio and choose the "Summarize Information" option.


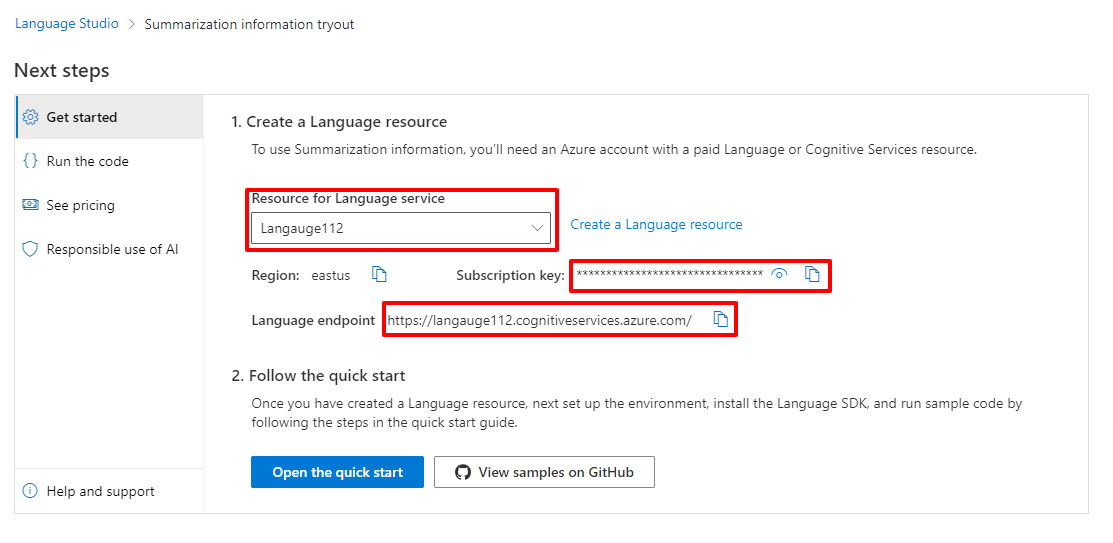
Now you can explore summarization directly in the Playground or seamlessly integrate it into our application using the provided Endpoints and API Key at bottom. Scroll to the bottom to find Language endpoints and Subscription Key. Ensure you have chosen the correct Resource for the Language service.


Copy the Subscription Key and Endpoint URL; we will utilize them in our React project.

Setting Up a React Application for Azure Language Service Integration:

The API, along with the obtained Endpoints from the above step, can be employed in various frontend applications. However, for demonstration purposes, we will utilize them in the React app.

Follow below steps to Create the React app and Install all the Packages needs in order to Integrate this:

Note: Ensure that your local development machine has Node version 14 or higher.


  • Run the "npx create-react-app document-summarize" command to set up the scaffolding for the React app.

  • Then Install the Client Package Library “npm install --save @azure/ai-language-text@1.1.0” in order to work with Azure AI Language.

  • Now open the Project in the VS Code.

  • Create a .env file in the root folder.

  • Store the EndPoint and APIKey in it as shown below.


  • Navigate to App.js file in the Folder.

  • Replace the Code with below code.


import React, { useState } from 'react';
const { AzureKeyCredential, TextAnalysisClient } = require("@azure/ai-language-text");

const endpoint = process.env.REACT_APP_ENDPOINT;
const apiKey = process.env.REACT_APP_APIKEY;

function App() {
  const [loading, setLoading] = useState(false);

  // In Order to Generate the Download Link of the File
  const download = async(filename, text) => {
    var previousElement = document.getElementById('downloadLink')
    if(previousElement){
      document.body.removeChild(previousElement);
    }
    var element = document.createElement('a');
    element.setAttribute('id', "downloadLink");
    element.setAttribute('href', 'data:text/plain;charset=utf-8,' + encodeURIComponent(text));
    element.setAttribute('download', filename);
    var linkText = document.createTextNode("Download the summarized version of the file");
    element.appendChild(linkText);
    document.body.appendChild(element);
  }

  // In Order to Handle the Input element
  const handleFileChange = async (event) => {
    setLoading(true)
    const file = event.target.files[0];
    var input = event.target;
    var reader = new FileReader();
    reader.onload = async function () {
      var text = reader.result;
      await analyzeAndSummarizeText(file.name,text)
      setLoading(false)
    };
    reader.readAsText(input.files[0]);
  };

  // Analyze and Summarize the Text
  const analyzeAndSummarizeText = async (inputFileName, originalText) => {
    const client = new TextAnalysisClient(endpoint, new AzureKeyCredential(apiKey));
    const actions = [
      {
        kind: "ExtractiveSummarization",
        maxSentenceCount: 2,
      },
    ];
    const analyzeBatch = await client.beginAnalyzeBatch(actions, [originalText], "en");
    analyzeBatch.onProgress(() => {
      console.log(
        `Last time the operation was updated was on: ${analyzeBatch.getOperationState().modifiedOn}`
      );
    });
    const results = await analyzeBatch.pollUntilDone();
    for await (const actionResult of results) {
      if (actionResult.kind !== "ExtractiveSummarization") {
        throw new Error(`Expected extractive summarization results but got: ${actionResult.kind}`);
      }
      if (actionResult.error) {
        const { code, message } = actionResult.error;
        throw new Error(`Unexpected error (${code}): ${message}`);
      }
      for (const result of actionResult.results) {
        console.log(`- Document ${result.id}`);
        if (result.error) {
          const { code, message } = result.error;
          throw new Error(`Unexpected error (${code}): ${message}`);
        }
        let summarizedTextContent = result.sentences.map((sentence) => sentence.text).join("\n");
        await download(inputFileName, summarizedTextContent);
      }
    }
  };

  return (
    <div id="inputFile">
      <input type="file" onChange={handleFileChange} />
      {
        loading && <p>Summarizing the document please wait a while...</p>
      }
    </div>
  );
}

export default App;

Save the files, then run "npm start" to initiate the development server on port 3000 and test the solution. Upload the document and wait briefly for the generation of the summarized version. Once ready, click the download link to retrieve the summarized version.

Output:


Conclusion:

Throughout this article, we explored the capabilities of Azure AI Language Service, delving into its features and functionality. Specifically, we seamlessly integrated the Document Summarization feature of the Language service into a React application. By doing so, we harnessed the power of Azure AI Language Service to enhance document processing in a practical and user-friendly manner.

If you have any questions you can reach out our SharePoint Consulting team here.

August 24, 2023

Integrating Azure OpenAI into Microsoft Teams using Teams Toolkit: A How-To Guide

Introduction:

In today's digital landscape, effective communication and collaboration are essential for productive teamwork. Microsoft Teams has emerged as a popular platform that brings people together. Now, imagine taking your Microsoft Teams experience to the next level by integrating it with Azure OpenAI, a powerful language model capable of generating human-like responses.


This article will walk you through the integration of Azure OpenAI with Microsoft Teams, enabling users to engage in chat-based conversations and receive intelligent responses within the familiar Teams interface.

Prerequisites:

  • Access to OpenAI Service on Azure (Please be aware that access to Azure OpenAI services is currently limited. If your Azure tenant does not have access, you have the option to apply for access through this link)

  • An M365 account.

  • NodeJS (Tested on Node.js 16.19.0)

  • Latest stable version of Teams Toolkit Visual Studio Code Extension (Tested on version 5.0.1)

Teams Toolkit:

Teams Toolkit is a user-friendly development framework by Microsoft, designed for creating apps, bots, and integrations within Microsoft Teams. It streamlines the process, making it easier to build collaborative solutions.


To install Teams Toolkit Visual Studio Code extensions, follow these steps:

  • Click on the Extensions icon on the left sidebar.

  • Search and install Teams Toolkit.


To scaffold the project, follow these steps within the Teams Toolkit interface:

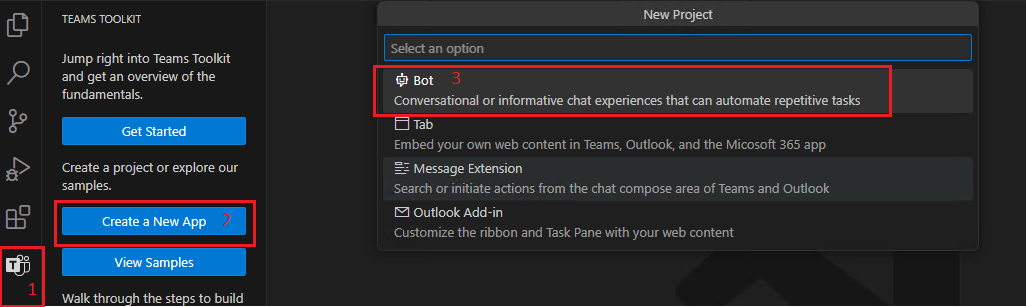
  • Click on the Teams Toolkit icon located in the left sidebar.

  • Select "Create a New App" and then choose the "Bot" option.

 
  • Now in the next step select "Basic Bot".

  • Move ahead with selecting  "TypeScript" as a Programming Language.

  • Specify the Location and Name of the App for our case it’s "TeamsGPT".


After scaffolding the project, you can test the bot solution by following these steps:

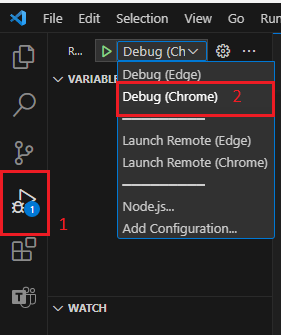
  • From the left menu, select "Run and Debug."

  • Choose the desired run profile.

  • Click on the "Run" button to test the bot solution.

Azure Open AI Model Deployment:

Azure OpenAI is a service provided by Microsoft that allows us to access powerful artificial intelligence models. It enables us to integrate AI capabilities into our applications, making them smarter and more intelligent.


Follow Below Steps to Create an Instance of Azure Open AI:

  • Navigate to Azure Open AI under the Cognitive Service in the Azure Portal.

  • Click on "Create New".

  • Fill all the Details with Name of the Instance and Resource.

  • Click on Next Until Review and Submit tab.

  • Verify all the Details and then Click on Create.


This will Create a Resource Group which contains Azure Open AI Service Instance now Navigate to the Resource Group and Select this Instance.


Follow Below steps to deploy the Model using this Instance:

  • Click on  "Model Deployment" on the Left Hand Side.

  • Then Select "Manage Deployment" and it will take us to the Azure Open AI Studio.

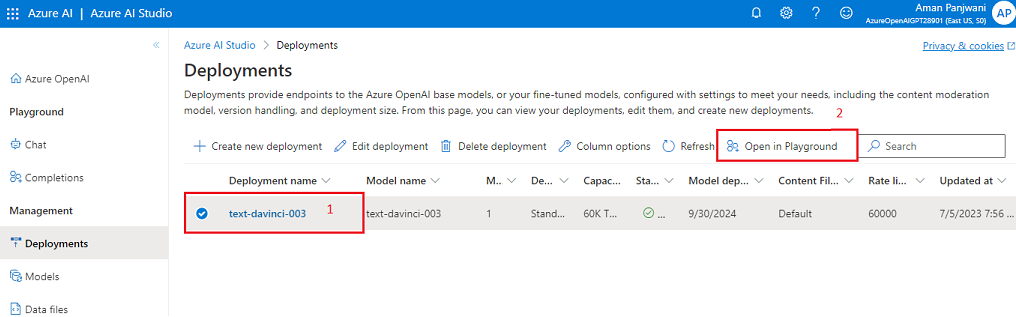
  • Now, Click on "Deployments" on the Left Hand Side.

  • Then Click on "Create new deployment" and it will Prompt us to add the Details for our Model.


In Select a Model Field Add "text-davinci-003" and also same in the Deployment Name and the Click on Create.


Text-davinci-003 model is a language model developed by OpenAI. It is designed to generate human-like text and provide natural language processing capabilities. This model can be used for various tasks such as chatbots, language translation, content generation, and more.


  • Now, Select the Model and Click on Open in Playground.


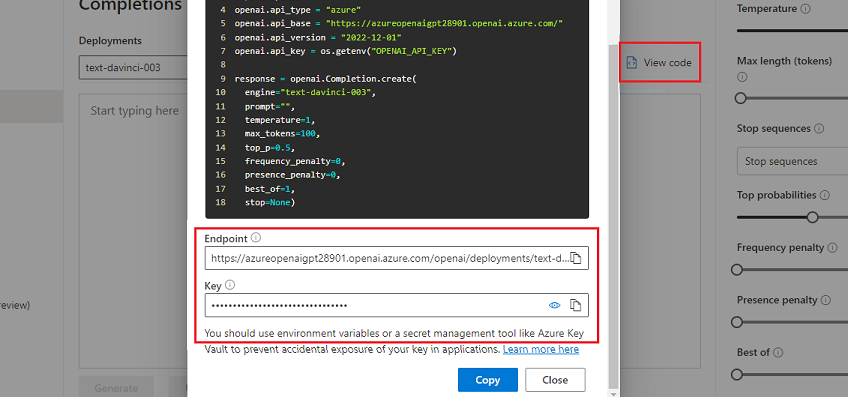
  • Click on View Code and note down the Endpoint and Key.


Now, coming back to our teams toolkit solution we will store this Endpoint and Key in the Configuration File. Open Config.ts file and Modify the Code as:

const config = {
  botId: process.env.BOT_ID,
  botPassword: process.env.BOT_PASSWORD,
  Endpoint: 'https://XXXX-openai.openai.azure.com/', //Your EndPoint URL
  APIKey: 'XXXX' //Your API Key
};

export default config;

To enable receiving the response back in the Teams interface, modify the implementation of the welcome Adaptive Card logic as follows.


Go to adaptiveCards and then the welcome.json file modify the code as below.

{
  "type": "AdaptiveCard",
  "body": [
    {
      "type": "TextBlock",
      "size": "Medium",
      "weight": "Bolder",
      "text": "${title}"
    },
    {
      "type": "TextBlock",
      "text": "${body}",
      "wrap": true
    }
  ],
  "$schema": "http://adaptivecards.io/schemas/adaptive-card.json",
  "version": "1.4"
}

Now, the Final Change - modify the teamsBot.ts file as below in order to get the work done.

import {
  TeamsActivityHandler,
  CardFactory,
  TurnContext,
} from "botbuilder";
import rawWelcomeCard from "./adaptiveCards/welcome.json";
import { AdaptiveCards } from "@microsoft/adaptivecards-tools";
import config from "./config";

export class TeamsBot extends TeamsActivityHandler {

  constructor() {
    super();
    
    this.onMessage(async (context, next) => {
      console.log("Running with Message Activity.");
      let text = context.activity.text;
      const removeMentionedText = TurnContext.removeRecipientMention(context.activity);
      if (removeMentionedText) {
        text = removeMentionedText.toLowerCase().replace(/\n|\r/g, "").trim();
      }

      const fetch = require('node-fetch');

      const endpoint = config.Endpoint;
      const apiKey = config.APIKey;

      const prompt = text;
      const maxTokens = 100;
      const temperature = 1;
      const frequencyPenalty = 0;
      const presencePenalty = 0;
      const topP = 0.5;
      const bestOf = 1;
      const stop = null;

      const requestBody = JSON.stringify({
        prompt,
        max_tokens: maxTokens,
        temperature,
        frequency_penalty: frequencyPenalty,
        presence_penalty: presencePenalty,
        top_p: topP,
        best_of: bestOf,
        stop,
      });

      const headers = {
        'Content-Type': 'application/json',
        'api-key': apiKey,
      };

      const response = await fetch(endpoint, {
        method: 'POST',
        headers,
        body: requestBody,
      });

      const data = await response.json();
      if (response.ok) {
        const generatedtext = data.choices[0].text;
        const cardData = {
          title: "Response From Open AI",
          body: generatedtext,
      };
        const card = AdaptiveCards.declare(rawWelcomeCard).render(cardData);
        await context.sendActivity({ attachments: [CardFactory.adaptiveCard(card)] });
      } else {
        throw new Error('Failed to generate Response');
      }

    })
  }
}

Now, Follow Below Steps to Run and Debug the Bot.

  • From the left menu, select "Run and Debug."

  • Choose the desired run profile.

  • Click on the "Run" button to test the bot solution.


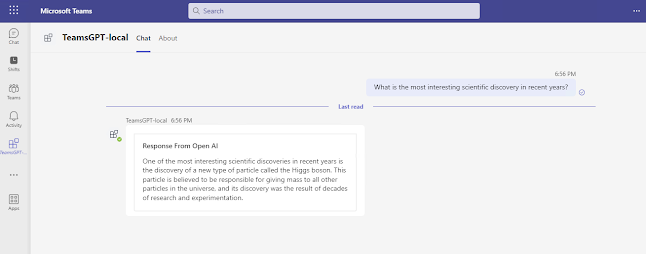
Now, Imagine having the ability to effortlessly generate responses and engage in intelligent conversations within the familiar interface of Microsoft Teams.

Conclusion:

With the integration of Azure OpenAI, this becomes a reality. Now, you can ask whatever comes to mind and receive seamless, insightful replies, unlocking a whole new level of communication and collaboration within Teams. Say goodbye to limitations and welcome a world where your thoughts and queries are met with intelligent conversations at your fingertips.


If you have any questions you can reach out our SharePoint Consulting team here.

June 22, 2023

Step-by-Step Guide: Unlocking the Power of AI with Azure OpenAI for Custom Data Models

Introduction:

OpenAI has revolutionized the world, prompting many individuals to seek its integration into their own data models. However, concerns regarding data privacy, security, and governance have arisen when utilizing OpenAI models. These considerations hold paramount importance in ensuring the responsible use of AI technologies.

Thankfully, there is a solution: Azure OpenAI Cognitive Services. Microsoft has introduced Azure OpenAI, which enables the deployment of OpenAI models for customized applications while benefiting from the robust security and governance measures provided by Microsoft.

In this article, we will explore the utilization of Azure OpenAI Services to access the ChatGPT model (gpt-3.5-turbo) and leverage Azure Cognitive Search for efficient data indexing and retrieval. Through these technologies, we will demonstrate how to create ChatGPT-like experiences using custom data, all while upholding the necessary privacy, security, and governance protocols.


Prerequisites:

  1. Access to OpenAI Service on Azure
     - Please note that access to Azure OpenAI is currently limited. If your tenant doesn't have access, you can apply for it here.
  2. Your Azure Account must have the necessary permissions, such as Microsoft.Authorization/roleAssignments/write operation permissions (E.g., User Access Administrator or Owner). 
  3. Azure Developer CLI
  4. Python 3+
     - Make sure you can run python --version from the console.

  5. Node.js
  6. Git
  7. PowerShell 7+ (pwsh)
     - Verify that you can run "pwsh.exe" from a PowerShell command. If this fails, it's likely that you need to upgrade your PowerShell version.

Installation:

To install and set up the necessary components, follow these steps:
  1. Create a new folder and open it in the Command Prompt.
  2. Run the command "azd auth login". This will open a browser window for authentication. Enter your Azure credentials in the browser window.
     - 
    Note: Once the authentication is complete, you can close the browser window.
  3. You should see a message like "Logged in to Azure" in the terminal window, indicating a successful authentication:

  4. Run the command "azd init -t azure-search-openai-demo". This command will initialize a git repository.
  5. When prompted for a new environment name, you can either keep the default name or change it as needed. Press Enter to keep the default name.
  6. After this step, you will see a message like "SUCCESS: New project initialized!":


You have now completed the installation and initialization process.

Custom Data Files:

To incorporate your own custom data files (such as PDFs, Word Documents, etc.) into your data models, follow these steps:
  1. Navigate to the folder where the project is initialized. Inside this folder, you will find a directory called "data".

  2. Access the "data" folder and you will find sample data files already present. You can replace or copy your own files into this folder.

Ensure that your custom files are placed within this "data" folder for the project to access and utilize them effectively.

Azure Deployment:

Now that everything is set up locally, we can proceed with deploying the project on Azure. Follow the steps below:

  1. Open the terminal.
  2. Run the command "azd up".
  3. Select the appropriate subscription and press Enter:

  4. Choose the desired region for deployment. Note that the regions currently supporting the models used in this sample are East US or South Central US. For an up-to-date list of regions and models, you can refer to the documentation here.

  5. The deployment process will begin, which includes packaging up the services and deploying them to Azure. Please be patient as this process may take some time.
  6. Once the deployment is complete, you will see a message in the terminal similar to:

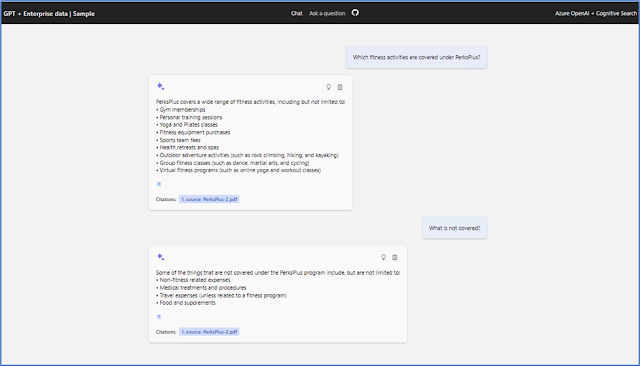
Additionally, you will be provided with an endpoint. Opening this endpoint in a browser will take you to the ChatGPT experience, where you can ask questions to the AI, and it will respond using the custom data files as the source of information and models.

Congratulations! Your application is now deployed on Azure and ready to be accessed via the provided endpoint.

Reference:

Conclusion:

Azure OpenAI Cognitive Services provides a secure and efficient solution for integrating OpenAI models into custom data models. With the power of Azure Cognitive Search and Microsoft's robust security measures, organizations can deploy ChatGPT-like experiences over custom data while ensuring data privacy and governance. By leveraging Azure OpenAI, businesses can unlock the potential of AI technologies and create innovative applications with confidence.

If you have any questions you can reach out our SharePoint Consulting team here.