Showing posts with label C#. Show all posts

December 18, 2025

Extending C# MCP Server with GitHub Copilot and Custom Tools

Introduction

AI assistants are becoming more capable, but their real power emerges when they can tap into their own systems, logic, and data. The Model Context Protocol (MCP) makes this possible by providing a standardized way for tools and services to interact directly with assistants like GitHub Copilot Chat. By exposing your backend capabilities through an MCP server, you can extend Copilot far beyond code suggestions and turn it into a practical interface for your applications.

Key Topics Covered:

  • A breakdown of how the Model Context Protocol works and the components that make up its architecture.
  • Steps to create an MCP server in C# and implement your own custom tools.
  • How to link your .NET-based MCP server with GitHub Copilot Chat in VS Code so they can communicate seamlessly.

What is MCP?

MCP defines a standard protocol for AI clients to connect to external servers.

  • MCP Server → your app or API that provides tools.
  • MCP Client → AI assistant (like GitHub Copilot Chat) that calls those tools.

Think of it like plugins for Copilot, but built with simple attributes and a lightweight protocol.


Project Setup:

  1. Create a new .NET Core application to serve as the base for your MCP server.
  2. Add the required dependencies, including:
  • ModelContextProtocol.AspNetCore
  • Microsoft.Azure.Functions.Worker.Extensions.Mcp
  • System.Data.SqlClient (for database communication)

Defining a tool:

  • A tool is a simple class decorated with McpServerToolType. Each method marked McpServerTool is automatically exposed to the MCP client.
  • Define tools with clear, detailed descriptions so the LLM can interpret them effectively and deliver more accurate responses.
  • Below is an example of the EmployeeTool.cs that has the tool defined:
[McpServerTool, Description("Get Employee details")]
public string GetEmployeeDetails(
    [McpToolTrigger("employee_tool", "MCP Tool that fetches employee records based on hiring dates.")]
      ToolInvocationContext trigger,
      [McpToolProperty("startDate", "string",
          "Start date of the provided date range."
      )]
      string startDate,
      [McpToolProperty("endDate", "string",
          "End date of the provided date range."
      )]
      string endDate
)
{
    // Write business logic to retrieve data
    return $"Fetching employees hired between {startDate} and {endDate}";
}

  • Register your tool in the Program.cs file as shown below.
var builder = WebApplication.CreateBuilder(args);

builder.Services
    .AddMcpServer()
    .WithHttpTransport()
    .WithToolsFromAssembly();

builder.Services.AddSingleton<EmployeeTool>();

var app = builder.Build();

app.MapMcp();

app.Run();
  • Once you’ve defined your tools, run the project:

Connecting with GitHub Copilot Chat:

Now that the tools are defined, let’s connect them to Copilot Chat.

  • A GitHub account
  • The GitHub Copilot and GitHub Copilot Chat extensions are installed in VS Code

Next, we’ll add the server using the steps below:

  1. Open the Command Palette.
  2. Search for “MCP: Add Server” and select it.
  3. Choose HTTP as the transport mode.
  4. Enter the server URL (for example: http://localhost:5000).
  5. Provide a name for your server and choose whether to save it as Global (user) or just for the current workspace.
  6. When asked, confirm that you trust this MCP server.
  7. Your MCP server is now registered and ready to be used through Copilot Chat.

Verify the Server:

  • Access the Command Palette and select “MCP: List Servers” to verify the server’s presence in the list.
  • Alternatively, navigate to the Extensions view and examine the section labeled MCP Servers => Installed.

Using MCP Tools Inside Copilot Chat:

Once the MCP server is added, you can start using the tools directly inside Copilot Chat:

  1. Open the Copilot Chat interface in VS Code.
  2. Switch to Agent mode from the drop-down beneath the chat box.
  3. Click the Tools icon to explore available MCP tools.
  4. Provide a prompt like: “Provide me with the employees hired in the last month.”
  5. To explicitly invoke a tool, type # and select it by name.
  6. When Copilot suggests a tool invocation, review it and click Continue to execute.

That’s it - Copilot will now call your MCP tools and return live data straight into chat.


Conclusion

In this guide, we explored how to build a custom MCP server using C# .NET, define powerful tools, and integrate them with GitHub Copilot Chat to extend its capabilities. With MCP, you can enable Copilot to access real-time data, execute business logic, and provide accurate, context-aware responses.

For more details and official documentation, check out the C# MCP SDK on GitHub.

June 19, 2025

Upgrading to .NET 8 Isolated Azure Functions: A Complete Step-by-Step Guide

Introduction

The .NET Isolated Worker Model enables developers to build Azure Functions using a .NET console app project that targets a supported .NET runtime. This model provides greater flexibility, improved performance, and better debugging capabilities compared to the in-process model.

In this guide, we will walk you through upgrading your existing Azure Functions project to .NET 8 using the isolated worker model.


Required Files in a .NET Isolated Project

A .NET-isolated Azure Functions project requires the following essential files:

  • host.json — Configuration file for host settings.
  • local.settings.json — Stores local configurations.
  • .csproj file — Defines the project and dependencies.
  • Program.cs — The entry point for the application.
  • Function code files — Contain your function implementations.

Updating the .csproj File

The first step is to convert the project file and update its dependencies.


Existing .NET 3.x Project (.csproj)


<Project Sdk="Microsoft.NET.Sdk">
  <PropertyGroup>
    <TargetFramework>netcoreapp3.0</TargetFramework>
    <AzureFunctionsVersion>v3</AzureFunctionsVersion>
  </PropertyGroup>
  <ItemGroup>
    <None Remove="Functions\host.json" />
    <None Remove="stylecop.json" />
  </ItemGroup>
  <ItemGroup>
    <AdditionalFiles Include="stylecop.json" />
  </ItemGroup>
  <ItemGroup>
    <PackageReference Include="Azure.Core" Version="1.13.0" />
    <PackageReference Include="Azure.Storage.Common" Version="12.7.2" />
    <PackageReference Include="Microsoft.AspNet.WebApi.Client" Version="5.2.4" />
    <PackageReference Include="Microsoft.Azure.Functions.Extensions" Version="1.0.0" />
    <PackageReference Include="Microsoft.Azure.WebJobs" Version="3.0.25" />
    <PackageReference Include="Microsoft.Azure.WebJobs.Core" Version="3.0.27" />
    <PackageReference Include="Microsoft.Azure.WebJobs.Extensions.CosmosDB" Version="3.0.9" />
    <PackageReference Include="Microsoft.Azure.WebJobs.Extensions.DurableTask" Version="2.4.1" />
    <PackageReference Include="Microsoft.Azure.WebJobs.Extensions.Http" Version="3.0.12" />
    <PackageReference Include="Microsoft.Azure.WebJobs.Extensions.Storage" Version="4.0.4" />
    <!-- Your remaining packages -->
  </ItemGroup>
  <ItemGroup>
    <None Update="host.json">
      <CopyToOutputDirectory>PreserveNewest</CopyToOutputDirectory>
    </None>
    <None Update="local.settings.json">
      <CopyToOutputDirectory>Always</CopyToOutputDirectory>
    </None>
  </ItemGroup>
</Project>

Updated .NET 8 Project (.csproj)

Make the following changes:

  • Set <TargetFramework> to net8.0.
  • Set <AzureFunctionsVersion> to v4.
  • Add <OutputType>Exe</OutputType>.
  • Replace Microsoft.NET.SDK.Functions With the following packages:


<Project Sdk="Microsoft.NET.Sdk">
  <PropertyGroup>
    <TargetFramework>net8.0</TargetFramework>
    <AzureFunctionsVersion>v4</AzureFunctionsVersion>
    <OutputType>Exe</OutputType>
    <ImplicitUsings>enable</ImplicitUsings>
    <Nullable>disable</Nullable>
  </PropertyGroup>
  <ItemGroup>
    <FrameworkReference Include="Microsoft.AspNetCore.App" />
    <PackageReference Include="Microsoft.Azure.Functions.Worker" Version="2.0.0" />
    <PackageReference Include="Microsoft.Azure.Functions.Worker.Extensions.Http" Version="3.2.0" />
    <!-- Your remaining packages -->
  </ItemGroup>
</Project>

Add the following new ItemGroup:


<ItemGroup> 
  <Using Include="System.Threading.ExecutionContext" Alias="ExecutionContext" /> 
</ItemGroup>

After you make these changes, your updated project should look like this:


<Project Sdk="Microsoft.NET.Sdk">
  <PropertyGroup>
    <TargetFramework>net8.0</TargetFramework>
    <AzureFunctionsVersion>v4</AzureFunctionsVersion>
    <OutputType>Exe</OutputType>
    <ImplicitUsings>enable</ImplicitUsings>
    <Nullable>disable</Nullable>
  </PropertyGroup>
  <ItemGroup>
    <FrameworkReference Include="Microsoft.AspNetCore.App" />
    <PackageReference Include="Microsoft.Azure.Functions.Worker" Version="2.0.0" />
    <PackageReference Include="Microsoft.Azure.Functions.Worker.Extensions.CosmosDB" Version="4.11.0" />
    <PackageReference Include="Microsoft.Azure.Functions.Worker.Extensions.Http" Version="3.2.0" />
    <PackageReference Include="Microsoft.Azure.Functions.Worker.Extensions.Http.AspNetCore" Version="2.0.0" />
    <PackageReference Include="Microsoft.Azure.Functions.Worker.Extensions.Storage.Blobs" Version="6.6.0" />
    <PackageReference Include="Microsoft.Azure.Functions.Worker.Sdk" Version="2.0.0" />
  </ItemGroup>
  <ItemGroup>
    <None Update="host.json">
      <CopyToOutputDirectory>PreserveNewest</CopyToOutputDirectory>
    </None>
  </ItemGroup>
  <ItemGroup>
    <Using Include="System.Threading.ExecutionContext" Alias="ExecutionContext" />
  </ItemGroup>
</Project>

To make all the above changes automatically, we can make use of the .NET UPGRADE ASSISTANT Extension.


Your isolated worker model application should not reference any packages from Microsoft.Azure.WebJobs.* namespace or Microsoft.Azure.Functions.Extensions.

If you have any remaining references to these, they should be removed.


Updating the host.json File

Your host.json The file plays a critical role in configuring the runtime behavior of your Azure Functions. Below is a sample configuration for an upgraded .NET 8 isolated function:


{
    "version": "2.0",
    "logging": {
        "applicationInsights": {
            "samplingSettings": {
                "isEnabled": true,
                "excludedTypes": "Request"
            },
            "enableLiveMetricsFilters": true
        }
    },
    "functionTimeout": "00:05:00", // Set the time according to your needs
    "extensionBundle": {
        "id": "Microsoft.Azure.Functions.ExtensionBundle",
        "version": "[4.0.0, 5.0.0)"
    }
}

Note: Please add this functionTimeout based on your function app plan. More details can be found here.

Updating the Program.cs File

The Program.cs file replaces FunctionStartup and serves as the application’s entry point


using Microsoft.Azure.Functions.Worker.Builder;
using Microsoft.Extensions.DependencyInjection;
using Microsoft.Extensions.Hosting;

var builder = new HostBuilder();
if (builder != null)
{
    builder.ConfigureFunctionsWebApplication().ConfigureServices(service =>
    {
        service.AddHttpClient();
        service.AddLogging();
        // Add configurations according to your needs
    });
}
// Build and run the application
builder.Build().Run();

The program.cs file will replace any file that has the FunctionStartup attribute, which is typically a startup.cs file.

In places where your FunctionStartup code would reference IFunctionHostBuilder.Services, you can instead add statements within the.ConfigureService() method of the HostBuilder in your Program.cs.

Once you have moved everything from any existing FunctionStartup to the program.cs file, you can delete the FunctionStartup attribute and the class it was applied to.


Function Signature changes

Before (In-Process Model)


public static class Function1
{
    [FunctionName("Function1")]
    public static IActionResult Run(
        [HttpTrigger(AuthorizationLevel.Anonymous, "get", "post")] HttpRequest req,
        ILogger log)
    {
        log.LogInformation("C# HTTP trigger function processed a request.");
        return new OkObjectResult("Hello, Azure Functions!");
    }
}

After (Isolated Worker Model)


public class Function1
{
    private readonly ILogger<Function1> _logger;

    public Function1(ILogger<Function1> logger)
    {
        _logger = logger;
    }

    [Function("Function1")]
    public async Task<HttpResponseData> Run(
        [HttpTrigger(AuthorizationLevel.Anonymous, "get", "post")] HttpRequestData req)
    {
        this._logger.LogInformation("C# HTTP trigger function processed a request.");
        var response = req.CreateResponse(HttpStatusCode.OK);
        await response.WriteStringAsync("Hello, Azure Functions!");
        return response;
    }
}

Updatinglocal.settings.json

Modify FUNCTIONS_WORKER_RUNTIME to dotnet-isolated.


{
  "IsEncrypted": false,
  "Values": {
    "FUNCTIONS_WORKER_RUNTIME": "dotnet-isolated"
  }
}

Publishing .NET 8 (Isolated) Azure Functions via Visual Studio

Follow these steps to deploy your function app to Azure using Visual Studio:

Download the Publish Profile

  • Open the Azure Portal.
  • Navigate to your Function App.
  • Go to Deployment Centre> Publish Profile and download the file.

Prepare Your Solution

  • Open your project in Visual Studio.
  • Set the build configuration to Release Mode.
  • Clean the solution to remove old build files.
  • Build the solution to ensure there are no errors.

Publish the Function App

  • In Solution Explorer, right-click on the function app project and select Publish.
  • Choose Import Profile as the publish target.
  • Browse and select the downloaded publish profile.
  • Click Publish and wait for the deployment to complete.

Once the process finishes, your function app is successfully deployed to Azure.


Upgrading in the Azure Portal

Upgrading your function app to the isolated model consists of the following steps:

Navigate to Settings > Environment Variables.

  • Update FUNCTIONS_EXTENSION_VERSION from ~3 to ~4.
  • Change FUNCTIONS_WORKER_RUNTIME to dotnet-isolated.

Under Settings > Configuration, ensure:

  • Runtime version is ~4.
  • General Settings .NET Version is .NET 8 Isolated.


Troubleshooting Error: “Building Configuration in an External Startup Class”Solution:

  • Go to Storage Account > Data Storage > Tables > AzureFunctionsDiagnosticEventsDate.
  • Delete or clear the table.


Conclusion

Upgrading to the .NET 8 Isolated Worker Model enhances the performance and maintainability of your Azure Functions. By following these steps, you ensure a smooth transition while leveraging the latest advancements in .NET and Azure Functions.

December 30, 2021

Web Scrapping in C# using Scraper API and HTMLAgilityPack

Overview:

In this Article, we will explore C# and how to create real life web scrapper using Scraper API and HtmlAgilityPack.

Requirement:

Recently, we have implemented a Scraper API to get data from different pages and dump into either CSV file OR Database for wholesale sourcing and ordering processing of the hospitality company based out Richmond, VA, USA.

Introduction:

What is Scraper API?

Scraper API is used to extract data. Its special purpose is to download large amounts of raw data easily and quickly. It is easy to use. We can scrape by sending the URL you would like to scrape to the API along with your API key and the API will return the HTML responses from the URL you want to scrape.

Get API Key from Scraper API?

We need to pass the API key with each Scraper API request to authenticate requests. For that, you need to sign up for an account here. After signing up on Scraper API, you will get 5000 free requests for a trial.

WEB SCRAPING USING C#

We are going to perform scraping with HTML parsing. We are going to extract data from https://coinmarketcap.com.
This website holds the information of cryptocurrencies, like name, current price, the percentage change in the last 24hrs, 7 days, market capital, etc.

Step-1: Create Project

First, create a project, here we are choosing Console App (.NET Core). You can choose the project template based on your requirement. Right now, our focus is web scraping so, skipped project creation steps.

Step-2: Install NuGet Packages

We require to install the following NuGet packages:
  1. ScraperAPI: This is the official C# SDK for the Scraper Api.
  2. HtmlAgilityPack: It is a .NET code library that allows you to parse "out of the web" HTML files.
Open Package Manager Console and run the below command one by one,
Install-Package ScraperApi
Install-Package HtmlAgilityPack

Step-3: GetDataFromWebPage() method

In this example, we are going to use the HttpClient and ScraperApiClient.
 1
 2
 3
 4
 5
 6
 7
 8
 9
10
11
static async Task GetDataFromWebPage() {
  string apiKey = "cb4b88b493a5d003efadb120698c1f14";
  HttpClient scraperApiHttpClient = ScraperApiClient.GetProxyHttpClient(apiKey);
  scraperApiHttpClient.BaseAddress = new Uri("https://coinmarketcap.com");

  var response = await scraperApiHttpClient.GetAsync("/");
  if (response.StatusCode == HttpStatusCode.OK) {
    var htmlData = await response.Content.ReadAsStringAsync();
    ParseHtml(htmlData);
  }
}

Replace your Scraper API key with “apiKey” variable.

GetProxyHttpClient() is used to create a HTTP client with the scraperapi.com.

GetAsync() will fetch the data from the website and store in local variable. proxy.

Step-4: ParseHtml() method

Once get html data from Webpage, parsing it using the HTMLdocument method. It comes from HtmlAgilityPack.

Next step, load html data and get the ‘tbody’ html tag from it. The tbody tag contains the rows of Cryptocurrency data.

To get more data, use selectSignleNode method. It will return the first HtmlNode that matches the XPath query, it will return a null reference if the matching node is not found. SelectNodes is a collection of Html Nodes.
 1
 2
 3
 4
 5
 6
 7
 8
 9
10
11
12
13
14
15
16
17
18
19
static void ParseHtml(string htmlData) {
  var coinData = new Dictionary < string,
    string > ();
  HtmlDocument htmlDoc = new HtmlDocument();
  htmlDoc.LoadHtml(htmlData);

  var theHTML = htmlDoc.DocumentNode.SelectSingleNode("html//body");
  var cmcTableBody = theHTML.SelectSingleNode("//tbody");
  var cmcTableRows = cmcTableBody.SelectNodes("tr");
  if (cmcTableRows != null) {
    foreach(HtmlNode row in cmcTableRows) {
      var cmcTableColumns = row.SelectNodes("td");
      string name = cmcTableColumns[2].InnerText;
      string price = cmcTableColumns[3].InnerText;
      coinData.Add(name, price);
    }
  }
  WriteDataToCSV(coinData);
}

Step-5: WriteDataToCSV() method

In this example, we have taken the currency name and its price from the scraped data, and store in CSV file.
1
2
3
4
5
6
7
8
9
static void WriteDataToCSV(Dictionary < string, string > cryptoCurrencyData) {
  var csvBuilder = new StringBuilder();

  csvBuilder.AppendLine("Name,Price");
  foreach(var item in cryptoCurrencyData) {
    csvBuilder.AppendLine(string.Format("{0},\"{1}\"", item.Key, item.Value));
  }
  File.WriteAllText("C:\\Kishan\\Webscraping.csv", csvBuilder.ToString());
}

Step-6: Main() method

Replace content of Main method with below code:
1
2
3
static async Task Main(string[] args) {
  await GetDataFromWebPage();
}

Output

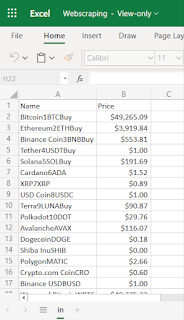
We can see CSV file as output that contains two columns, 1) Currency Name and 2) Price. We can get required column and data based on our need.
Webscraping-csv


Conclusion

In this blog, with the help of ScraperAPI and HtmlAgility Nuget Packages, we can scrap the data from site, filter the require data and dump into CSV file.

If you have any questions you can reach out our SharePoint Consulting team here.

April 15, 2021

How to maintain new Log Files for every execution using Log4net for .NET Application?

Overview:

We recently implemented a Console Application for a Construction Engineering Company based out of Washington, United States using C# for automated execution with the help of Windows Tasks Scheduler to read the data from SharePoint List and create files in the local file system as per the requirements from the client. Most of us have used “Log4net” as a logging tool for our .NET Application. We came across some different requirements wherein we need to maintain the log for each execution in a separate log file. With OOTB configuration the logs are appended in a single file. So, how can we customize this thing?

To achieve this, we will add one custom function of log configuration in our program file. We will append the current date and time after the file name. Using the current date and time we could create a new file with a unique name on every execution. Using this method will create a new file on every execution. So, now let’s get started!

Step 1: Add NuGet Package for "Log4net"

Let’s start with creating an application in Visual Studio. After that, we will use the “Log4net” NuGet package. We will add the “Log4net” library from the Manage NuGet Package. Follow the below steps to add “Log4net”.
  1. In the "Solution Explorer Window," select and right-click on your project
  2. Click "Manage NuGet Packages..."
  3. Click "Online" and then type log4net in the search box
  4. Select the log4net package you would like to install
  5. Click "Install" to start the installation process

Step 2: Add custom method for configuration 

We will create a new method in our class (.cs) file. You can use any class(.cs) file to create this method. Here, we will use the same class (.cs) file available in our solution!

Add the below lines of code.
     public static void initLog4Net()  
     {  
       try  
       {  
         var hierarchy = (log4net.Repository.Hierarchy.Hierarchy)log4net.LogManager.GetRepository();  
         hierarchy.Configured = true;  
         var rollingAppender = new log4net.Appender.RollingFileAppender  
         {  
           File = Path.GetDirectoryName(Process.GetCurrentProcess().MainModule.FileName) + "\\" +  
           "LogFiles\\" + "C#LogFile_" + DateTime.Now.ToString("yyyyMMddTHHmm") + ".log",  
           AppendToFile = true,  
           LockingModel = new log4net.Appender.FileAppender.MinimalLock(),  
           Layout = new log4net.Layout.PatternLayout("%date [%thread] %level %logger - %message%newline")  
         };  
         var traceAppender = new log4net.Appender.TraceAppender()  
         {  
           Layout = new log4net.Layout.PatternLayout("%date [%thread] %level %logger - %message%newline")  
         };  
         hierarchy.Root.AddAppender(rollingAppender);  
         hierarchy.Root.AddAppender(traceAppender);  
         rollingAppender.ActivateOptions();  
         hierarchy.Root.Level = log4net.Core.Level.All;  
       }  
       catch (global::System.Exception ex)  
       {  
         new Exception(ex.Message);  
       }  
     }  
Using the above code, we can create a new log file on every execution in the same folder from where we execute this application.

As shown in the below code snippet we declare our filename with appended date-time format.

 File = Path.GetDirectoryName(Process.GetCurrentProcess().MainModule.FileName) + "\\" +  
           "LogFiles\\" + "CDMDepartment_" + DateTime.Now.ToString("yyyyMMddTHHmm") + ".log",  
This will generate the new file in the “LogFiles” folder. The name of the log will start with “C#LogFile_” and with that, it will add the current date-time in (“yyyyMMddTHHmm”) format. We can change the name of the file as well as the date-time format.

Here we will make sure we would add the proper format of date and time based on how many times we execute this application in one day.

Step 3: Create an instance of the logger file

To create an instance of logger file add the below code within a class.
 public static class Program  
   {  
     private static readonly log4net.ILog log = log4net.LogManager.GetLogger(System.Reflection.MethodBase.GetCurrentMethod().DeclaringType);  
   }  

Step 4: Call the log file and use it

We need to call the method for creating a log. We need to call this method at the starting of the application so we can use it in our code.
 static void Main()  
     {  
         Console.Clear();  
         initLog4Net();  
         log.Info("Welcome to Application Program");  
     }  
As shown above, after a call of the “initLog4Net” function we used the “log.Info” to print this to the logger file.

We can also use other formats of the logging as following.
  • Log.Error();
  • Log.Debug();
  • log.Warn();
  • log.Fatal();

Now we can run our application and it will create a file as “C#LogFile_20201221T2238”.


Conclusion: 

This is how we can use the “Log4Net” library and we can create new a file on every execution of an application. Hope, this helps.

If you have any questions you can reach out our SharePoint Consulting team here.

April 8, 2021

Access Events from Shared Calendar Using Exchange Web Service and Store Events Data to SharePoint List with C# Console Application

Introduction:

We implemented the intranet solution for a consulting firm based out of Alpharetta, GA, USA. One of the requirements was to store events from Shared Outlook Calendar (Office 365) to SharePoint List for easier accessibility for the users. In this blog, we will learn how to get events from a Shared Outlook Calendar using Microsoft Exchange web service and store in SharePoint Online List with CSOM using C# console application.

So, now Let’s get started with the procedure to build the custom console application.

Step 1: Create Solution

  1.  Open Visual Studio 2019, Click on Create New Project and then Choose Console App (.NET Framework).
  2.  Give it a meaningful Project Name and in Framework select .NET Framework 4 and click "Create".


Step 2: Establish Connectivity with Microsoft Exchange Webservice

  1. Install "Microsoft.Exchange.WebServices" NuGet package.
  2. Add namespace “using Microsoft.Exchange.WebServices.Data;”
  3. We will be using Exchange Service class to connect the Shared Calendar.
  4. We can use the below piece of code to create the instance of ExchangeService and define the credentials & endpoint URL.
     ExchangeService service = new ExchangeService(ExchangeVersion.Exchange2010);  
     service.Credentials = new WebCredentials("userEmailAddress", "userPassword");  
     service.Url = new Uri("https://outlook.office365.com/ews/exchange.asmx");  
    

Step 3: Get Calendar Events

  1. The calendar can contain some folder, with the use of the "FolderView" class we can retrieve the same. Constructor FolderView(100) Initializes a new instance of the FolderView class with the maximum number of returned folders specified.
     FolderView view = new FolderView(100);
    

  2. Initialize a new instance of the FolderId class with the specified folder name and mailbox.
     FolderId folderToAccess = new FolderId(WellKnownFolderName.Calendar, "shared Email");  
     FolderId(WellKnownFolderName, Mailbox)  
    Use this constructor to link this folder ID to a well-known folder (for example, Inbox, Calendar or Contacts) in a specific mailbox.

  3. FindFoldersResults Represents the results of a folder search operation.
     FindFoldersResults findFolderResults = service.FindFolders(WellKnownFolderName.Root, view);  
    
    FindFolders Obtains a list of folders by searching the subfolders of the specified folder.

  4. CalendarFolder Represents a folder that contains appointments.
     var calendar2 = CalendarFolder.Bind(service,folderToAccess);  
    
    CalendarFolder.Bind(service,folderToAccess) binds to an existing calendar folder and loads its first-class properties. Calling this method results in a call to Exchange Web Services (EWS).

  5. Define a date range view of appointments in the calendar folder search operations.
     CalendarView cv = new CalendarView(StartDate, EndDate);  

  6. FindAppointments obtains a list of appointments by searching the contents of a specified folder.
     FindItemsResults<Appointment> fapts = service.FindAppointments(folderToAccess, cv);  
    
    FindItemsResults<Appointment> a collection of appointments that represents the contents of the specified folder.

    Now with the use of appointment class property, we can retrieve Event Subject, Organizer, and other property.

  7. Here, we will get the Event Title and Organizer.

Step 4: Store in SharePoint List.

  1. Once we get data, we can store it in SharePoint List with CSOM. We will add the Event subject and Organizer Name, for that we create one Single Line of Text and one Person column in a SharePoint List.
  2. Add namespace “using Microsoft.SharePoint.Client;” and “using System.Security;”.
  3. Represents the context for SharePoint objects and operations.
     ClientContext clientContext = new ClientContext(siteUrl);  
    

  4. Give Email and Password, Gets or sets the authentication information for the client context
     clientContext.Credentials = new SharePointOnlineCredentials("username", "password");  
    

  5. Connect List.
     List appointmentsList = clientContext.Web.Lists.GetByTitle("Appointments");  
    

  6. ListItemCreationInformation specifies the properties of the new list item.
     ListItemCreationInformation itemCreateInfo = new ListItemCreationInformation();  
    
    ListItem represents an item or row in a list.

  7. List.AddItem method returns a ListItem instance representing the creation of a new list item in the list.
     ListItem newItem = appointmentsList.AddItem(itemCreateInfo);  
    

  8.  As we know to add items in Person columns into the list, we need to provide Id, below code, will get Id of the organizer.
     var demo = Appoint.Organizer;  
     string testName = demo.ToString();  
     var demo2 = testName.Substring(0, testName.IndexOf("<") - 1);  
     User userTest = clientContext.Web.EnsureUser(demo2);  
     clientContext.Load(userTest);  
     clientContext.ExecuteQuery();  
    

  9. Now, the final step to insert a record into the SharePoint list.
     newItem["Title"] = Appoint.Subject;  
     newItem["Users"] = userTest.Id;  
     newItem.Update();  
     clientContext.ExecuteQuery();  
    

Complete Code

 using System;  
 using Microsoft.Exchange.WebServices.Data;  
 using Microsoft.SharePoint.Client;  
 using System.Security;  
 using Folder = Microsoft.Exchange.WebServices.Data.Folder;  
 namespace SharedCalender  
 {  
 class Program  
 {  
 static void Main(string[] args)  
 {  
 ExchangeService service = new ExchangeService(ExchangeVersion.Exchange2010);  
 service.Credentials = new WebCredentials("userEmailAddress", "userPassword");  
 service.Url = new Uri("https://outlook.office365.com/ews/exchange.asmx");  
 FolderView view = new FolderView(100);  
 FolderId folderToAccess = new FolderId(WellKnownFolderName.Calendar, "shared Email");  
 FindFoldersResults findFolderResults = service.FindFolders(WellKnownFolderName.Root, view);  
 foreach (Folder f in findFolderResults)  
 {  
 var calendar2 = CalendarFolder.Bind(service,folderToAccess);  
 DateTime StartDate = DateTime.Today.AddMonths(-1);  
 DateTime EndDate = DateTime.Today.AddMonths(1);  
 CalendarView cv = new CalendarView(StartDate, EndDate);  
 FindItemsResults<Appointment> fapts = service.FindAppointments(folderToAccess, cv);  
 if (fapts.Items.Count > 0)  
 {  
 foreach (Appointment Appoint in fapts)  
 {  
 string siteUrl = "https://constoso.sharepoint.com/sites/SiteName";  
 ClientContext clientContext = new ClientContext(siteUrl);  
 SecureString passWord = new SecureString();  
 foreach (char c in "Password".ToCharArray()) passWord.AppendChar(c);  
 clientContext.Credentials = new SharePointOnlineCredentials("userEmailAddress", passWord);  
 List appointmentsList = clientContext.Web.Lists.GetByTitle("TestList");  
ListItemCreationInformation itemCreateInfo = new ListItemCreationInformation(); ListItem newItem = appointmentsList.AddItem(itemCreateInfo);
//get user id var demo = Appoint.Organizer; string testName = demo.ToString(); var demo2 = testName.Substring(0, testName.IndexOf("<") - 1); User userTest = clientContext.Web.EnsureUser(demo2); clientContext.Load(userTest); clientContext.ExecuteQuery(); newItem["Title"] = Appoint.Subject; newItem["Users"] = userTest.Id; newItem.Update(); clientContext.ExecuteQuery() } } Console.ReadLine(); } } } }

Conclusion:

This is how we can access Events from Shared Calendar using Exchange web service and store data to SharePoint list.

If you have any questions you can reach out our SharePoint Consulting team here.