Showing posts with label CanvasApp. Show all posts

June 12, 2025

Embed PDFs in Power Apps Using the Experimental PDF Viewer

Introduction

Power Apps now offers an experimental PDF Viewer control that lets you display PDFs directly within your app interface. This is especially helpful in use cases like displaying reference documents, training guides, or reports stored in SharePoint Document Libraries - without requiring users to download them.

Below is a detailed, step-by-step guide to help you display a PDF stored in SharePoint within your Power Apps application using the experimental PDF Viewer control. 

Power Apps - PDF Viewer

Step-by-Step Instructions:

Step 1: Open or Create a Power Apps Project 

  • Navigate to https://make.powerapps.com.
  • Either:
  • Create a new Canvas app (start from blank), or
  • Open an existing app where you want to display the PDF.

Step 2: Connect to SharePoint Document Library 

  1. From the left panel, click on Data.
  2. Click on + Add data.
  3. Search for SharePoint and select it.
    Add data source in Power apps

  4. Choose your account, paste or search for your SharePoint Site URL, and then click Connect.
  5. Select your Document Library where your PDFs are stored, then click Connect.
  6. (Optional) Open your SharePoint Document Library in a new tab and upload your PDF if it's not already available. This ensures the document can be linked and previewed in Power Apps.

Step 3: Insert the Experimental PDF Viewer 

  1. In Power Apps, click on the Insert or + icon on the left toolbar.
  2. Use the search bar to search for PDF Viewer (experimental).
    Insert PDF viewer (experimental)

  3. Click to insert it into your screen.

Step 4: Set Up PDF Viewer to Display a File 

Start by using this formula in the Document property of the PDF Viewer: 

LookUp(Documents, Name = "Sample PDF.pdf").'Link to item'

Note: This may not always work as expected in Power Apps. If the PDF doesn't load, try the workaround method below to generate a direct file link. 

Workaround: Generate a Direct PDF URL Manually 

Sometimes Power Apps doesn't support rendering the default SharePoint link ('Link to item'). Instead, you can manually create a direct PDF link. 


Steps to generate a working PDF link: 

1. In SharePoint Document Library:

  1. Click on + Add Column > Select Hyperlink.
  2. Name it: Link

2. Once the column is created, go to Library Settings, then click on the Link column. 

  1. Change Format URL as: from Hyperlink to Picture.
    Library Setting - Hyperlink to Link

3. Back in your Document Library: 

  1. Click on the ellipsis (...) next to the PDF file.
  2. Click Open in browser. The PDF opens in a new tab.
  3. Copy the full URL. Remove everything after .pdf so that the link ends with .pdf.

4. Go back to your document library and:

  1. Click on Edit in grid view.
  2. Paste this cleaned-up PDF URL into the Link column for that file.
  3. Click Exit grid view to save changes. 

Edit in grid and update the url - remove extra from the link ends with .pdf
Step 5: Update Power Apps to Use the Cleaned URL 

Finally, update the Document property of the PDF Viewer to reference your new link column: 

LookUp(Documents, Name = "Sample PDF.pdf").Link

Success! Your PDF should now render properly inside the Power Apps screen. 

Show PDF in Power Apps using PDF viewer


Pro Tips:

  • Use Preview mode (F5) to test PDF rendering.
  • Ensure your PDF link ends with .pdf - any additional query parameters or tokens may break it.
  • This experimental control works best with direct-access or publicly accessible links.

Use Case Example:

This method is ideal for onboarding portals, document approval systems, training guides, or resource libraries where documents need to be viewed quickly without download. 


Conclusion:

Embedding PDFs within Power Apps is now easier thanks to the experimental PDF Viewer control. With a direct SharePoint link configured properly, you can enable seamless in-app PDF viewing for onboarding guides, reference documents, and more - without needing third-party tools or downloads. 

If you have any questions you can reach out our SharePoint Consulting team here.

January 6, 2020

Retrieve User Profile information from Delve using Office 365 Connector in Power Apps

Introduction:
We have come across with specific requirement to fetch User Profile properties from Delve for the specific user, by having a custom People Picker in Power Apps - Canvas App.

Please refer to this article for creating Custom People Picker.

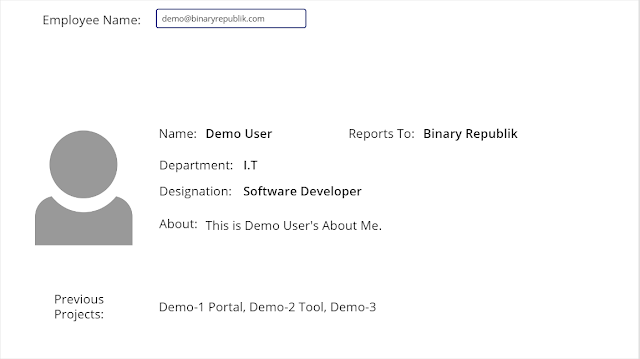
The expected end result is as follows, where the current logged-in user will search for the Employee using email ID and Delve Profile information will be displayed in the App.

So, now let’s start the development process to fulfill the requirement.

A. Create a Template to display User Profile Information:
1. In this App. we are displaying the following Delve properties to the end-user.
  • Name
  • Reports to Manager
  • Department
  • Designation
  • About
  • Previous Projects
  • Employee Photo

2. To display the information, we will use Labels and Image controls in Power Apps.


B. Configure properties to fetch infromation:
3. Once template is created, we need to configure the properties for each control. Please find the below table showing all the information which are mapped for each control.
Property Name
Event for the Selected Property
Formula/ Text/URL
Name
Text
If(IsBlank(SelectedUserEmail),"",Office365Users.UserProfileV2(SelectedUserEmail).displayName)
Reports To
Text
If(IsBlank(SelectedUserEmail),"",Office365Users.ManagerV2(SelectedUserEmail).displayName)
Department
Text
If(IsBlank(SelectedUserEmail),"",Office365Users.UserProfileV2(SelectedUserEmail).department)
Designation
Text
If(IsBlank(SelectedUserEmail),"",Office365Users.UserProfileV2(SelectedUserEmail).jobTitle)
About
Text
If(IsBlank(SelectedUserEmail),"",Office365Users.UserProfileV2(SelectedUserEmail).aboutMe)
Previous Projects
Text
Office365Users.UserProfileV2(SelectedUserEmail).pastProjects.Value
Profile Image
Image
If(IsBlank(SelectedUserEmail),"",Office365Users.UserPhotoV2(SelectedUserEmail))
          **Please refer references section for the other User Properties.

4. Once the properties are configured, let’s check the output. Search for the user and select value from the suggestion box.
And here it is!! The output will be shown in the following screen.

References:
Below is the list of the functions of Office 365 Users.
  • Office365Users.DirectReportsV2
  • Office365Users.ManagerV2
  • Office365Users.MyProfileV2
  • Office365Users.MyTrendingDocuments
  • Office365Users.RelevantPeople
  • Office365Users.SearchUsers
  • Office365Users.TrendingDocuments
  • Office365Users.UserPhotoV2
  • Office365Users.UserPhotoMetadata
  • Office365Users.UserProfileV2

Below is the list of properties which we can get using a user’s email.
  • Office365Users.UserProfileV2(SelectedUserEmail).aboutme
  • Office365Users.UserProfileV2(SelectedUserEmail).accountEnabled
  • Office365Users.UserProfileV2(SelectedUserEmail).birthday
  • Office365Users.UserProfileV2(SelectedUserEmail).bussinessPhones
  • Office365Users.UserProfileV2(SelectedUserEmail).city
  • Office365Users.UserProfileV2(SelectedUserEmail).companyName
  • Office365Users.UserProfileV2(SelectedUserEmail).country
  • Office365Users.UserProfileV2(SelectedUserEmail).department
  • Office365Users.UserProfileV2(SelectedUserEmail).displayName
  • Office365Users.UserProfileV2(SelectedUserEmail).givenName
  • Office365Users.UserProfileV2(SelectedUserEmail).hireDate
  • Office365Users.UserProfileV2(SelectedUserEmail).id
  • Office365Users.UserProfileV2(SelectedUserEmail).interests
  • Office365Users.UserProfileV2(SelectedUserEmail).jobTitle
  • Office365Users.UserProfileV2(SelectedUserEmail).mail
  • Office365Users.UserProfileV2(SelectedUserEmail).mailNickname
  • Office365Users.UserProfileV2(SelectedUserEmail).mobilePhone
  • Office365Users.UserProfileV2(SelectedUserEmail).mySite
  • Office365Users.UserProfileV2(SelectedUserEmail).officeLocation
  • Office365Users.UserProfileV2(SelectedUserEmail).pastProjects
  • Office365Users.UserProfileV2(SelectedUserEmail).postalCode
  • Office365Users.UserProfileV2(SelectedUserEmail).prefferredLanguage
  • Office365Users.UserProfileV2(SelectedUserEmail).responsibilities
  • Office365Users.UserProfileV2(SelectedUserEmail).schools
  • Office365Users.UserProfileV2(SelectedUserEmail).skills
  • Office365Users.UserProfileV2(SelectedUserEmail).state
  • Office365Users.UserProfileV2(SelectedUserEmail).streetAddress
  • Office365Users.UserProfileV2(SelectedUserEmail).surname
  • Office365Users.UserProfileV2(SelectedUserEmail).userPrincipleName
  • Office365Users.UserProfileV2(SelectedUserEmail).userType


If you have any questions you can reach out our SharePoint Consulting team here.

December 30, 2019

How to build a Custom People Picker in Power Apps

In Power Apps - Canvas App, we came across the specific requirement to have a custom people picker where user can search employees by its name and associated email-id should be displayed in the drop-down.

We know, Power Apps doesn’t provide any OOTB people picker without Form control. That’s why we need to build a custom people picker in our App. So, let start creating the custom people picker in Power Apps.


A. Create Custom People Picker:
Please follow the below steps to create our own custom people picker with the suggestion box.

  1. Add Data Source. To add the data source, Go to the View menu and then select Data Sources option.

  2. Click on “Office 365 Users” for adding the Data Source.
                         

  3.  Now, add  List Box” and “Text Input” Control.
    • To add List Box click on “Insert” then on “Controls” -> “ListBox

    • To add Text Box click on “Insert” then in “Text” select “Text Input”.
  4. Select the Textbox control which we have added in Step 3 and configure the following properties.
    • Text Box
      • Default: SelectedUserEMail
      • OnSelect: Set(UsersListBox,true)
    • List Box
      • Items: If(!IsBlank(TextInput2.Text), Office365Users.SearchUser({searchTerm:TextInput2}).Mail)
      • Visible: UsersListBox
      • OnSelect: Set(SelectedUserEmail, ListBox1.SelectedText.Value); Set(UsersListBox,false);Reset(TextInput2)

Now, let’s test our custom people picker!
  • Search for the Employee name in textbox of Custom people picker.
  • It will show the email-id property of that user in the suggestion box. Currently, we have displayed only “Email Property” in the combo box. However, we can show the other Office 365 properties as well.

If you have any questions you can reach out our SharePoint Consulting team here.