
In SharePoint, permissions are crucial for ensuring appropriate access to resources within SharePoint sites. There may be instances where you need to replicate the permissions of one site to another. To achieve this, a method for copying or migrating SharePoint site permissions from one site to another is necessary.
In this article, we will provide a step-by-step guide on how to copy or migrate SharePoint site permissions from one site to another.
For Migrating the Permission we will be using the ShareGate Migration Tool, Its a migration tool that simplifies and accelerates migration processes directly to the latest SharePoint or Microsoft 365.
Prerequisites:
ShareGate licence
ShareGate Migration Tool Installed
The user performing this action must be a Site Collection Administrator
PowerShell version 3.0 or higher (Note: This will not work with version 7.0)
Method 1 Using ShareGate Migration tool:
The ShareGate migration tool offers user-friendly features that simplify any migration task. When migrating permissions, you can select the source site and destination site, ensure proper mapping, and migrate the permissions with just a click. Follow the steps below to migrate permissions using the migration tool.
Step 1: Open the ShareGate Migration Tool. In the left section, click on "Copy" and then select "Copy Structure and Content."

Step 2: Enter the source site URL, select "Browser for Authentication," and log in with your credentials.

Step 3: Similarly, log in to the destination site by entering the destination URL and selecting "Browser" as the authentication type. Once logged in to both the source and destination sites, you will see the following interface.

Step 4: First, migrate the Permission Levels, and then migrate the SharePoint Groups from the source site to the destination site.
Select the Permission Levels, choose the specific Permission Levels you want to migrate, and then click "Start Copy."

With this, the permission roles will be copied to the destination site. Next, we can proceed to migrate the SharePoint Groups across the sites.
Open the SharePoint Groups from the Site Objects.
Step 5: Now, select all the groups that you want to migrate to the destination site.

Make sure that Mapping is set for the default Groups of SharePoint like Members, Owners and Visitors under mappings as shown below.
ShareGate Mapping provides a way to map the source object with destination and set the content accordingly in the destination as per the mapping.
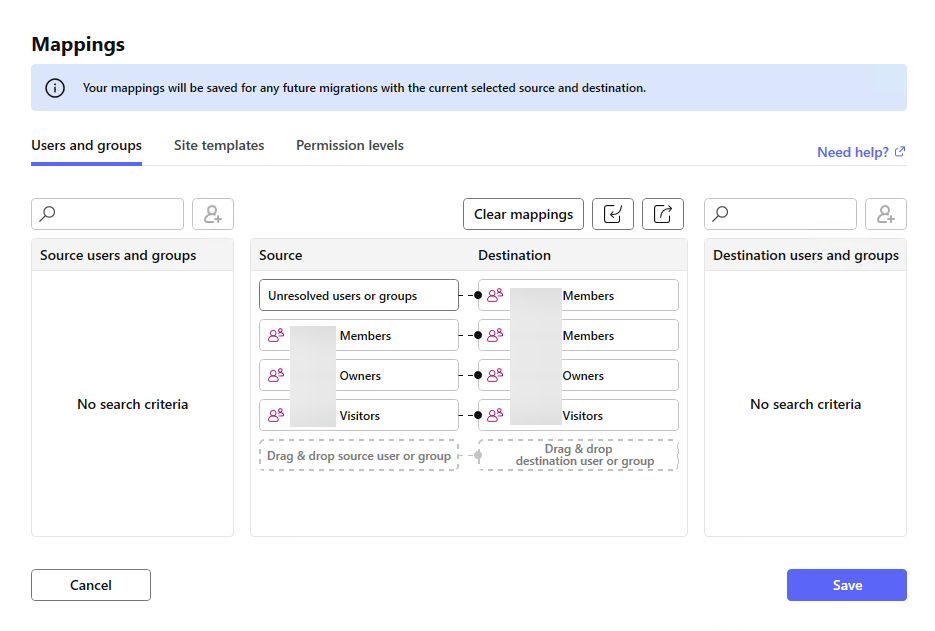
Now, click "Start Copy" to begin copying the SharePoint groups along with their members.

After the copying task is completed, you will see that the groups have been migrated. You can also verify the members of each group by checking the respective site.
Method 2: Using ShareGate & PnP PowerShell
PowerShell is a robust command-line tool that can automate numerous tasks in Microsoft 365. For copying SharePoint site permissions from one site to another, we will use ShareGate PowerShell. Execute the following PowerShell script to copy the SharePoint site permissions.
Note: Please ensure that you have the Sharegate module imported before running this script. Additionally, ensure that PnP.PowerShell version 1.12 is installed (ShareGate Migration tool must be installed on your system).
To import the Sharegate module, use the following command:
Import-Module Sharegate
Install-Module PnP.PowerShell -RequiredVersion 1.12 -Force
Execute the script provided below.
Enter your login credentials when prompted to access the site.
The script will then continue its execution.
#Config Parameters
$SourceSite = "<<Source Site>>"
$DestinationSite = "<<Destination Site>>"


#Function to Copy-Migrate the SharePoint Site Level Permission from one site to another
Function Copy-MigrateSiteLevelPermission {
    param (
        $DestinationSite,
        $SourceSite
    )

    Write-Host "Establishing the connection between source site and destination site..."
    $Source = Connect-Site -Url $SourceSite -Browser
    $Destination = Connect-Site -Url $DestinationSite -UseCredentialsFrom $Source

    Write-Host "Setting up the Mappings for the Default SharePoint Groups..."
    $mappingSettings = New-MappingSettings
    $mappingSettings = Set-UserAndGroupMapping -Source "Destination Site Members" -Destination "Source Members"
    $mappingSettings = Set-UserAndGroupMapping -MappingSettings $mappingSettings -Source "Destination Site  Owners" -Destination "Source Owners"
    $mappingSettings = Set-UserAndGroupMapping -MappingSettings $mappingSettings -Source "Destination Site  Visitors" -Destination "Source Visitors"

    Write-Host "Copying the Permission from one site to another..."
    Copy-ObjectPermissions -Source $Source -Destination $Destination -MappingSettings $mappingSettings
    Write-Host "Permission Copied Successfully from one site to another..." -f Green
}


#Function to Copy the Permission Level from one site to another
Function Copy-PermissionLevel {
    param (
        $DestinationSite,
        $SourceSite
    )
    Write-Host "Connecting with Source and Destination Site..."

    $SourceSiteConnection = Connect-PnPOnline -Url $SourceSite -UseWebLogin -ReturnConnection
    $DestinationSiteConnection = Connect-PnPOnline -Url $DestinationSite -UseWebLogin -ReturnConnection


    Write-Message "Starting the Migration Process for Permission Levels..."
    Write-Message "Reading all the Permission Level From source site..."
    $AllPermissionLevel = Get-PnPRoleDefinition -Connection $SourceSiteConnection


    foreach ($permissionLevel in $AllPermissionLevel) {


        $permissionLevelName = $permissionLevel.Name
        Write-Host "Migration: $permissionLevelName"
        Write-Host "Checking permission level $permissionLevelName..."

        if (!(Get-PnPRoleDefinition -Identity $permissionLevelName -ErrorAction SilentlyContinue -Connection $DestinationSiteConnection)) {
            Write-Host "Creating new permission level $permissionLevelName..."

            if ($permissionLevel.PermissionLevels) {
                Add-PnPRoleDefinition -RoleName $permissionLevelName -PermissionLevels $permissionLevel.PermissionLevels -Description $permissionLevel.Description -Connection $DestinationSiteConnection
            }
            else {
                Add-PnPRoleDefinition -RoleName $permissionLevelName -Clone $permissionLevel -Description $permissionLevel.Description -Connection $DestinationSiteConnection
            }
        }
    }
    Write-SuccessMessage "Permission Level Migration Completed successfully..."
}

#Execute the Function to Copy the Permission Level
Copy-PermissionLevel -DestinationSite $DestinationSite -SourceSite $SourceSite

#Execute the Function with Parameter to Copy the Groups and other Permissions
Copy-MigrateSiteLevelPermission -DestinationSite $DestinationSite -SourceSite $SourceSite




