August 26, 2021

Overview on adding custom columns in Azure Cosmos DB

Introduction

We recently implemented a console application for a Postal and Parcel company based out of Melbourne, Victoria, Australia. In this, we have to store the user's login track details to a Cosmos DB. So we needed to add few custom columns in the Azure Cosmos DB container to store this type of information.


In this blog, we will look into the overall structure of the Cosmos DB container and we will be creating few custom columns also.

Solution

  • The Cosmos DB is a schema-free and unstructured database. It means that we can store data without considering its format.
  • The Cosmos DB has tables as containers for the database.
  • The container stores data in JSON format. So, we can store JSON objects as an item in the container of Cosmos DB. 
  • We can add any number of custom columns and their values as a JSON property.
  • The Cosmos DB container requires only one mandatory property it's the Item ID ("id"). and the Item ID is a not null and unique field. It has 255 characters limit.

Creating an item with custom columns

First, we need to pass a JSON format object to create a new item as shown below. 

 {    

   "id": "1",    

   "User name": "Aniket Chauhan",    

   "Email Address": "aniket.chauhan@binaryrepublik.com",    

   "Logged Date Time": "2021-07-09T09:07:19.2825515Z",    

}   

Now when we save this new item it will be stored with some system-generated fields as shown below. 


Here, the User name, Email Address, and Logged Date Time properties are custom columns.
When we create an item in the cosmos DB container it generates 5 extra properties.
  1. _rid: The resource ID (_rid) is a unique identifier that is used internally for navigation and placement of the resource.
  2. _self: It is the unique addressable URI for the item.
  3. _etag: Entity tag(_etag) used for optimistic concurrency control.
  4. _attachments: It specifies the addressable path for the attachment resource.
  5. _ts: It stores the timestamp of the last update of the item.
Note: We can also pass the GUID for the "id" field as per our requirement.

Conclusion

This is how we can add custom columns in Cosmos DB. Hope this helps, good day!


If you have any questions you can reach out our SharePoint Consulting team here.

August 5, 2021

How to add user to Office 365 Group using Power Automate?

Overview:

We recently implemented an application on Power Platform for a consulting firm based out of Alpharetta, Georgia, United States. We came across a scenario to add the user to Office 365 Group using Power Automate. So, how can we achieve this requirement? Let's get started.

Step 1:

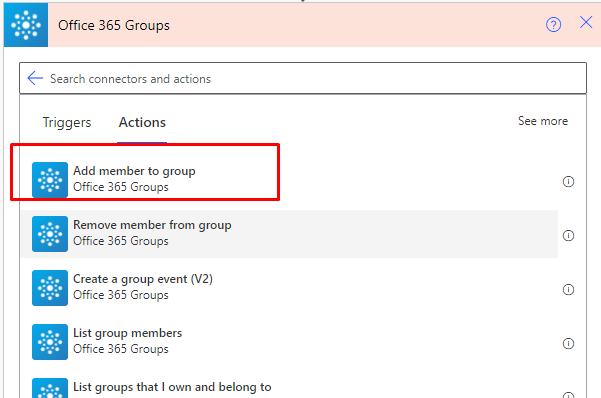
Create Power Automate flow and search for “Office 365 Groups”.
 

Step 2:

From, action choose “Add member to group”.
 

Step 3:

It will ask for following two parameters:
Group ID = It will show all groups available to your Office 365 account.
User Principal Name  = We need to provide user name to be added to the group.


Step 4:

Run the Power Automate flow and check the result.
The user has been added to Office 365 Group.
 

Conclusion:

This is how we can simply add user to Office 365 groups! Happy Automation!

If you have any questions you can reach out our SharePoint Consulting team here.

July 22, 2021

How to apply styles dynamically In SPFx web part?

Introduction:

We implemented an intranet portal for a Real Estate Agency based out of Bellevue, Washington, United States. We came across a requirement to apply styles dynamically in the custom SPFx webpart based on the color selected in the property panel of the SPFx webpart. Let's see how this functionality can be achieved.

Requirement:

We need to apply the color of text based on the color selected in the property panel. In the property panel, we have added a textbox, where users can add a color code or a color name that they want as the text color.

Implementation:

We have applied the class name for the div where we are showing texts. In the CSS file, we need to define the color of the text using variables. 

The CSS will be as below:
 .ProjectTitle{  
      color: var(--projectTitleColor);  
 }  

And our HTML will be as below:
 <div className="ProjectTitle">  
      Intranet Portal       
 </div>  

As we can see, in the CSS we have used a variable for applying the color. Now we will assign the value to this variable. First, we will get the value from the text box of the property panel as below:
 var colorName = this.props.TextColor;  

Now we will use colorName variable, to assign a color to the style’s variable. 
 let div = document.createElement('style');  
 div.innerHTML = ':root {-- projectTitleColor: ' + colorName + ' }';  
 document.getElementsByTagName('head')[0].append(div);  

So here we created a new element for style and appended this element in the head element of the page.
Whatever value we assign to the variable – projectTitleColor, it will assign to the color style in the CSS file. Here in this example, we have used a CSS file, but you can also use the same steps for SCSS file as well.

Conclusion:

This is how we can apply dynamic styles. Hope this helps you!

If you have any questions you can reach out our SharePoint Consulting team here.