Showing posts with label Microsoft Flow. Show all posts

March 10, 2022

How to create a Teams Invite using Power Automate?

Overview:

In this blog, we will learn how we can create a Teams Invite using Power Automate. So, Let’s get started!

Business Requirement:

When a SharePoint List Item is created, we want to create a Microsoft Teams Invite with the help of Power Automate! We have a list structure with the following list schema. Now, let’s start building the flow.

Step 1:

Add a Trigger – “When an item is created”. Provide Site address and URL.

Step 2:

Initialize two variables with the type String and Array.

Step 3:

Create Attendees array using the following JSON structure. Here, we need to provide “AttendeesDisplayName” and “Attendees Email”. This will automatically add Apply to each loop.
 {  
  "type": "required",  
  "emailAddress": {  
   "name": "@{items('Apply_to_each')?['DisplayName']}",  
   "address": "@{items('Apply_to_each')?['Email']}"  
  }  
 }  

Step 4:

Set Meeting Body with the following structure.
 {  
  "subject": "@{triggerOutputs()?['body/Title']}",  
  "body": {  
   "contentType": "HTML",  
   "content": "@{triggerOutputs()?['body/Description']}"  
  },  
  "start": {  
   "dateTime": "@{triggerOutputs()?['body/StartDate']}",  
 "timeZone": "UTC"  
  },  
  "end": {  
   "dateTime": "@{triggerOutputs()?['body/EndDate']}",  
   "timeZone": "UTC"  
  },  
  "location": {  
   "displayName": "Online"  
  },  
 "attendees": @{variables('vAttendees')} ,  
  "isOnlineMeeting": true,  
  "onlineMeetingProvider": "teamsForBusiness"  
 }  

Step 5:

Add an action – “Invoke an HTTP request”
Add Method as “POST”
Add URL of the request, Headers, and pass “MeetingBody” for the body of the request.

Click on ellipses and select - "Add new connection"

Provide Base Resource URL and Azure AD Resource URI for Microsoft Graph.

Step 6:

Now, let’s save & test the flow.

Flow ran successfully.

Teams invite has been generated successfully.

Conclusion:

This is how we can simply create Power Automate flow to create Teams Meeting invite! Happy Power Apping!

If you have any questions you can reach out our SharePoint Consulting team here.

December 16, 2021

[Issue Resolved]: "You must specify a value for this required field" error while updating a Multi Valued Managed Metadata column value in Power Automate


Introduction

Recently, we implemented an OOTB Document Approval process using Power Automate for a Postal and Parcel company based out of Melbourne, Victoria, Australia. The approval process was built using the "Start and wait for an Approval" action of Power Automate and based on the approver's response the Power Automate was updating the status and other metadata fields of the Document in the SharePoint Library.  So, here we encountered an issue while updating a multi-valued managed metadata column to the SharePoint Library and we resolved it by providing a valid expression value which we will explain in further process.


In this blog, we will learn about the "You must specify a value for a required field" issue and its solution that will help us to store its value in the document library.  

Issue

      • In Power Automate, we used an update item SharePoint action for a multi-valued managed metadata column. 
      • When we use the value of the trigger field it was not binding the value accordingly and the Update item action returns the error “You must specify a value for this required field” message with 400 status code as shown below. 

      • We tried with the trigger values of the Category managed property but it was giving as invalid as shown below. 


      • We tried with other metadata properties also like the Category value but it was creating an Apply to each loop because it is a multi-value field and this loop updates the item multiple times with different category field values which was not the correct behavior. 

      Solution

        • When we use update item action, we have to provide all the required field values. 
        • If we do not provide a proper value, then update item action would return this type of error. 
        • As this column was a multi-valued managed metadata column, we have to create an array variable and store all the values in the array with a specific format for storing the value in a correct format to the library. 
        • First, we will create an array variable as shown below. 

        • Now we will store all the managed metadata values in the array inside the Append to array variable action. For that we will pass the expression value in format {item('Apply_to_each_3')?['Value']} as shown below. 


        • We will use the array in the Update item action as shown below.


        Hence, a multi-valued managed metadata column Category values will be stored in the library with the proper format.

        Conclusion

        This is how we can resolve the error with managed metadata multi-valued field in Power Automate. Hope this helps, good day! 

        If you have any questions you can reach out our SharePoint Consulting team here.

        September 23, 2021

        Introducing Co-Presence in Power Automate

        Overview

        Microsoft recently rolled out a prominent feature which is “Co-Presence” functionality in Power Automate. Most of the time, when we are working with multiple developers on the same Flow, we are unaware of who is editing the Flow? With this new feature, now we can track all the persons who are editing the Flow in real-time. 

        If multiple users make changes to the flow simultaneously, Power Automate detects conflicts during the Flow save operation and presents appropriate options to the user to minimize conflicts. So, let’s get started!

        Step 1:

        We have one Power Automate Flow which is shared with Dhruvin and Shriraj.


        Step 2:

        Dhruvin and Shriraj both have opened the Flow in Edit Mode.

        Step 3:

        Dhruvin can see Shriraj’s avatar as “Co-Presence”.

        Step 4:

        Now, let’s make some changes with Shriraj’s account and Save the Flow. The changes will be saved!

        Step 5:

        Let’s make some changes to Dhruvin’s account. 

        Try to save the changes. This will pop up with the following screen.

        Now, let’s try to understand the options provided here!
        • Discard your changes: This will discard Dhruvin’s changes and keep Shriraj’s changes as is.
        • Save a copy of your changes: This will save a Copy of my changes as a separate flow and appear in My Flow section.
        • Overwrite other people’s changes: This will keep Dhruvin’s changes and discard Shriraj’s changes.

        Conclusion:

        This is how the Co-Presence feature will work in Power Automate. Isn’t that cool? Happy Automation!!!

        If you have any questions you can reach out our SharePoint Consulting team here.

        August 5, 2021

        How to add user to Office 365 Group using Power Automate?

        Overview:

        We recently implemented an application on Power Platform for a consulting firm based out of Alpharetta, Georgia, United States. We came across a scenario to add the user to Office 365 Group using Power Automate. So, how can we achieve this requirement? Let's get started.

        Step 1:

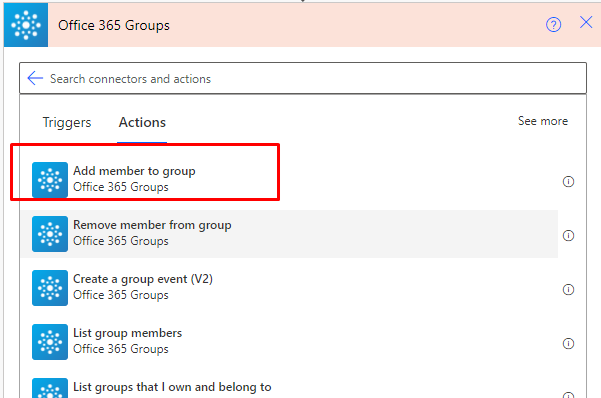
        Create Power Automate flow and search for “Office 365 Groups”.
         

        Step 2:

        From, action choose “Add member to group”.
         

        Step 3:

        It will ask for following two parameters:
        Group ID = It will show all groups available to your Office 365 account.
        User Principal Name  = We need to provide user name to be added to the group.


        Step 4:

        Run the Power Automate flow and check the result.
        The user has been added to Office 365 Group.
         

        Conclusion:

        This is how we can simply add user to Office 365 groups! Happy Automation!

        If you have any questions you can reach out our SharePoint Consulting team here.

        February 25, 2021

        Call SharePoint Rest API with Client ID and Client Secret from Power Automate

        Overview:

        We recently implemented an automated approval process in SharePoint Online with Power Automate for a construction and engineering company based out of Washington, United States. We came across a scenario where we required to consume SharePoint data in Power Automate with REST API using Client ID & Client Secret. Here in this article, we will discuss step by step process to implement such functionality.


        Prerequisite:

        We must have SharePoint App registered, please visit this article for step by step process to register the SharePoint App.

        Copy Tenant ID from Azure Portal:

        1. Open Azure Portal. From Left Navigation click on Azure Active Directory
        2. Here, you will get your Tenant ID.

        Steps to call SharePoint REST APIs with Client ID and Client Secret from Power Automate (MS Flow)

        1. Initialize variables for – Client ID, Client Secret, Tenant Name and Tenant ID.
          1. Client ID and Client Secret = We can get these from where we registered the App.
          2. Tenant Name = Name of the Tenant.
          3. Tenant ID = We can get that from Azure Portal (Step 2 from above section).
        2. Prepare Body Variable.
           grant_type=client_credentials&client_id=<<Client ID>>@<<TenantID>>&client_secret=<<Client Secret>>&resource=00000003-0000-0ff1-ce00-000000000000/<<TenantName>>.sharepoint.com@<<TenantID>>   
          
        3. Now, add “HTTP action”.
          1. Method: POST
          2. URI: https://accounts.accesscontrol.windows.net/@{variables('tenantID')}/tokens/OAuth/2
          3. Headers:  Content-Type: application/x-www-form-urlencoded
          4. Body: Pass the variable defined in Step 2.
        4. Get Access token in Compose Variable.
          Expression: body('Get_Access_Token_from_SharePoint')['access_token']
        5. Add HTTP Action to get users from SharePoint group.
          1. Method: Get
          2. URI: https://tenantname.sharepoint.com/sites/sitename/_api/web/sitegroups/getbyname('groupname')/users
          3. Headers: 
          4. Accept: application/json;odata=verbose
            Authorization: Bearer @{outputs('Compose')}
        6. Then, let’s Parse our JSON using Select Statement.

        This is how we can create a flow to find the users from SharePoint Group with client Id and client secret. 


        Test Flow

        The flow ran successfully.
        We got the following access token using first API call.
        Then this access token used to call the group users. We got the following users.


        Conclusion:

        This is how, we can call SharePoint Rest API with Client ID and Client Secret from Power Automate. Isn’t that amazing? 

        If you have any questions you can reach out our SharePoint Consulting team here.

        February 4, 2021

        How to Run Power Automate with Admin Consent from Power Apps?

        Introduction

        We recently converted the InfoPath forms to Power Apps forms for an Engineering & Construction company located in Boston, Massachusetts, United States. In one of the forms we converted, the requirement was to populate a dropdown list with the members of a SharePoint Group as values. 

        Problem Statement

        To populate a dropdown in Power Apps with SharePoint group users, we added Microsoft Power Automate to our Power Apps application with “Send an HTTP request to SharePoint” action. But when a user who is not a part of the group nor has Full Control permission opens the form, the flow would fail. 

        Error in Power Apps:


        Error in Power Automate (MS Flow): 

        Error: Access denied. You do not have permission to perform this action or access this resource.

        Root Cause:

        Flows started by Power Apps run in the context of the user who is running the Power Apps. So the problem occurs when a user who is not a part of the SharePoint Group nor has Full Control permission opens the form. In this case, the flow would fail.
          

        Resolution

        So we decided to run the flow in the context of SharePoint Add-ins. When the add-in-only policy is used, SharePoint checks only the permissions of the add-in principal. Authorization checks succeed only if the current add-in has sufficient permissions to perform the action in question, regardless of the permissions of the current user (if any).
        The entire procedure covers the following steps:
        1. Register SharePoint Add-ins 
        2. Create Power Automate flow to get users from SharePoint Group
        3. Configure flow in PowerApps

        Step-1: Register SharePoint Add-ins
        Please check This Article which describes the steps to register App in SharePoint. Client ID and Client Secret availed from this process will be used in Step 2.
         
        Step-2: Microsoft Flow to get SharePoint Users
        1. Create an instant cloud flow with Power Apps trigger as shown in the below picture.

        2. Now, instead of “Send an HTTP request to SharePoint” action we will be using “HTTP” action.

          In the HTTP action fill the details as per below:
          • Method: Post
          • Replace the Tenant ID in the URI.
            URI: https://accounts.accesscontrol.windows.net/TenantID/tokens/OAuth/2
          • Replace the highlighted content in the body.
            Body: grant_type=client_credentials&client_id=ClientID@TenantID&client_secret=ClientSecret&resource=00000003-0000-0ff1-ce00-000000000000/TenantName.sharepoint.com@TenantID
          • Headers:
            Key: Content-Type
            Value: application/x-www-form-urlencoded

        3. Now in the next step, we will use Compose action. Pass the access token that we get from the HTTP action in the inputs.Formula: body(‘HTTP’)[‘access_token’]

        4. In the next step, we will again use the HTTP action.

        5. In the HTTP 2 action fill the details as per below:
          • Method: Get
          • Replace the highlighted content in URI. Set the group name to the SharePoint Group of which you want the users.
            URI: https://tenantname.sharepoint.com/sites/sitename/_api/web/sitegroups/getbyname('GroupName')/users
            • Headers:
              Key: Accept; Value: application/json;odata=verbose
              Key: Authorization; Value: Bearer and the output of compose action as shown in the above image. 

            1. Now we will use the Select action to get only the specific properties from all the elements of the array and form a new array as shown in the below picture.
              • Pass the results of “HTTP 2” action in the From as body('HTTP 2')['d']['results'].
              • We need to map the properties to make the array format as required in Power Apps. You can check the properties from the json generated in the HTTP 2 action. Pass the keys as shown in the image and values as item()?['PropertyName'].


            2. The last step of the Flow is Response action. Here we pass the output of the Select Action.

            3. Click on Show advance option and select Generate from sample. Here, we need to insert a sample JSON payload. Add the following JSON structure:
               [  
                {  
                 "Email": "",  
                 "Claims": "",  
                 "DisplayName": "",  
                 "Department": "",  
                 "JobTitle": "",  
                 "Picture": ""  
                }  
               ]  
              

            Step-3: Configure the Flow in Power Apps
            1. Now we will store the response generated by the flow in a collection by passing ClearCollect(CollectionName,'FlowName'.Run()); on the “OnVisible” property of the “FormScreen”.

            2. Pass the collection on the “Items” property of the DataCardValue as shown in the below picture.

            Conclusion

            This is how we can call our Power Automate flow with admin consent from PowerApps.

            If you have any questions you can reach out to our SharePoint Consulting team here.

            January 28, 2021

            All you should know Condition and Switch Condition in Power Automate (MS Flow)

            Introduction: 

            We implemented the automated process using Power Automate (MS Flow) for a Postal and Parcel company based out of Melbourne, Victoria, Australia. The automated process was lengthy in terms of implementation that required many if/else conditions and routes. In this blog, we will understand the difference between Condition and Switch control in Power Automate (MS Flow), the benefits of using it, and also discuss its limitations.

            So, let’s first talk about Limitations for Condition and Switch Actions:

            • In Power Automate, if we use Condition Action, then we can add max. 8 nested steps and 500 actions per flow.
            • In Power Automate, if we use Switch Action, then we can add max. 25 nested steps and 500 actions per flow.

            How to overcome the limitation for Conditional Statements?

            Now, let’s talk about how we can overcome this limitation? We came across a scenario wherein we reached the 8th nested level with a conditional statement, then what can we do?

            To overcome such a scenario, we can implement “Child Flow”. To, implement the concept of the child flow, we need to follow the below steps. The detailed information with a real-life scenario for creating a child flow can be referred to from this Blog Post. Below is the summary for the same.

            1. Create a Flow Solution. (To create a child flow, we must have to create a solution file.)
            2. Create a Child Flow
            3. Call Child flow from Parent Flow.

            How to overcome the limitation for Switch Statement?

            1. To overcome this limitation you can add another switch case in default options and this way you can add another 25 cases.
            2. The default will execute if there is no match found.

            Comparison between If and Switch.

            If Conditions

            • Easy to Understand
            • Not practical if we have a lot of conditions.
            • Hard to visualize on the screen if we have more conditions.
            • There is a limit of 8 nested conditions (as of the writing of this post). 

            Switch

            • Easy to setup.
            • Easy to visualize on the screen
            • Switch Case action only accepts string and integer when it compares values. So in case you have a date field or other column types, you would need to first initialize a variable and set it to be either a String or an Integer.
            • Cannot compare against Range.

            Conclusion:

            Hope, this helps to identify the limitations, solution, and comparison between Condition and Switch Action in Power Automate.   

            If you have any questions you can reach out our SharePoint Consulting team here.