Introduction:
We have come across with specific requirement to fetch
User Profile properties from Delve for the specific user, by having a custom
People Picker in Power Apps - Canvas App.
The expected end result is as follows, where the current logged-in user will search for the Employee using email ID and Delve Profile information will be displayed in the App.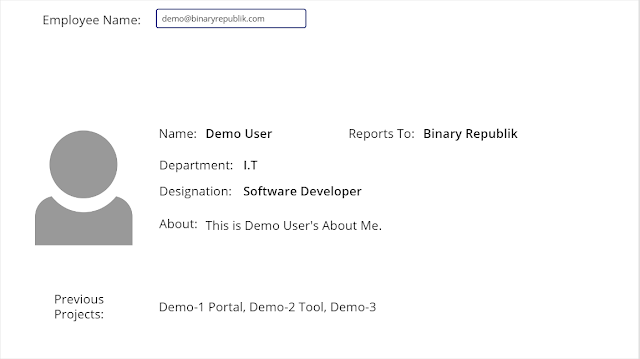
So, now let’s start the development process to fulfill the requirement.
A. Create a
Template to display User Profile Information:
1. In this App. we are displaying the following Delve properties to the end-user.- Name
- Reports to Manager
- Department
- Designation
- About
- Previous Projects
- Employee Photo
2. To display the information, we will use Labels and Image controls in Power Apps.

B. Configure properties to fetch infromation:
3. Once template is created, we need to configure the properties for each control. Please find the below table showing all the information which are mapped for each control.
Property Name
|
Event for the Selected Property
|
Formula/ Text/URL
|
Name
|
Text
|
If(IsBlank(SelectedUserEmail),"",Office365Users.UserProfileV2(SelectedUserEmail).displayName)
|
Reports To
|
Text
|
If(IsBlank(SelectedUserEmail),"",Office365Users.ManagerV2(SelectedUserEmail).displayName)
|
Department
|
Text
|
If(IsBlank(SelectedUserEmail),"",Office365Users.UserProfileV2(SelectedUserEmail).department)
|
Designation
|
Text
|
If(IsBlank(SelectedUserEmail),"",Office365Users.UserProfileV2(SelectedUserEmail).jobTitle)
|
About
|
Text
|
If(IsBlank(SelectedUserEmail),"",Office365Users.UserProfileV2(SelectedUserEmail).aboutMe)
|
Previous Projects
|
Text
|
Office365Users.UserProfileV2(SelectedUserEmail).pastProjects.Value
|
Profile Image
|
Image
|
If(IsBlank(SelectedUserEmail),"",Office365Users.UserPhotoV2(SelectedUserEmail))
|
4. Once the properties are configured, let’s check the output. Search for the user and select value from the suggestion box.


References:
Below is the list of the functions of Office 365 Users.- Office365Users.DirectReportsV2
- Office365Users.ManagerV2
- Office365Users.MyProfileV2
- Office365Users.MyTrendingDocuments
- Office365Users.RelevantPeople
- Office365Users.SearchUsers
- Office365Users.TrendingDocuments
- Office365Users.UserPhotoV2
- Office365Users.UserPhotoMetadata
- Office365Users.UserProfileV2
Below is the list of properties which we can get using a user’s email.
- Office365Users.UserProfileV2(SelectedUserEmail).aboutme
- Office365Users.UserProfileV2(SelectedUserEmail).accountEnabled
- Office365Users.UserProfileV2(SelectedUserEmail).birthday
- Office365Users.UserProfileV2(SelectedUserEmail).bussinessPhones
- Office365Users.UserProfileV2(SelectedUserEmail).city
- Office365Users.UserProfileV2(SelectedUserEmail).companyName
- Office365Users.UserProfileV2(SelectedUserEmail).country
- Office365Users.UserProfileV2(SelectedUserEmail).department
- Office365Users.UserProfileV2(SelectedUserEmail).displayName
- Office365Users.UserProfileV2(SelectedUserEmail).givenName
- Office365Users.UserProfileV2(SelectedUserEmail).hireDate
- Office365Users.UserProfileV2(SelectedUserEmail).id
- Office365Users.UserProfileV2(SelectedUserEmail).interests
- Office365Users.UserProfileV2(SelectedUserEmail).jobTitle
- Office365Users.UserProfileV2(SelectedUserEmail).mail
- Office365Users.UserProfileV2(SelectedUserEmail).mailNickname
- Office365Users.UserProfileV2(SelectedUserEmail).mobilePhone
- Office365Users.UserProfileV2(SelectedUserEmail).mySite
- Office365Users.UserProfileV2(SelectedUserEmail).officeLocation
- Office365Users.UserProfileV2(SelectedUserEmail).pastProjects
- Office365Users.UserProfileV2(SelectedUserEmail).postalCode
- Office365Users.UserProfileV2(SelectedUserEmail).prefferredLanguage
- Office365Users.UserProfileV2(SelectedUserEmail).responsibilities
- Office365Users.UserProfileV2(SelectedUserEmail).schools
- Office365Users.UserProfileV2(SelectedUserEmail).skills
- Office365Users.UserProfileV2(SelectedUserEmail).state
- Office365Users.UserProfileV2(SelectedUserEmail).streetAddress
- Office365Users.UserProfileV2(SelectedUserEmail).surname
- Office365Users.UserProfileV2(SelectedUserEmail).userPrincipleName
- Office365Users.UserProfileV2(SelectedUserEmail).userType
If you have any questions you can reach out our SharePoint Consulting team here.


