Showing posts with label Azure AI. Show all posts

November 20, 2025

Preventing Context Loss in RAG Pipelines with Azure AI Search: A Semantic Chunking and Retrieval Strategy


RAG: that’s short for Retrieval-Augmented Generation is the secret sauce behind many AI systems that actually know what they’re talking about.
Instead of relying only on a language model’s memory, RAG lets the model search for relevant facts and use them as context when generating responses. It’s like giving your AI assistant a reading assignment before it answers your question.

Sounds great, right?

Well… almost.

Because there’s one sneaky issue that ruins the magic: "Context loss"
You ask a question like “Explain how AI evolved in the 1940s and 50s,” and the model gives you:

  • Just half the answer.
  • Or skips the definition of an important term.
  • Or mixes up two unrelated paragraphs.

This happens when the chunks of information fed into the model are either:

  • Too small to be meaningful, or
  • Too isolated to carry the full picture.

Today, we’re going to fix that.
We’ll build a smarter RAG pipeline using Azure AI Search, and along the way you’ll learn how to:

  • Chop up documents semantically (not just every 500 tokens)
  • Retrieve passages using both keywords and vector similarity
  • Stitch back the right context (even when your query didn’t know it needed it)

By the end, you’ll have a clean, modular setup that’s ready to power any LLM app that needs rich, relevant context without losing the thread.
Let’s start with what actually goes wrong and why it happens more often than you think.

The Problem: Context Loss in RAG Pipelines

On paper, a RAG setup sounds simple:
Break your documents into parts → Search through them → Provide the context to your model → Get a fact-based answer.

But in practice, there's a common issue that quietly sneaks in:
You lose the context right when it matters most.
Let’s say you’re indexing a long research doc. Somewhere in there, a paragraph says:


“This mechanism is a variation of Hebbian theory, which we introduced in the previous section.”

And now a user asks:
“What is Hebbian theory?”

Guess what?
Your retriever grabs the current chunk with that line but not the previous section that actually explains what Hebbian theory is.

Here’s why this happens so often:

Most pipelines split documents every N token (say, 500–800). That’s easy for machines, but brutal for meaning:

  • Sentences get cut mid-way.
  • Tables get sliced in half.
  • References point to nowhere.

Shallow retrieval:

RAG systems often rely on:

  • Keyword matches (BM25)
  • Or a single vector field (semantic similarity)

Both are good, but not enough on their own:

  • Keywords might miss reworded passages.
  • Vectors might pull something conceptually close… but not specific enough. 

Context isolation:

Even when you retrieve the right chunk, it might need its neighbors:

  • The chunk before might define a term.
  • The chunk after might finish the logic.
  • And they’re often left out entirely.

Most RAG pipelines are good at fetching passages,

but not great at reconstructing context.

Now let’s fix that without rewriting your whole stack. 

The Solution Strategy: Keep Your Context, Serve Better Answers

To solve the context-loss problem, we use a combination of semantic chunking, hybrid search, and smart indexing all powered by Azure OpenAI and Azure AI Search.

Here’s the game plan broken down:

Step 1: Semantic Chunking (Not Just Slicing Text)

We split your documents by meaning, not just fixed size. That means paragraphs that “belong together” stay together preserving the flow of thought.
This preserves semantic integrity, so the model sees the whole story.

Step 2: Index with Azure AI Search

Once we’ve chunked the content, we store it in a searchable index. Each chunk gets its own embedding and metadata (source URI, headings, position in doc, etc.).

Why this matters:

  • You get fast semantic search with vector support
  • Plus, keyword fallback when needed (hybrid search FTW!)

Step 3: Hybrid Retrieval = Vector + Keyword 

When the user asks a question, we combine:

  • Vector similarity: Find semantically close matches
  • BM25 keyword matching: Catch exact terms (e.g., "Turing Test")
  • Neighbor expansion – fetches previous and next chunks for continuity

Together, this improves precision + recall the model sees more relevant chunks, grounded in the user's intent.

Step 4: Feed to the Model as Context

We pass the top-k matching chunks to Azure OpenAI as context in your prompt.

This gives your model:

  • Enough signal to answer clearly
  • No noise from unrelated data
  • A better shot at staying grounded

let's jump in to the implementation

Prerequisites & Setup: 

Before we dive into code, let’s make sure we’ve got all the tools and ingredients ready. Think of this as your RAG recipe checklist

Python Packages to Install


pip install azure-search-documents openai python-docx tiktoken tenacity python-dotenv


Environment Variables:

Create a .env file with your credentials (never hardcode in scripts!):
AZURE_OPENAI_API_KEY=""
AZURE_OPENAI_ENDPOINT=""
AZURE_OPENAI_EMBEDDING_DEPLOYMENT="text-embedding-3-small"

AZURE_SEARCH_ENDPOINT=""
AZURE_SEARCH_API_KEY=""
AZURE_SEARCH_INDEX_NAME="my-index-name"

Step 1: Semantic Chunking with Azure OpenAI

Before we send anything to a vector index, we need to split our text into smaller, meaningful chunks not just by paragraph or sentence, but by semantic boundaries (where the topic naturally shifts). That’s where SemanticChunker shines!

1. Setup Azure OpenAI Embeddings

from langchain_openai.embeddings import AzureOpenAIEmbeddings
import os

def get_azure_embeddings():
    """
    Creates an embedding client for Azure OpenAI
    Returns:
        AzureOpenAIEmbeddings: LangChain embedding object
    """
    return AzureOpenAIEmbeddings(
        azure_deployment=os.getenv("AZURE_OPENAI_EMBEDDING_DEPLOYMENT"),
        api_key=os.getenv("AZURE_OPENAI_API_KEY"),
        azure_endpoint=os.getenv("AZURE_OPENAI_ENDPOINT"),
        api_version=os.getenv("AZURE_OPENAI_API_VERSION"),
    )

2. Semantic Chunking with LangChain

from langchain_experimental.text_splitter import SemanticChunker

def chunk_text_semantically(text: str, embeddings) -> list:
    """
    Splits long text into semantically meaningful chunks using Azure OpenAI embeddings.
    
    Args:
        text (str): Full document text
        embeddings: An AzureOpenAIEmbeddings object
    
    Returns:
        list: A list of Document chunks
    """
    splitter = SemanticChunker(
        embeddings=embeddings,
        breakpoint_threshold_type="percentile",   # How aggressive to split
        breakpoint_threshold_amount=95.0,         # Top 5% breakpoint
        min_chunk_size=120                        # Avoid tiny chunks
    )
    
    return splitter.create_documents([text])

Example Usage:

embeddings = get_azure_embeddings()
chunks = chunk_text_semantically(doc_text, embeddings)

print(f"Total chunks created: {len(chunks)}")
print("Sample Chunk:\n", chunks[0].page_content[:500])

Step 2: Indexing Chunks into Azure AI Search

Azure AI Search doesn’t just take your text and call it a day you need to prepare it right. Each chunk becomes a document with fields like id, content, and embedding.

Here’s how we do it, step by step

1. Define Your Index Schema (if not already created)

from azure.search.documents.indexes.models import (
    SearchIndex, SimpleField, SearchableField, VectorSearch, VectorSearchAlgorithmConfiguration
)

def build_search_index_schema(index_name: str) -> SearchIndex:
    return SearchIndex(
        name=index_name,
        fields=[
            SimpleField(name="id", type="Edm.String", key=True),
            SearchableField(name="content", type="Edm.String"),
            SimpleField(name="chunk_id", type="Edm.Int32"),
            SimpleField(name="doc_id", type="Edm.String"),
            SimpleField(name="source_uri", type="Edm.String"),
            SimpleField(name="prev_id", type="Edm.String"),
            SimpleField(name="next_id", type="Edm.String"),
            SimpleField(name="page_no", type="Edm.Int32", filterable=True),
            SimpleField(name="embedding", type="Collection(Edm.Single)", searchable=True, vector_search_dimensions=1536),
        ],
        vector_search=VectorSearch(
            algorithm_configurations=[
                VectorSearchAlgorithmConfiguration(
                    name="default-vector-config",
                    kind="hnsw",
                    parameters={"m": 4, "efConstruction": 400}
                )
            ]
        )
    )

2. Format Chunks with prev_id and next_id

import uuid

def format_chunks_for_indexing(chunks: list, doc_id: str, source_uri: str) -> list:
    formatted = []
    for i, chunk in enumerate(chunks):
        formatted.append({
            "id": f"{doc_id}_{i}".replace("#", "_"),
            "doc_id": doc_id,
            "chunk_id": i,
            "source_uri": source_uri,
            "page_no": chunk.metadata.get("page", None),
            "content": chunk.page_content,
            "prev_id": f"{doc_id}_{i-1}" if i > 0 else None,
            "next_id": f"{doc_id}_{i+1}" if i < len(chunks)-1 else None
        })
    return formatted

3. Embed and Upload to Azure AI Search

from azure.search.documents import SearchClient
from azure.core.credentials import AzureKeyCredential

def index_chunks_to_azure(chunks: list, embedding_fn, search_client: SearchClient):
    for chunk in chunks:
        chunk["embedding"] = embedding_fn(chunk["content"])
    search_client.upload_documents(documents=chunks)
    print(f"Uploaded {len(chunks)} chunks to Azure Search")

Putting It All Together:

# 1. Setup SearchClient
search_client = SearchClient(
    endpoint=os.getenv("AZURE_SEARCH_ENDPOINT"),
    index_name=os.getenv("AZURE_SEARCH_INDEX_NAME"),
    credential=AzureKeyCredential(os.getenv("AZURE_SEARCH_API_KEY"))
)

# 2. Setup embeddings
embedding_model = get_azure_embeddings()
embedding_fn = lambda text: embedding_model.embed_query(text)

# 3. Format and push
doc_id = "ai_intro_doc"
formatted_chunks = format_chunks_for_indexing(chunks, doc_id, "document-path")
index_chunks_to_azure(formatted_chunks, embedding_fn, search_client)

Step 3: Semantic Retrieval with Context-Aware Expansion

Once your semantic chunks are indexed, it's time to make them useful. A great RAG system doesn’t just match keywords it understands meaning and also respects structure. That’s why we use Hybrid Search.
We'll:
  1. Embed the user query (for semantic search)
  2. Perform hybrid search: text + vector
  3. Pull neighboring chunks via `prev_id` and `next_id` to prevent context loss
  4. Format results for your model prompt

1. Embed the User Query

We’ll use the same embedding model to turn the query into a vector, so we can find the closest semantic matches in the index.
def get_query_embedding(query: str, embedding_model) -> list:
    return embedding_model.embed_query(query)

2. Perform Hybrid Search in Azure AI Search

Azure Search supports sending both a search_text (keyword) and vector (semantic) to run hybrid
from azure.search.documents.models import Vector

def hybrid_search(query: str, query_vector: list, search_client, k: int = 5):
    vector = Vector(value=query_vector, k=k, fields="embedding")

    results = search_client.search(
        search_text=query,
        vectors=[vector],
        select=["id", "content", "doc_id", "prev_id", "next_id"],
        top=k,
    )
    return list(results)

3. Expand Results with Prev/Next Context

def fetch_with_context(results, search_client):
    related_ids = set()
    for r in results:
        related_ids.add(r["id"])
        if r.get("prev_id"):
            related_ids.add(r["prev_id"])
        if r.get("next_id"):
            related_ids.add(r["next_id"])

    # Filter to fetch all related IDs
    filter_expr = " or ".join([f"id eq '{rid}'" for rid in related_ids])
    expanded_results = search_client.search(
        search_text="*", 
        filter=filter_expr,
        select=["id", "content", "doc_id"],
    )
    return list(expanded_results)

Putting It All Together

query = "What were the key milestones in early AI history?"
query_vector = get_query_embedding(query, embedding_model)

top_chunks = hybrid_search(query, query_vector, search_client, k=4)
contextual_chunks = fetch_with_context(top_chunks, search_client)

# Sort by doc_id/chunk_id to preserve flow
contextual_chunks = sorted(contextual_chunks, key=lambda c: c["id"])

# Display sample
for chunk in contextual_chunks:
    print(f"\n{chunk['id']}\n{chunk['content'][:300]}...")

Step 4: Stitch Chunks, Prompt the Model (The RAG Finale)

Once we’ve retrieved the best matching chunks including their neighbors it’s time to give them to the model.

But wait it’s not just “Top 3 chunks → Dump into prompt.”
We make sure the chunks are:

  • Deduplicated (no repeats)
  • Sorted (in reading order)
  • Joined with separators (so the model can distinguish them)

def prepare_prompt_context(results: list, k: int = 3) -> str:
    """
    Collects top-k search results, expands with neighbors, deduplicates, and prepares prompt-ready context.
    """
    seen = set()
    selected = []

    for doc in results[:k]:
        for chunk in [doc["prev_chunk"], doc["current_chunk"], doc["next_chunk"]]:
            chunk_id = chunk["id"]
            if chunk_id not in seen:
                selected.append(chunk)
                seen.add(chunk_id)

    # Sort by chunk_id to maintain reading order
    selected.sort(key=lambda x: x["chunk_id"])

    # Join with clear separators
    return "\n---\n".join(chunk["content"] for chunk in selected)

You can now take the returned string and plug it into your LLM prompt like so:
prompt = f"""You are an expert assistant. Use the following context to answer clearly and accurately.

{prepare_prompt_context(retrieved_results)}

Question: {user_query}
Answer:"""

Result: Your model sees a coherent slice of the source doc complete with the lead-in, answer, and follow-up. No more broken thoughts!

Wrapping Up: From Documents to Grounded Answers

Preventing context loss isn’t just a nice-to-have in Retrieval-Augmented Generation (RAG). It’s the difference between vague answers… and useful ones.

By combining:

  • Semantic chunking - keeps ideas together
  • Smart indexing - stores structure and meaning
  • Hybrid retrieval - balances precision and recall
  • Neighbor-aware context - completes the narrative

we make Azure AI Search and Azure OpenAI work together like a dream team.

This approach isn’t just scalable it’s grounded, relevant, and ready for production RAG applications.

Whether you're building internal knowledge assistants, research bots, or customer-facing copilots preserving context is your secret weapon.

If you have any questions you can reach out our SharePoint Consulting team here.

July 10, 2025

Test Your AI Voice Assistant with Realistic TTS Using Piper

Introduction
In today's landscape, where AI particularly voice integration is essential for delivering exceptional customer experiences, testing voice interfaces introduces unique challenges for QA teams.
Unlike traditional UI or API testing, voice-based applications require validation across various tones, languages, and speaking styles, making it difficult to scale test coverage efficiently.

This is where Piper, a lightweight and open-source text-to-speech (TTS) model, proves invaluable. It empowers testers to generate realistic voice inputs in multiple languages, accents, and frequencies enabling comprehensive, automated testing of voice-enabled systems.

What is Piper?
  • Piper is a high-quality, lightweight TTS engine. It runs locally, is fast, and supports multiple voices and languages. Best of all, it’s open-source (MIT licensed), making it suitable for development, testing, and deployment in privacy-sensitive environments.
  • Piper supports over 35 languages and various voice variants—ideal for testing diverse speech scenarios (accents, languages, frequencies). Default audio output format for piper is .wav (Waveform Audio File).  

Key benefits:

  • Fully local, no internet needed
  • Fast inference and output
  • High-quality speech output
  • MIT licensed (safe for commercial use)  


Installing Piper:

  • Navigate to https://github.com/rhasspy/piper/releases
  • Download piper_windows_amd64.zip (You can download as per your system's configurations) 


Generating Audio for Voice Assistant Testing:

  • Go to bash
  • Change directory to Piper Folder
  • echo "Hello, this is a test using Piper TTS." | .\piper.exe -m en_US-kathleen-low.onnx -c en_en_US_kathleen_low_en_US-kathleen-low.onnx.json -f test1.wav

Feeding Audio into the Assistant (Example with WebSocket)


with wave.open("product_A_final.wav", "rb") as wf:
    while chunk := wf.readframes(3200):
        await ws.send(chunk)
await ws.send("EOS")

Validating the Assistant’s Response:

  • Was the transcript accurate?
  • Did it invoke the correct tool/function?
  • Was the backend action completed?

Use a test case definition and then validate programmatically via API assertions or database checks.

{
  "audio_file": "product_A_final.wav",
  "expected_transcript": "Add product to cart",
  "expected_function": "add_product",
  "expected_arguments": {"product": "product A"}
}

Real-World Use Cases where Piper can help:

  • Automated regression testing for voice assistants
  • Offline voice testing for edge devices
  • Multilingual testing using various Piper voices
  • CI/CD pipeline integration (e.g., GitHub Actions) 

Conclusion:

Piper offers a powerful and lightweight solution to simulate voice input in automated test scenarios. Combined with tools like pytest, FastAPI, and WebSocket clients, you can create robust test suites for your AI assistant workflows without relying on cloud-based TTS providers.

If you’re building or testing a voice assistant with Azure Voice Live, Dialogflow, or your own NLP stack, Piper is a tool worth integrating into your QA strategy.

If you have any questions you can reach out our SharePoint Consulting team here.

November 23, 2023

Unlocking the Power of Azure AI Language Service: A Comprehensive Overview and Document Summarization

Introduction:

In the ever-evolving world of artificial intelligence, Azure AI Language Service stands out as a formidable tool that promises to revolutionize the way we interact with and analyze textual content.


This article will dive you into the depths of Azure AI Language Service, offering a comprehensive overview and insight into its capabilities. Also we will witness the magic of document summarization in a small yet powerful React application.


This interactive experience will showcase how seamlessly Azure AI Language Service integrates with modern web technologies, providing a practical demonstration of its capabilities using Natural Language Processing (NLP) features for understanding and analyzing text.

Prerequisites:

  • Azure Subscription - Create free subscription from here.

  • NodeJS Installed on Machine (Tested on Node.js 16.19.0)

Azure AI Language Service: Unleashing Its Power:

Azure AI Language is a cloud-centric solution offering Natural Language Processing (NLP) capabilities for text comprehension and analysis. Using this service we can develop smart applications that manipulate textual content. Here is a complete overview of what the Language service can do with its powerful features:


Named Entity Recognition (NER): It spots entities like names, events, places, and dates from the text with named entity recognition.


Personally identifying (PII) and health (PHI) information detection: Detect and hide sensitive info like phone numbers, email addresses, and IDs in text with PII detection.


Language detection: Figure out the language of a document and get a language code with language detection that works for many languages and variations.


Sentiment Analysis and opinion mining: Learn what people think about our topic with sentiment analysis and opinion mining. These features analyze text to discover positive or negative feelings and link them to specific aspects.


Summarization: Generate document or conversation summaries using summarization, Which extracts key sentences to capture the most crucial information from the original contents


Key phrase extraction: It identifies and lists the main concepts in text with key phrase extraction, a preconfigured feature.


Explore additional features and functionalities within the Language service in this documentation available here. Let’s gain insights into the Summarization feature within the Language Service and integrate it into our compact React application.


Azure AI Language Service: Document Summarization:

In today's fast-paced and information-rich world, the need for efficient content processing has become paramount. Summarization plays a crucial role in addressing this need by distilling lengthy and complex information into concise and digestible forms.

Summarization constitutes one of the capabilities provided by Azure AI Language, a suite of cloud-based machine learning and AI algorithms tailored for crafting intelligent applications centered around written language.

Document summarization employs natural language processing techniques to create a condensed version of a document. The API supports two main approaches to automatic summarization: extractive and abstractive.

Extractive: Selects and extracts sentences directly from the original content that collectively capture the most crucial information.

Abstractive: Creates a summary by generating concise and coherent sentences or words, not limited to extracting sentences from the original document. This approach aims to provide a shortened version of lengthy content.

Let’s create an instance of the Language service to showcase practical summarization and seamlessly integrate it into our React application.

Follow Below Steps to Create an Instance of Language Service:

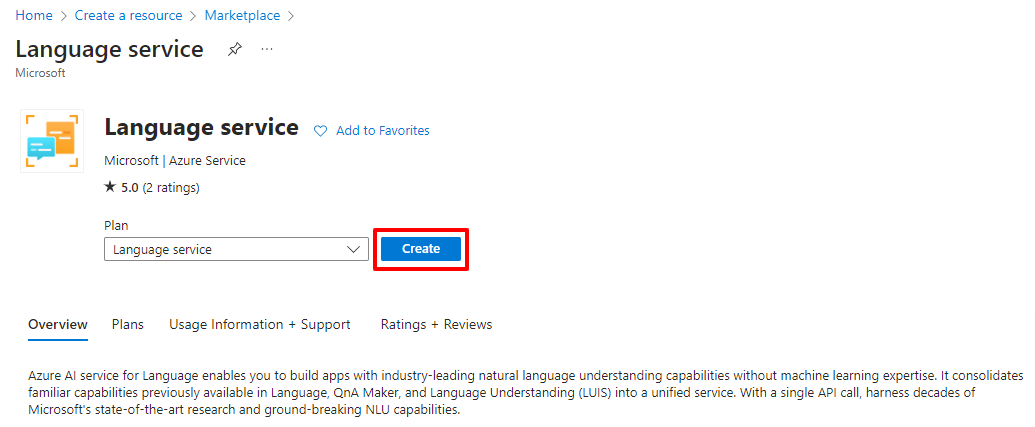
  • To Create Instance, log in to your Azure Subscription, go to “Create a resourceand type for language.


  • Click on Create and then Continue to Create your resource at bottom.

  • Fill all the Details with Name of the Instance and Resource. (You can use the free pricing tier (Free F0) to try the service, and upgrade later to a paid tier for production.)

  • Click on Next Until Review and Create tab.

  • Verify all the Details and then Click on Create.


After creating the service instance, review the details in the resource group. To utilize the Language service,
Now will obtain Endpoints and an API key by accessing the Language Studio through this link. Login using the Azure Subscription in which you created the instance.

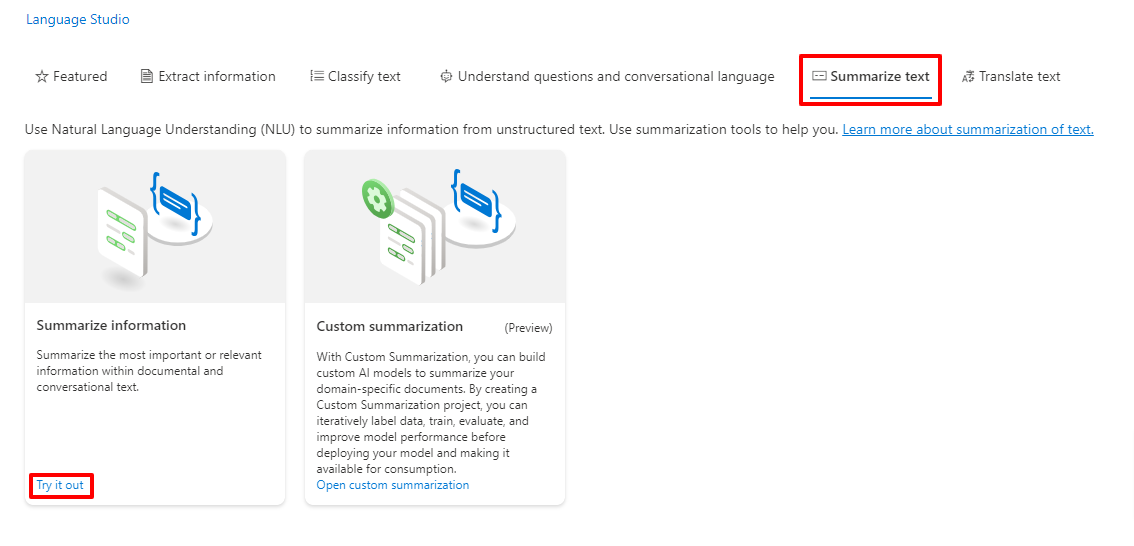
Navigate to the Summarization text tab within Language Studio and choose the "Summarize Information" option.


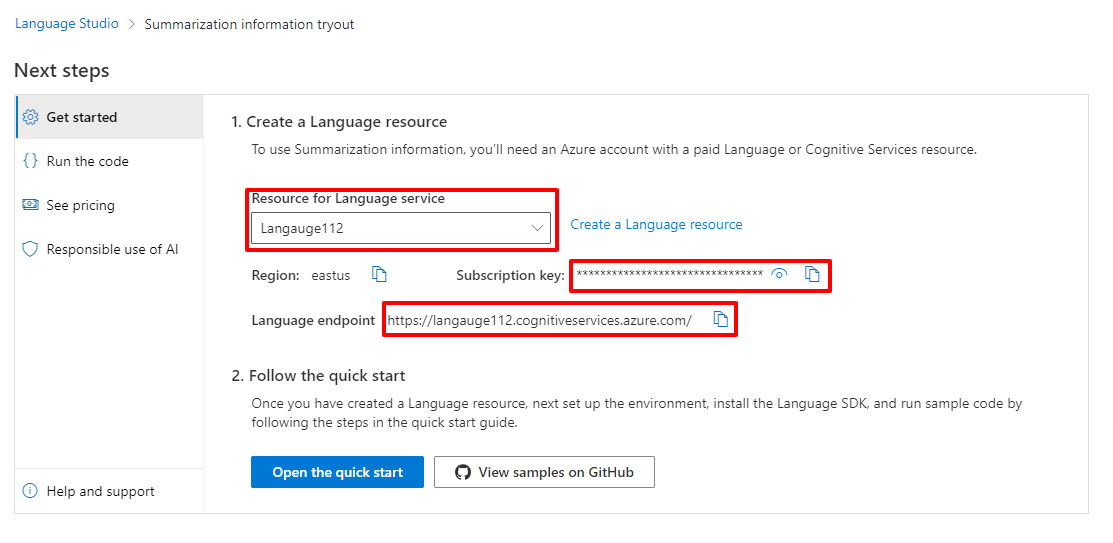
Now you can explore summarization directly in the Playground or seamlessly integrate it into our application using the provided Endpoints and API Key at bottom. Scroll to the bottom to find Language endpoints and Subscription Key. Ensure you have chosen the correct Resource for the Language service.


Copy the Subscription Key and Endpoint URL; we will utilize them in our React project.

Setting Up a React Application for Azure Language Service Integration:

The API, along with the obtained Endpoints from the above step, can be employed in various frontend applications. However, for demonstration purposes, we will utilize them in the React app.

Follow below steps to Create the React app and Install all the Packages needs in order to Integrate this:

Note: Ensure that your local development machine has Node version 14 or higher.


  • Run the "npx create-react-app document-summarize" command to set up the scaffolding for the React app.

  • Then Install the Client Package Library “npm install --save @azure/ai-language-text@1.1.0” in order to work with Azure AI Language.

  • Now open the Project in the VS Code.

  • Create a .env file in the root folder.

  • Store the EndPoint and APIKey in it as shown below.


  • Navigate to App.js file in the Folder.

  • Replace the Code with below code.


import React, { useState } from 'react';
const { AzureKeyCredential, TextAnalysisClient } = require("@azure/ai-language-text");

const endpoint = process.env.REACT_APP_ENDPOINT;
const apiKey = process.env.REACT_APP_APIKEY;

function App() {
  const [loading, setLoading] = useState(false);

  // In Order to Generate the Download Link of the File
  const download = async(filename, text) => {
    var previousElement = document.getElementById('downloadLink')
    if(previousElement){
      document.body.removeChild(previousElement);
    }
    var element = document.createElement('a');
    element.setAttribute('id', "downloadLink");
    element.setAttribute('href', 'data:text/plain;charset=utf-8,' + encodeURIComponent(text));
    element.setAttribute('download', filename);
    var linkText = document.createTextNode("Download the summarized version of the file");
    element.appendChild(linkText);
    document.body.appendChild(element);
  }

  // In Order to Handle the Input element
  const handleFileChange = async (event) => {
    setLoading(true)
    const file = event.target.files[0];
    var input = event.target;
    var reader = new FileReader();
    reader.onload = async function () {
      var text = reader.result;
      await analyzeAndSummarizeText(file.name,text)
      setLoading(false)
    };
    reader.readAsText(input.files[0]);
  };

  // Analyze and Summarize the Text
  const analyzeAndSummarizeText = async (inputFileName, originalText) => {
    const client = new TextAnalysisClient(endpoint, new AzureKeyCredential(apiKey));
    const actions = [
      {
        kind: "ExtractiveSummarization",
        maxSentenceCount: 2,
      },
    ];
    const analyzeBatch = await client.beginAnalyzeBatch(actions, [originalText], "en");
    analyzeBatch.onProgress(() => {
      console.log(
        `Last time the operation was updated was on: ${analyzeBatch.getOperationState().modifiedOn}`
      );
    });
    const results = await analyzeBatch.pollUntilDone();
    for await (const actionResult of results) {
      if (actionResult.kind !== "ExtractiveSummarization") {
        throw new Error(`Expected extractive summarization results but got: ${actionResult.kind}`);
      }
      if (actionResult.error) {
        const { code, message } = actionResult.error;
        throw new Error(`Unexpected error (${code}): ${message}`);
      }
      for (const result of actionResult.results) {
        console.log(`- Document ${result.id}`);
        if (result.error) {
          const { code, message } = result.error;
          throw new Error(`Unexpected error (${code}): ${message}`);
        }
        let summarizedTextContent = result.sentences.map((sentence) => sentence.text).join("\n");
        await download(inputFileName, summarizedTextContent);
      }
    }
  };

  return (
    <div id="inputFile">
      <input type="file" onChange={handleFileChange} />
      {
        loading && <p>Summarizing the document please wait a while...</p>
      }
    </div>
  );
}

export default App;

Save the files, then run "npm start" to initiate the development server on port 3000 and test the solution. Upload the document and wait briefly for the generation of the summarized version. Once ready, click the download link to retrieve the summarized version.

Output:


Conclusion:

Throughout this article, we explored the capabilities of Azure AI Language Service, delving into its features and functionality. Specifically, we seamlessly integrated the Document Summarization feature of the Language service into a React application. By doing so, we harnessed the power of Azure AI Language Service to enhance document processing in a practical and user-friendly manner.

If you have any questions you can reach out our SharePoint Consulting team here.