Showing posts with label SharePoint REST API. Show all posts

February 25, 2021

Call SharePoint Rest API with Client ID and Client Secret from Power Automate

Overview:

We recently implemented an automated approval process in SharePoint Online with Power Automate for a construction and engineering company based out of Washington, United States. We came across a scenario where we required to consume SharePoint data in Power Automate with REST API using Client ID & Client Secret. Here in this article, we will discuss step by step process to implement such functionality.


Prerequisite:

We must have SharePoint App registered, please visit this article for step by step process to register the SharePoint App.

Copy Tenant ID from Azure Portal:

  1. Open Azure Portal. From Left Navigation click on Azure Active Directory
  2. Here, you will get your Tenant ID.

Steps to call SharePoint REST APIs with Client ID and Client Secret from Power Automate (MS Flow)

  1. Initialize variables for – Client ID, Client Secret, Tenant Name and Tenant ID.
    1. Client ID and Client Secret = We can get these from where we registered the App.
    2. Tenant Name = Name of the Tenant.
    3. Tenant ID = We can get that from Azure Portal (Step 2 from above section).
  2. Prepare Body Variable.
     grant_type=client_credentials&client_id=<<Client ID>>@<<TenantID>>&client_secret=<<Client Secret>>&resource=00000003-0000-0ff1-ce00-000000000000/<<TenantName>>.sharepoint.com@<<TenantID>>   
    
  3. Now, add “HTTP action”.
    1. Method: POST
    2. URI: https://accounts.accesscontrol.windows.net/@{variables('tenantID')}/tokens/OAuth/2
    3. Headers:  Content-Type: application/x-www-form-urlencoded
    4. Body: Pass the variable defined in Step 2.
  4. Get Access token in Compose Variable.
    Expression: body('Get_Access_Token_from_SharePoint')['access_token']
  5. Add HTTP Action to get users from SharePoint group.
    1. Method: Get
    2. URI: https://tenantname.sharepoint.com/sites/sitename/_api/web/sitegroups/getbyname('groupname')/users
    3. Headers: 
    4. Accept: application/json;odata=verbose
      Authorization: Bearer @{outputs('Compose')}
  6. Then, let’s Parse our JSON using Select Statement.

This is how we can create a flow to find the users from SharePoint Group with client Id and client secret. 


Test Flow

The flow ran successfully.
We got the following access token using first API call.
Then this access token used to call the group users. We got the following users.


Conclusion:

This is how, we can call SharePoint Rest API with Client ID and Client Secret from Power Automate. Isn’t that amazing? 

If you have any questions you can reach out our SharePoint Consulting team here.

January 28, 2021

How to register an App only Principal in SharePoint Online?

Overview:

We implemented the Delivery Schedule application in .Net Core for a Seattle, Washington-based construction firm. The information on Delivery Sites was available in SharePoint Online, we had to query this information using REST API from SharePoint Online and display the same in the .Net Core application.

Now, to call REST API from the .Net Core application, we need to use Client ID & Client Secret (app-only authentication) as per best practices. To generate Client ID and Client Secret, we need to register the SharePoint App. In this article, we will check the registration steps for the SharePoint App. So, now let’s get started!
  1. Access following URL to open App Registration Page.
    https://<<Site Collection URL>>/_layouts/15/appregnew.aspx 
  2. This will open following screen. 
  3. Click on “Generate” for Client ID and Client Secret. 
  4. Enter the Title, App Domain and Redirect URL.
    1. Title = BRiteApp (a meaningful name)
    2. App Domain = www.localhost.com
    3. Redirect URL = https://localhost.com 
  5. Click on Create.
  6. This will give you a summary of the App you created. Copy this information for future reference.
  7. Now, access the following URL.
    https://<<Site Collection URL>>/_layouts/15/appinv.aspx 
  8. This will open the following screen.
  9. Enter the same Client ID in the App ID field that we registered in Step 3 and click on Lookup. This will auto-populate other information.
  10. Now, in “Permission Request XML" we need to provide the XML with the desired permission level information. Below is the example XML that grants Site Collection level Full Control permission to the app. For more details on the permission request options, please visit this article from Microsoft.
     <AppPermissionRequests AllowAppOnlyPolicy="true">  
     <AppPermissionRequest Scope="http://sharepoint/content/sitecollection" Right="FullControl" />  
     </AppPermissionRequests>  
    

  11. Click on Create.
  12. Click on the “Trust it” button.

Conclusion:

This is how we register our App in SharePoint Online. The registered app (Client ID & Client Secret) can be used to call the SharePoint REST APIs from the other applications.

If you have any questions you can reach out our SharePoint Consulting team here.

May 14, 2020

How to overcome URL length limitation while fetching data using REST API in SharePoint?

Problem Statement:

Sometimes we might need to fetch data from long URL containing more filters while using REST API. REST query allows max –length of URL is 2,048 characters. If you exceed this limit, will throw 404 error in the code. let's check out how we should overcome this issue.

Analysis:

When we execute the query with URL having less filters & columns and thus having URL length less than the limit, we can get the response correctly:

But if we keep on increasing the filters & columns in REST API, once URL exceeds the limit of 2048 characters, we should start getting 404 error as shown below.

So, I thought of checking the URL with same filters in SharePoint directly, would it give same error? Surprisingly,  I found that SharePoint shows the results correctly with same numbers of filter and even more.

Technical Solution:

My analysis got me on the conclusion that the request is getting 404 caused by browser execution limitation of REST API and is not the issue from SharePoint end. So, we need to find a way through which we can send query to SharePoint and execute without browser itself.  So, I thought of using Batch API option for the same. I followed below steps to execute long URL successfully:

    Step 1: Load BatchUtils script into browser.


      Step 2: Verify BatchUtils loaded and Run in browser.


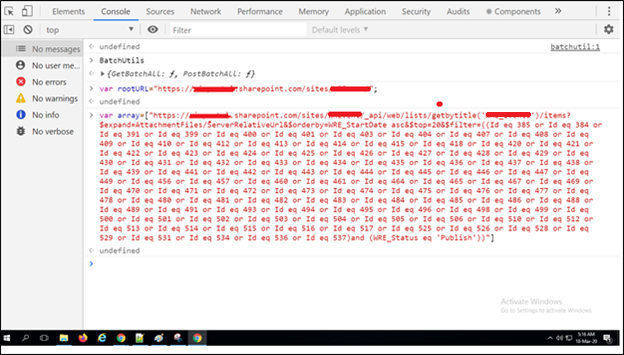
     Step 3: Prepare data for BatchUtils.


·         You need to specify Root Site URL of SharePoint tenant.
·         Push Long URL in array.

     Step 4: Request for fetch data using BatchUtils.


·         Here, you go! get the results without any error.

Note: We can use BatchUtils in Custom SPFX Web Part.


Below are useful reference links which helps us in calling Batch API in SharePoint Online and Run Code snippets direct in chrome DevTools.

If you have any questions you can reach out our SharePoint Consulting team here.

June 16, 2017

Create a subsite programmatically using Custom Site Template through SharePoint JavaScript Object Model and REST API

Here, I'll explain you in detail how to create SharePoint sub-site programmatically using custom Site Templates through JSOM and REST API.
 
Implementation Approach: First, we need to identify Web Template Id for our custom template. programmatically. And then, we will a create sub-site using the Web Template Id.

Let's go through the code snippet, now. We have two functions in code snippet:

1. CreateSubsiteByTemplateName(title, description, webUrl, templateTitle) 
- This function will create a sub-site by Template Name. First of all, it will find out the Template Id from Template Name, and then, will call another function to create the sub-site.
Parameters Information:
    1. title= name of sub-site which you want to create Ex: "subsite1"
    2. description = description for sub-site
    3. weburl = URL for sub-site Ex: "subsite1"
    4. templateTitle= Name of custom template Ex: "Physicians"

2. CreateSubsiteByTemplateId(title, description, webUrl, templateId)
- This function will create a sub-site by Template Id.
Parameters Information:
    1. title= name of sub-site which you want to create Ex: "subsite1"
    2. description = description for sub-site.
    3. weburl = URL for sub-site Ex: "subsite1"
    4. templateId= Id of custom template Ex: "{D5729655-B3D8-4DED-B5E9-3EE09934FC80}#Physicians"

Code Snippet 1:
 function CreateSubsiteByTemplateName(title, description, webUrl, templateTitle) {   
   var context = new SP.ClientContext.get_current();   
   var web = context.get_web();   
   context.load(web);   
   var webTemplates = web.getAvailableWebTemplates(1033, false);   
   context.load(webTemplates);   
   context.executeQueryAsync(function () {   
    var enumerator = webTemplates.getEnumerator();   
    var templateId = "STS#0";   
    while (enumerator.moveNext()) {   
     var webTemplate = enumerator.get_current();   
     var webTitle = webTemplate.get_title();   
     if (webTitle == templateTitle) {   
      templateId = webTemplate.get_name();  
      break;   
     }   
    }   
    CreateSubsiteByTemplateId(title, description, webUrl, templateId);   
   },   
    function (sender, args) {   
     alert(args.get_message())   
    }   
   );   
  }  

Code Snippet 2:
 function CreateSubsiteByTemplateId(title, description, webUrl, templateId) {    
   var restAPIURL = "/_api/web/webinfos/add";    
   var newSiteData = JSON.stringify(    
   {    
   'parameters': {    
    '__metadata': {    
    'type': 'SP.WebInfoCreationInformation'    
    },    
    'Url': webUrl,    
    'Description': 'Subsite created from REST API',    
    'Title': title,    
    'Language': 1033,    
    'WebTemplate': templateId,    
    'UseUniquePermissions': true    
   }    
   });    
   $.ajax    
   ({    
   url: restAPIURL,    
   type: "POST",    
   async: false,    
   data: newSiteData,    
   headers: {    
    "accept": "application/json;odata=verbose",    
    "content-type": "application/json;odata=verbose",    
    "X-RequestDigest": $('#__REQUESTDIGEST').val()    
   },    
   success: function (data) {    
    console.log('site created');    
   },    
   error: function (data) {    
    console.log('Error creating site');    
   }    
   });    
  }    

If you have any questions you can reach out our SharePoint Consulting team here.