June 22, 2023

Step-by-Step Guide: Unlocking the Power of AI with Azure OpenAI for Custom Data Models

Introduction:

OpenAI has revolutionized the world, prompting many individuals to seek its integration into their own data models. However, concerns regarding data privacy, security, and governance have arisen when utilizing OpenAI models. These considerations hold paramount importance in ensuring the responsible use of AI technologies.

Thankfully, there is a solution: Azure OpenAI Cognitive Services. Microsoft has introduced Azure OpenAI, which enables the deployment of OpenAI models for customized applications while benefiting from the robust security and governance measures provided by Microsoft.

In this article, we will explore the utilization of Azure OpenAI Services to access the ChatGPT model (gpt-3.5-turbo) and leverage Azure Cognitive Search for efficient data indexing and retrieval. Through these technologies, we will demonstrate how to create ChatGPT-like experiences using custom data, all while upholding the necessary privacy, security, and governance protocols.


Prerequisites:

  1. Access to OpenAI Service on Azure
     - Please note that access to Azure OpenAI is currently limited. If your tenant doesn't have access, you can apply for it here.
  2. Your Azure Account must have the necessary permissions, such as Microsoft.Authorization/roleAssignments/write operation permissions (E.g., User Access Administrator or Owner). 
  3. Azure Developer CLI
  4. Python 3+
     - Make sure you can run python --version from the console.

  5. Node.js
  6. Git
  7. PowerShell 7+ (pwsh)
     - Verify that you can run "pwsh.exe" from a PowerShell command. If this fails, it's likely that you need to upgrade your PowerShell version.

Installation:

To install and set up the necessary components, follow these steps:
  1. Create a new folder and open it in the Command Prompt.
  2. Run the command "azd auth login". This will open a browser window for authentication. Enter your Azure credentials in the browser window.
     - 
    Note: Once the authentication is complete, you can close the browser window.
  3. You should see a message like "Logged in to Azure" in the terminal window, indicating a successful authentication:

  4. Run the command "azd init -t azure-search-openai-demo". This command will initialize a git repository.
  5. When prompted for a new environment name, you can either keep the default name or change it as needed. Press Enter to keep the default name.
  6. After this step, you will see a message like "SUCCESS: New project initialized!":


You have now completed the installation and initialization process.

Custom Data Files:

To incorporate your own custom data files (such as PDFs, Word Documents, etc.) into your data models, follow these steps:
  1. Navigate to the folder where the project is initialized. Inside this folder, you will find a directory called "data".

  2. Access the "data" folder and you will find sample data files already present. You can replace or copy your own files into this folder.

Ensure that your custom files are placed within this "data" folder for the project to access and utilize them effectively.

Azure Deployment:

Now that everything is set up locally, we can proceed with deploying the project on Azure. Follow the steps below:

  1. Open the terminal.
  2. Run the command "azd up".
  3. Select the appropriate subscription and press Enter:

  4. Choose the desired region for deployment. Note that the regions currently supporting the models used in this sample are East US or South Central US. For an up-to-date list of regions and models, you can refer to the documentation here.

  5. The deployment process will begin, which includes packaging up the services and deploying them to Azure. Please be patient as this process may take some time.
  6. Once the deployment is complete, you will see a message in the terminal similar to:

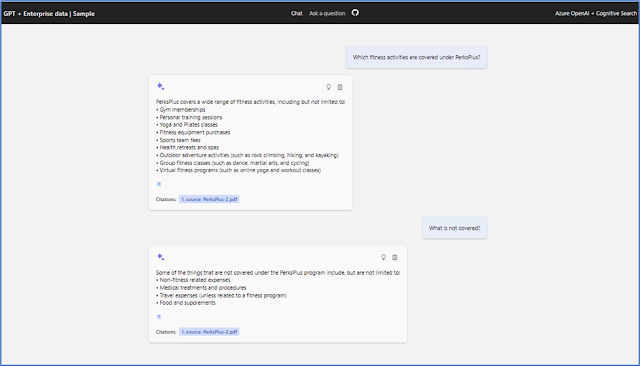
Additionally, you will be provided with an endpoint. Opening this endpoint in a browser will take you to the ChatGPT experience, where you can ask questions to the AI, and it will respond using the custom data files as the source of information and models.

Congratulations! Your application is now deployed on Azure and ready to be accessed via the provided endpoint.

Reference:

Conclusion:

Azure OpenAI Cognitive Services provides a secure and efficient solution for integrating OpenAI models into custom data models. With the power of Azure Cognitive Search and Microsoft's robust security measures, organizations can deploy ChatGPT-like experiences over custom data while ensuring data privacy and governance. By leveraging Azure OpenAI, businesses can unlock the potential of AI technologies and create innovative applications with confidence.

If you have any questions you can reach out our SharePoint Consulting team here.

Resolving Attachment Issues in Power Automate Approval Action - 'Start and Wait for an Approval': Step-by-Step Guide


Introduction: 

Recently, while working on a Power Automate Flow, we encountered a specific requirement involving the need to send attachments in an Approval action. To address this, we utilized the “Start and Wait for an approval” action. Within this action, we clicked on “Show advanced options” to configure the attachments field from the dynamic contents array variable that we had created for appending the attachment contents.


Here we passed the ApprovalAttachments array consisting of JSON objects with two properties “Name” and ContentBytes. 

 {   
  "Name": @{items('Apply_to_each_2')?['DisplayName']},   
  "ContentBytes": @{body('Get_attachment_content')}   
 }   


The flow was executed without any errors, and I received the expected emailHowever, the attached files were missing from the email.  


It became evident that the attachments were not being successfully included in the email.  Therefore, in this blog, we will thoroughly examine the procedure for sending multiple attachments using the “Start and Wait for an Approval action within Power Automate. Our focus will be on resolving the specific issue that arises when attempting to send attachments using this particular action. Let’s dive into the step-by-step process and find a solution to this problem! 


Solution: 

Step 1: Initialize the array variable. 


Step 2: "Get attachments" action in Power Automate returns all attachments for given item in the array.


Step 3: To read all the attachment contents, click on the next step and then select the "Get attachment content". 


Step 4: Proceed to the next step and select theAppend to array variableaction inside the apply to each loop. 

- Now select the variable ApprovalAttachment that you have previously created

- Configure the value using the following JSON structure: 

  • Name: Set the display name from the dynamic content. 

  • Content: Set the attachment content of the Get attachment contents from the dynamic content. 


   {   
               "Name": @{items('Apply_to_each_2')?['DisplayName']},   
               "Content": @{body('Get_attachment_content')}   
   }   

It is important to note that you should use the “Content” instead of “Content Bytes” to avoid any issue in sending attachments. Now you will get an email with attachments too. 


Step 5: In this final action, go to the advanced options and set the dynamic content from the approval attachments array. 


Conclusion: 

So, this is how we can easily send attachments without encountering any issues using the approval action. 


If you have any questions you can reach out our SharePoint Consulting team here.