December 30, 2021

Web Scrapping in C# using Scraper API and HTMLAgilityPack

Overview:

In this Article, we will explore C# and how to create real life web scrapper using Scraper API and HtmlAgilityPack.

Requirement:

Recently, we have implemented a Scraper API to get data from different pages and dump into either CSV file OR Database for wholesale sourcing and ordering processing of the hospitality company based out Richmond, VA, USA.

Introduction:

What is Scraper API?

Scraper API is used to extract data. Its special purpose is to download large amounts of raw data easily and quickly. It is easy to use. We can scrape by sending the URL you would like to scrape to the API along with your API key and the API will return the HTML responses from the URL you want to scrape.

Get API Key from Scraper API?

We need to pass the API key with each Scraper API request to authenticate requests. For that, you need to sign up for an account here. After signing up on Scraper API, you will get 5000 free requests for a trial.

WEB SCRAPING USING C#

We are going to perform scraping with HTML parsing. We are going to extract data from https://coinmarketcap.com.
This website holds the information of cryptocurrencies, like name, current price, the percentage change in the last 24hrs, 7 days, market capital, etc.

Step-1: Create Project

First, create a project, here we are choosing Console App (.NET Core). You can choose the project template based on your requirement. Right now, our focus is web scraping so, skipped project creation steps.

Step-2: Install NuGet Packages

We require to install the following NuGet packages:
  1. ScraperAPI: This is the official C# SDK for the Scraper Api.
  2. HtmlAgilityPack: It is a .NET code library that allows you to parse "out of the web" HTML files.
Open Package Manager Console and run the below command one by one,
Install-Package ScraperApi
Install-Package HtmlAgilityPack

Step-3: GetDataFromWebPage() method

In this example, we are going to use the HttpClient and ScraperApiClient.
 1
 2
 3
 4
 5
 6
 7
 8
 9
10
11
static async Task GetDataFromWebPage() {
  string apiKey = "cb4b88b493a5d003efadb120698c1f14";
  HttpClient scraperApiHttpClient = ScraperApiClient.GetProxyHttpClient(apiKey);
  scraperApiHttpClient.BaseAddress = new Uri("https://coinmarketcap.com");

  var response = await scraperApiHttpClient.GetAsync("/");
  if (response.StatusCode == HttpStatusCode.OK) {
    var htmlData = await response.Content.ReadAsStringAsync();
    ParseHtml(htmlData);
  }
}

Replace your Scraper API key with “apiKey” variable.

GetProxyHttpClient() is used to create a HTTP client with the scraperapi.com.

GetAsync() will fetch the data from the website and store in local variable. proxy.

Step-4: ParseHtml() method

Once get html data from Webpage, parsing it using the HTMLdocument method. It comes from HtmlAgilityPack.

Next step, load html data and get the ‘tbody’ html tag from it. The tbody tag contains the rows of Cryptocurrency data.

To get more data, use selectSignleNode method. It will return the first HtmlNode that matches the XPath query, it will return a null reference if the matching node is not found. SelectNodes is a collection of Html Nodes.
 1
 2
 3
 4
 5
 6
 7
 8
 9
10
11
12
13
14
15
16
17
18
19
static void ParseHtml(string htmlData) {
  var coinData = new Dictionary < string,
    string > ();
  HtmlDocument htmlDoc = new HtmlDocument();
  htmlDoc.LoadHtml(htmlData);

  var theHTML = htmlDoc.DocumentNode.SelectSingleNode("html//body");
  var cmcTableBody = theHTML.SelectSingleNode("//tbody");
  var cmcTableRows = cmcTableBody.SelectNodes("tr");
  if (cmcTableRows != null) {
    foreach(HtmlNode row in cmcTableRows) {
      var cmcTableColumns = row.SelectNodes("td");
      string name = cmcTableColumns[2].InnerText;
      string price = cmcTableColumns[3].InnerText;
      coinData.Add(name, price);
    }
  }
  WriteDataToCSV(coinData);
}

Step-5: WriteDataToCSV() method

In this example, we have taken the currency name and its price from the scraped data, and store in CSV file.
1
2
3
4
5
6
7
8
9
static void WriteDataToCSV(Dictionary < string, string > cryptoCurrencyData) {
  var csvBuilder = new StringBuilder();

  csvBuilder.AppendLine("Name,Price");
  foreach(var item in cryptoCurrencyData) {
    csvBuilder.AppendLine(string.Format("{0},\"{1}\"", item.Key, item.Value));
  }
  File.WriteAllText("C:\\Kishan\\Webscraping.csv", csvBuilder.ToString());
}

Step-6: Main() method

Replace content of Main method with below code:
1
2
3
static async Task Main(string[] args) {
  await GetDataFromWebPage();
}

Output

We can see CSV file as output that contains two columns, 1) Currency Name and 2) Price. We can get required column and data based on our need.
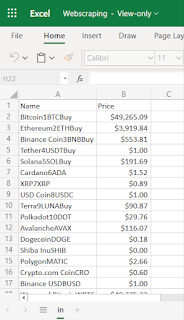
Webscraping-csv


Conclusion

In this blog, with the help of ScraperAPI and HtmlAgility Nuget Packages, we can scrap the data from site, filter the require data and dump into CSV file.

If you have any questions you can reach out our SharePoint Consulting team here.

December 16, 2021

[Issue Resolved]: "You must specify a value for this required field" error while updating a Multi Valued Managed Metadata column value in Power Automate


Introduction

Recently, we implemented an OOTB Document Approval process using Power Automate for a Postal and Parcel company based out of Melbourne, Victoria, Australia. The approval process was built using the "Start and wait for an Approval" action of Power Automate and based on the approver's response the Power Automate was updating the status and other metadata fields of the Document in the SharePoint Library.  So, here we encountered an issue while updating a multi-valued managed metadata column to the SharePoint Library and we resolved it by providing a valid expression value which we will explain in further process.


In this blog, we will learn about the "You must specify a value for a required field" issue and its solution that will help us to store its value in the document library.  

Issue

      • In Power Automate, we used an update item SharePoint action for a multi-valued managed metadata column. 
      • When we use the value of the trigger field it was not binding the value accordingly and the Update item action returns the error You must specify a value for this required field” message with 400 status code as shown below. 

      • We tried with the trigger values of the Category managed property but it was giving as invalid as shown below. 


      • We tried with other metadata properties also like the Category value but it was creating an Apply to each loop because it is a multi-value field and this loop updates the item multiple times with different category field values which was not the correct behavior. 

      Solution

        • When we use update item action, we have to provide all the required field values. 
        • If we do not provide a proper value, then update item action would return this type of error. 
        • As this column was a multi-valued managed metadata column, we have to create an array variable and store all the values in the array with a specific format for storing the value in a correct format to the library. 
        • First, we will create an array variable as shown below. 

        • Now we will store all the managed metadata values in the array inside the Append to array variable action. For that we will pass the expression value in format {item('Apply_to_each_3')?['Value']} as shown below. 


        • We will use the array in the Update item action as shown below.


        Hence, a multi-valued managed metadata column Category values will be stored in the library with the proper format.

        Conclusion

        This is how we can resolve the error with managed metadata multi-valued field in Power Automate. Hope this helps, good day! 

        If you have any questions you can reach out our SharePoint Consulting team here.

        December 9, 2021

        [Issue Resolved]: The term 'yo' is not recognized as the name of a cmdlet, function, script file or operable program

        Introduction:

        In this blog, we will see how can we resolve the error The term 'yo' is not recognized as the name of a cmdlet, function, script file, or operable program. Generally, this error occurs while we have set up a new environment for SPFx development.

        Reason:

        The reason for this error was the wrong path was selected in the user path environment variable.

        Solution:

        Follow the below steps to resolve this error:

        Step 1) Open the start menu and search for the 'environment'. Now select the Edit the system environment variables.

        Step 2) Now go to the Advanced tab and click on Environment Variables.

        Step 3) On clicking Environment Variables, it will open another popup. Now select the PATH variable and click on the Edit button.

        Step 4) On clicking the Edit button, it will open another popup.

        Step 5) Now in Variable value, add the below path and click on the OK button:

        • C:\Users\{username}\AppData\Roaming\npm
          • Note: Replace {username} with your username.

        Step 6) Now click on the OK button in Environment Variable and System properties popups.

        Step 7) Restart the command prompt, and the issue will be resolved.

        Conclusion:

        This is how we can resolve the issue “The term 'yo' is not recognized”. Hope this helps!

        If you have any questions you can reach out our SharePoint Consulting team here.

        December 2, 2021

        [Issue Resolved]: "Specified argument was out of the range of valid values" while executing Add-PnPSiteScript and Add-PnPSiteDesign PowerShell commands

        Introduction

        Recently, we implemented a SharePoint site design using a PowerShell script for a Postal and Parcel company based out of Melbourne, Victoria, Australia. We encountered an issue while applying the site script and site design during the execution of  Add-PnPSiteScript and Add-PnPSiteDesign commands.


        In this blog, we will learn about the issue and its solution that we can implement while creating a new site design template using the PowerShell script. 

        Issue

          • We normally use the Add-PnPSiteScript and Add-PnPSiteDesign commands to add a new Site Script and Site Design on a SharePoint tenant. 
          • When we execute these commands frequently on the same tenant, a new Site Script is being created every time. 
          • And after some time, we encounter these below issues during the execution of the PowerShell script. 

          Image 1


          • It says “Specified argument was out of the range of valid values”. 

          Solution

            This issue is occurring because there is a tenant level limitation in SharePoint that we can create max of 100 Site Scripts and 100 Site Designs templates.

            • To resolve these issues, first of all, we need to remove some of the unused Site Scripts and Site Designs so that we can add our new Site Scripts and Site Designs. 
            • To remove a Site Script and Site Design, we will be using the below commands. 

             Remove-PnPSiteScript -Identity $scriptID -Force  
             Remove-PnPSiteDesign -Identity $designID -Force  
            
            • Here the $scriptID & the $designID is the ID of the existing Site Script and Site Design that is been available at the SharePoint tenant level.
            • The –Force in the Remove command is used to confirm the execution of this command without asking for confirmation to remove for its execution.
            • We cannot view these IDs directly from the SharePoint tenant, so we will be using the below commands to retrieve the details of these IDs.

             Get-PnPSiteScript  
             Get-PnPSiteDesign   
            

            • The Get-PnPSiteScript & the Get-PnPSiteDesign commands will retrieve the available Site Scripts and Site Design details and we will extract these details, identify unused Site Script/Site Design and will be using them for removing the existing unused Site Design and Site Scripts.
            • And then, it should allow creating your new Site Design and Site Script by executing the Add-PnPSiteScript and Add-PnPSiteDesign commands.

            Conclusion

            This is how we can resolve the "Specified argument was out of the range of valid values" error in the PowerShell script. Hope this helps, good day! 

            If you have any questions you can reach out our SharePoint Consulting team here.