Showing posts with label Power Apps Consulting. Show all posts

October 6, 2022

Convert Power Apps Controls to PDF without HTML (Using PDF Function)

Introduction:

We have often come across requirements to convert a control or a screen from Power Apps to PDF. Earlier, we used to generate an HTML and populate the data from Power Apps which goes to Power Automate and create a PDF file.

With this new feature of PDF Function in Power Apps, this has become much simpler.

Please follow the below steps for getting the PDF function in PowerApps:


Step 1: Go to File -> Settings

Step 2: Go to Upcoming Feature and search for PDF and enable the PDF Function toggle.


Once we have enabled the function, you will be able to use this function in your App.

Please see the below example for generating PDF from Power Apps:

Step 1: Create a Power Automate Flow with trigger Power Apps (V2) and Add an input as File.

Step 2: Add action to Create file in OneDrive for Business and add the output of the trigger to File Content

Hence, the overall flow will look like this:


Step 3: Go to Power Apps and add this flow on an Action Button.

Step 4: Write the below code on “OnSelect” property of the button.

GeneratePDF.Run(
    {
        file: {
            name: "test.pdf",
            contentBytes: PDF(Screen1)
        }
    }
)

Step 5: Click on the button and it should trigger the Flow.

We should have PDF File generated in the OneDrive when Flow is executed successfully.

NOTE: If you are targeting to convert a gallery control to PDF, then the time it takes to convert varies upon the number of rows in the gallery.


Conclusion:

We can now generate PDF for a specific control as well as for the whole screen without generating any HTML code and CSS issues. Hope this helps!

If you have any questions you can reach out our SharePoint Consulting team here.

September 29, 2022

Get Members from the Security Group in Power Apps

We often come across a requirement wherein we need to fetch the information from the Security Group and need to display within Power Apps for Business Logic implementation.

Example:
Below is one of the Security Group created in Microsoft 365. Here, there are two members added to that Security Group.

In Power Apps, we need information about those two users.

Step 1: Open Power Apps Canvas App. First, we need to add Office 365 Groups Connector. For that, 
  1. Go to View Menu, and select Data sources.

  2. Search for “Office 365 Groups”. Select the highlighted one and add a connector to the App.

  3. Once the Connector is added, this will look like this.

Step 2:
  1. Open Power Apps screen and add a button.
  2. Write the following line of code for “On Select” event of the button.
     ClearCollect(MembersfromSG,Office365Groups.ListGroupMembers("GroupID").value)  
  3. Here, MembersfromSG is the Name of the collection. Office365Groups.ListGroupMembers(“Group ID”) returns the information about all the members of that security group.

How can we find that Group ID for the Security Group?
  1. Open Azure Portal and search for Groups. This will open the following screen.
  2. Select your security group for more information.
  3. Copy Object Id. This is the Group ID. We can use this Group ID in the below formula. The formula will look like this.
 ClearCollect(MembersfromSG,Office365Groups.ListGroupMembers("xxxxxxxx-1xxb-4x4b-xxxxxx").value)  

Step 3: Now, add Gallery Control and add Collection as a data source. This will show users in the Gallery.

Step 4: Now, let’s run the solution. This will show, User’s Display Name and User Principal Name.
You can check more properties of members returned by this collection from the executed collection.

Conclusion:
This is how we can get the Member Information using Office 365 Groups Connector in Power Apps.

If you have any questions you can reach out our SharePoint Consulting team here.

September 15, 2022

Filter Records based on Date and Time Condition in Power Apps

Overview:

Consider a scenario, where you are moving your Power Apps to the production environment and we only want to show records after our Production Launch!

Let’s say, Production Live happened at 01:00 PM then we need to show records created after 01:00 PM on that day. So, how can we achieve this? 

Solution:

We need to use the following Power Fx formula to achieve this!
  • DateValue
  • Time function with Hour, Minute, and Second

Consider the following example:
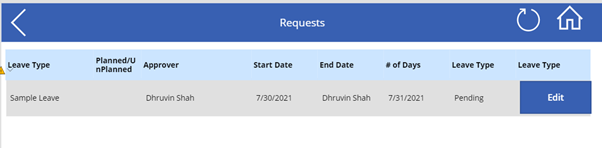
Below is the screenshot for List Items. We need to show records that are created only after “07/26/2021 01:00:00 PM”.
 

Go to your Power Apps and Add the following line of code to your Items Property of the Gallery.
 Filter(  
   Leaves,  
   (DateValue(  
     Text(  
       Created,  
       "[$-en-US]mm/dd/yyyy"  
     )  
   ) + Time(  
     Hour(Created),  
     Minute(Created),  
     Second(Created)  
   )) > (DateValue("07/26/2021") + Time(  
     Value(13),  
     0,  
     0  
   ))  
 )  

Here, we are comparing if the "Created" value from SharePoint List is greater than “07/26/2021 01:00:00 PM”.

As a result, we are getting the following outcome!
 

Conclusion:

Hope, this trick is helpful to you! Happy Power Apping!!

If you have any questions you can reach out our SharePoint Consulting team here.

September 16, 2021

Power Apps Validation Tip - End Date and time should be greater than Start Date and time

Overview:

We implemented several Power Apps forms for a consulting firm based out of Alpharetta, Georgia, United States. We came across a scenario to validate Start Date & End Date in one of the forms. In this article, we will talk about how we can apply DateTime validation in our Power Apps Form. Most of the time, we need to implement, one most common validation in Power Apps where End DateTime must be greater than Start DateTime. How can we apply that validation? Let’s see!

We have the following form in our Power Apps. We want to validate, check-out time should be greater than check-in time! So, how can we achieve this?


Step 1:

Please check the Datacard for Check-In and Check-Out time.

Step 2:

Add the following line of code on below highlighted controls! Need to add the same code on all following controls!

 If(  
   Or(  
     IsBlank(  
       DateValue2.SelectedDate + Time(  
         Value(HourValue2.Selected.Value),  
         Value(MinuteValue2.Selected.Value),  
         0  
       )  
     ),  
     IsBlank(  
       DateValue1.SelectedDate + Time(  
         Value(HourValue1.Selected.Value),  
         Value(MinuteValue1.Selected.Value),  
         0  
       )  
     )  
   ),  
   Set(  
     IsEndDateValid,  
     true  
   ),  
   DateDiff(  
     DateValue1.SelectedDate + Time(  
       Value(HourValue1.Selected.Value),  
       Value(MinuteValue1.Selected.Value),  
       0  
     ),  
     DateValue2.SelectedDate + Time(  
       Value(HourValue2.Selected.Value),  
       Value(MinuteValue2.Selected.Value),  
       0  
     ),  
     Minutes  
   ) > 0,  
   Set(  
     IsEndDateValid,  
     true  
   ),  
   Set(  
     IsEndDateValid,  
     false  
   )  
 )  

Step 3:

Set Validation message
 If(!IsEndDateValid, "Ënd Date Time should be greater than Start Date Time")  

Step 4:

Set Visible property for an Error message.

Step 5:

Prevent form for submitting an invalid entry by setting up the below condition for “OnSave”. If you are using a standalone Canvas app, then you need to write the same code on your button click!

Step 6:

Change "OnNew" Property of form. If you are using a standalone Canvas app, then you need to write the same code on the New button of the form!
 NewForm(SharePointForm1);Set(IsEndDateValid,true)  

Step 7:

Save and Publish form!

Conclusion:

This is how we can simply apply end DateTime validation for Power Apps! Happy Power Apping!

If you have any questions you can reach out our SharePoint Consulting team here.

January 12, 2021

Allow users to upload only specific extension files in Power Apps Attachment control

Introduction:

In this blog, we will learn how to allow users to upload only specific extension files in Power Apps Form Attachment control. The example here we have carried in this blog is to allow users to upload only the ".pdf" extension files.

Resolution:

Below are the steps we are going to work on here!

1.     Set restriction on uploading other extension files in Attachment control and notify the user when they upload any extension file other than ".pdf".

2.     Restrict the user from saving until resolving file errors.

Step 1: Set restriction on uploading other extension files in Attachment control

Place the below code at OnAddFile property of the Attachment control:

 If(  
   CountRows(  
     Filter(  
       RenameColumns(  
         DataCardValue4.Attachments,  
         "Name",  
         "NewName"  
       ),  
       Last(  
         Split(  
           NewName,  
           "."  
         )  
       ).Result <> "pdf"  
     )  
   ) > 0,  
   Notify(  
     "Only PDF files can be attached",  
     NotificationType.Error  
   );  
   ,  
   SubmitForm(Form1);  
   ResetForm(Form1);  
   EditForm(Form1);  
   )  

After placing this, check by adding a different extension file in the attachment control. You will be able to see this type of error at the top of the app.


Now as we have set the restriction message, let’s restrict the user from saving the form until all the attachments in the control are ".pdf".

Step2: Restrict user from saving until resolving file errors

Place the below code in the OnSelect property of the save button or in the OnSave property of SharePointIntegration:

  If(  
   CountRows(  
     Filter(  
       RenameColumns(  
         DataCardValue4.Attachments,  
         "Name",  
         "NewName"  
       ),  
       Last(  
         Split(  
           NewName,  
           "."  
         )  
       ).Result <> "pdf"  
     )  
   ) > 0,  
   Notify(  
     "Only PDF files can be attached",  
     NotificationType.Error  
   );  
   ,  
   SubmitForm(Form1);  
   ResetForm(Form1);  
   EditForm(Form1);  
   )  

Now add a different file extension in the control and click on save. It will show the below error and won’t let the user save the item.

Conclusion

This is how we can restrict users to upload only ".pdf" extension files in the Power Apps - Form Attachment Control.

If you have any questions you can reach out our SharePoint Consulting team here.

April 8, 2020

Get multiple List Items and send merged response to Power Apps through MS Flow

Introduction:
In this article, we will walkthrough on how to get items from multiple SharePoint Lists having the same list structure schema, combine the list items and send merged list items response to the Power Apps.

Real-Life Use-case and Scenario:
We have come across a scenario wherein we have one master list having the name of all child lists from where we need to fetch the data. Let’s say for an example –

We have a master list named “ABC MasterList”. The column called “ListNames” from the list has the information of the all child lists. Please see the below screen.

Now, we need to loop through on column – “ListNames” and find out the items from those lists. Let’s say in “ListNames” column if there are 2 lists name, then this will loop through those two lists, get all items from those lists and send the response back to the Power Apps. So, now let’s get started!!

Step 1: Create Flow with trigger action of Power Apps.  In the end, the flow will look like the below screen.

We need to initialize one variable in which we collect all the list items and send this variable to Power Apps response. We need to create one string variable “Items” as shown in the below image.

Step 2: Add an action called – “Get items from SharePoint list” to get all list names from the master list.

Step 3: Make an Http request to fetch the items from each list fetched from Step 2. Below is the overall looping step.

Now, let’s see each component.

Step 3.1: Click on the “Add an action” button.


Search “select”  in the search box and select the “Select” from Actions as shown in the below image.


Select the column which you want to send to the response.


Step 3.2: Click on the “Add an action” as shown in step 3.1. Select the “Join” from Actions as shown in the below image.

Join the output of “Select” with “\n” for separation.

Step 3.3: Append the “Output” to the string “Items”.

Step 4: Now, let’s send the response back to the Power Apps. Add Response Variable with the value assigned to it. And then send the above string variable to Power Apps response.

Now, let’s run and test the flow. Below is the test result.

Also, this is the value for the final variable which is returning to the Power Apps.

Conclusion:
This is how we can fetch the data from the multiple lists having the same schema and send the final response back to the Power Apps.

If you have any questions you can reach out to our SharePoint Consulting team here.